
Are you tired of dreaming about a garden overflowing with fresh, delicious vegetables? Do you crave the satisfaction of harvesting your own food, knowing exactly where it came from and how it was grown? Many gardeners struggle with getting a truly bountiful harvest, especially when it comes to climbing plants like runner beans. They face challenges like choosing the right variety, providing adequate support, or dealing with pests and diseases. But what if I told you that growing runner beans successfully is easier than you think? In this guide, I’ll share my years of experience and proven techniques to help you cultivate thriving runner bean plants and enjoy bumper harvests. You’ll discover the secrets to maximizing your yield, from seed to table, so you can savor the delicious taste of homegrown runner beans all season long.
1. Choosing the Right Runner Bean Variety

Selecting the right runner bean variety is the crucial first step in your journey to a bountiful harvest. Think of it like choosing the right tool for a job – the right variety will be better suited to your specific needs and growing conditions. I’ve learned through experience that not all runner beans are created equal. Some boast vibrant flowers, while others are prized for their exceptionally long pods. Consider your local climate, the amount of space you have available, and, of course, your personal taste when making your selection.
Here are a few popular runner bean varieties to get you started:
- Scarlet Emperor: This classic variety is known for its stunning scarlet red flowers, making it a beautiful addition to any garden. It’s a reliable producer of long, flavorful pods.
- White Emergo: If you prefer white beans, ‘White Emergo’ is an excellent choice. It produces heavy yields of tender, white beans that are delicious in soups and stews.
- Enorma: As the name suggests, ‘Enorma’ is all about size. This variety produces exceptionally long pods, often reaching over a foot in length! It’s a great choice for gardeners who want to make a statement.
- Painted Lady: This variety is a feast for the eyes, boasting bi-colored flowers in shades of red and white. It’s a vigorous climber and a prolific producer.
- Streamline: A modern variety bred for its stringless pods, making it easier to prepare and enjoy. It’s also a reliable cropper, even in cooler climates.
When choosing your runner bean variety, I recommend checking with local nurseries or seed suppliers for recommendations specific to your region. They can provide valuable insights into which varieties perform best in your area. Don’t hesitate to ask questions and do your research. A little time spent choosing the right variety will pay off handsomely come harvest time.
Understanding the Impact of Climate:
Climate plays a significant role in determining which runner bean varieties will thrive in your garden. Some varieties are better suited to warm climates, while others can tolerate cooler temperatures. If you live in a region with a short growing season, you may want to choose an early-maturing variety. Conversely, if you have a long growing season, you can experiment with later-maturing varieties that produce larger yields.
Considering Space and Garden Style:
The amount of space available in your garden will also influence your choice of variety. Some runner beans are more vigorous climbers than others, requiring more space to grow. If you have limited space, consider choosing a compact variety or training them to grow vertically on a trellis or fence. Also, think about the overall aesthetic of your garden. Do you prefer the vibrant flowers of ‘Scarlet Emperor’ or the classic look of ‘White Emergo’? Choosing a variety that complements your garden’s style can enhance the overall beauty and enjoyment of your space.
Beyond the Basics:
In addition to the factors mentioned above, you might also consider the following when selecting your runner bean variety:
- Disease resistance: Some varieties are more resistant to common diseases like bean rust and bean mosaic virus. Choosing a disease-resistant variety can save you time and effort in managing potential problems.
- Pod size and shape: Do you prefer long, slender pods or shorter, sturdier ones? Different varieties exhibit variations in pod size and shape, so choose one that suits your preferences.
- Flavor: While most runner beans have a similar flavor profile, there can be subtle differences between varieties. Some may have a slightly sweeter flavor, while others may be more earthy.
By carefully considering these factors, you can choose the perfect runner bean variety for your garden and ensure a successful growing season. Remember, the key is to select a variety that is well-suited to your specific needs and growing conditions.
2. Preparing the Soil and Planting

Now that you’ve chosen your runner bean variety, it’s time to get your hands dirty! Preparing the soil properly is essential for healthy growth. Runner beans, like most vegetables, thrive in well-drained soil that’s rich in organic matter. Before planting, I always amend my soil with plenty of compost or well-rotted manure. This provides the necessary nutrients for strong root development and vigorous growth.
Here’s a step-by-step guide to planting your runner beans:
- Choose your planting location: Select a spot that receives at least 6-8 hours of sunlight per day. Runner beans are sun-lovers!
- Prepare the soil: Loosen the soil and remove any weeds or debris. Amend the soil with compost or manure as described above.
- Sow the seeds: Plant the seeds about an inch deep and a few inches apart. You can either sow them directly into the ground after the last frost or start them indoors a few weeks earlier for a head start. Starting them indoors gives the beans an advantage and can extend your harvest season.
- Water thoroughly: After planting, water the seeds thoroughly to ensure they are well hydrated.
- Provide support: Runner beans are climbers, so they’ll need some sort of support to grow on. I’ll discuss trellising in more detail in the next section.
Timing is Key:
The timing of your planting will depend on your local climate. In most regions, it’s best to plant runner beans after the last spring frost. If you’re starting seeds indoors, sow them about 3-4 weeks before the last frost. This will give them a head start and allow you to transplant them outdoors once the weather warms up. I’ve found that waiting until the soil has warmed up a bit is crucial. Cold soil can hinder germination and early growth.
Soil Amendments for Success:
- Compost: Compost is a fantastic soil amendment that improves soil structure, drainage, and fertility. It’s like giving your runner beans a nutritious meal!
- Aged Manure: Aged manure is another excellent source of nutrients. Make sure it’s well-rotted to avoid burning the plants.
- Bone Meal: Bone meal is a good source of phosphorus, which is essential for root development.
- Blood Meal: Blood meal is high in nitrogen, which promotes leafy growth. Use it sparingly, as too much nitrogen can lead to excessive foliage and fewer beans.
By taking the time to prepare your soil properly and planting at the right time, you’ll set your runner beans up for success from the very beginning. A little effort at this stage will make a big difference in your harvest.
3. Providing Support and Trellising

Runner beans are vigorous climbers, and providing adequate support is crucial for their growth and productivity. Without proper support, the plants will sprawl along the ground, making them susceptible to damage, pests, and diseases. They may also produce fewer beans and become tangled and difficult to harvest.
Why Trellising is Essential:
- Maximizes Space: Trellising allows you to grow runner beans vertically, maximizing space in your garden, especially if you have limited space. You can grow them up fences, walls, or even along the sides of your house.
- Enhances Air Circulation: Good air circulation is essential for preventing fungal diseases like bean rust. Trellising helps to keep the foliage off the ground, improving air flow and reducing the risk of disease.
- Reduces Pest and Disease Problems: Keeping the plants off the ground also helps to reduce contact with soil-borne pests and diseases, such as slugs and snails.
- Easier Access for Harvesting: Trellising makes it much easier to reach and harvest the beans. You can simply walk along the trellis and pick the pods as they mature.
Types of Trellis Structures:
There are many different types of trellises you can use for runner beans. Here are a few popular options:
- Wooden Trellis: A classic choice, wooden trellises can be made from a variety of materials, such as bamboo, cedar, or even recycled pallets. They can be freestanding or attached to a fence or wall.
- Wire Trellis: Wire trellises are lightweight and easy to install. They can be made from wire mesh, chicken wire, or even strong twine.
- Bamboo Poles: Bamboo poles are a simple and inexpensive way to support runner beans. You can create a teepee-like structure by leaning several poles together.
- Fences: Existing fences can provide excellent support for runner beans. You can simply train the plants to climb the fence.
Tips for Effective Trellising:
- Start Early: Provide support for your runner beans as soon as they start to grow. This will encourage them to climb the trellis and prevent them from sprawling on the ground.
- Secure the Trellis: Make sure your trellis is securely anchored to the ground to prevent it from toppling over in strong winds.
- Train the Plants: Gently guide the young plants to climb the trellis by wrapping their tendrils around the support.
- Regularly Check and Adjust: As the plants grow, continue to check the trellis and adjust as needed to ensure the plants have adequate support.
By providing the right support for your runner beans, you can maximize their growth, increase your yield, and make your garden more beautiful and productive. Remember, a well-supported runner bean plant is a happy and productive runner bean plant!
4. Watering and Fertilizing

Water is essential for the growth and development of runner beans. Consistent moisture is crucial, especially during periods of hot, dry weather. However, overwatering can lead to root rot and other fungal diseases. The key is to strike a balance and provide the plants with the right amount of water.
Watering Techniques:
- Deep Watering: Water deeply and thoroughly, ensuring that the soil is moist but not waterlogged. Deep watering encourages the roots to grow deeper, making the plants more drought-resistant.
- Avoid Overhead Watering: Overhead watering can spread fungal diseases like bean rust. It’s best to water at the base of the plants, avoiding the foliage.
- Mulching: Mulching around the base of the plants can help to conserve moisture and suppress weeds. Use a layer of organic mulch, such as straw or wood chips, to keep the soil cool and moist.
Frequency of Watering:
The frequency of watering will depend on several factors, including weather conditions, soil type, and plant stage. As a general rule, water your runner beans deeply once or twice a week during dry periods. Check the soil moisture regularly by digging your finger into the soil. If the top inch of soil feels dry, it’s time to water.
Fertilizing Your Runner Beans:
In addition to water, runner beans also require nutrients to grow and produce a bountiful harvest. You can fertilize your plants with a balanced fertilizer, such as a 10-10-10 formulation. Apply the fertilizer according to the package directions, usually once or twice during the growing season.
Organic Fertilizing Options:
- Compost Tea: Compost tea is a liquid fertilizer made from compost. It’s rich in beneficial microorganisms that can improve soil health and enhance plant growth.
- Fish Emulsion: Fish emulsion is a liquid fertilizer derived from fish parts. It’s a good source of nitrogen and other essential nutrients.
- Seaweed Extract: Seaweed extract is a natural fertilizer that contains a variety of vitamins and minerals. It can help to improve plant vigor and disease resistance.
By providing your runner beans with the right amount of water and nutrients, you can ensure healthy growth and a bountiful harvest. Remember, consistency is key. Regular watering and fertilization will help your plants thrive and produce an abundance of delicious beans.
5. Pest and Disease Control

While runner beans are generally robust plants, they can be susceptible to certain pests and diseases. Keeping a watchful eye on your plants and taking proactive measures can help you prevent and manage these problems effectively.
Common Pests:
- Aphids: These tiny, sap-sucking insects can infest the undersides of leaves, causing them to curl and distort. They can also transmit plant viruses.
- Slugs and Snails: These slimy creatures can devour young seedlings and leaves. They are particularly active during damp weather.
- Bean Beetles: These beetles can chew on leaves and flowers, reducing plant vigor and yield.
Disease Control:
- Bean Rust: This fungal disease causes brown or reddish-brown pustules on leaves and stems. It thrives in humid conditions.
- Bean Mosaic Virus: This viral disease causes mottling and distortion of leaves. It is transmitted by aphids.
Pest and Disease Management Strategies:
- Regular Inspection: Regularly inspect your plants for signs of pests and diseases. Early detection is key to effective control.
- Handpicking: For small infestations of aphids or slugs, handpicking can be an effective control method.
- Companion Planting: Planting companion plants, such as marigolds, garlic, and nasturtiums, can help to deter pests and attract beneficial insects.
- Organic Pest Control: Neem oil, insecticidal soap, and diatomaceous earth are effective organic pest control options.
- Disease Prevention: Avoid overhead watering, which can spread fungal diseases. Ensure good air circulation around the plants by providing adequate spacing and support.
Preventing Fungal Diseases:
- Proper Watering: Water at the base of the plants, avoiding overhead watering, which can spread fungal spores.
- Good Air Circulation: Ensure adequate spacing between plants to allow for good air circulation. This helps to prevent the buildup of moisture, which can promote fungal growth.
- Cleanliness: Remove any infected plant debris promptly and dispose of it properly.
By implementing these preventive measures and monitoring your plants regularly, you can minimize the impact of pests and diseases on your runner bean harvest. Remember, a healthy plant is a productive plant!
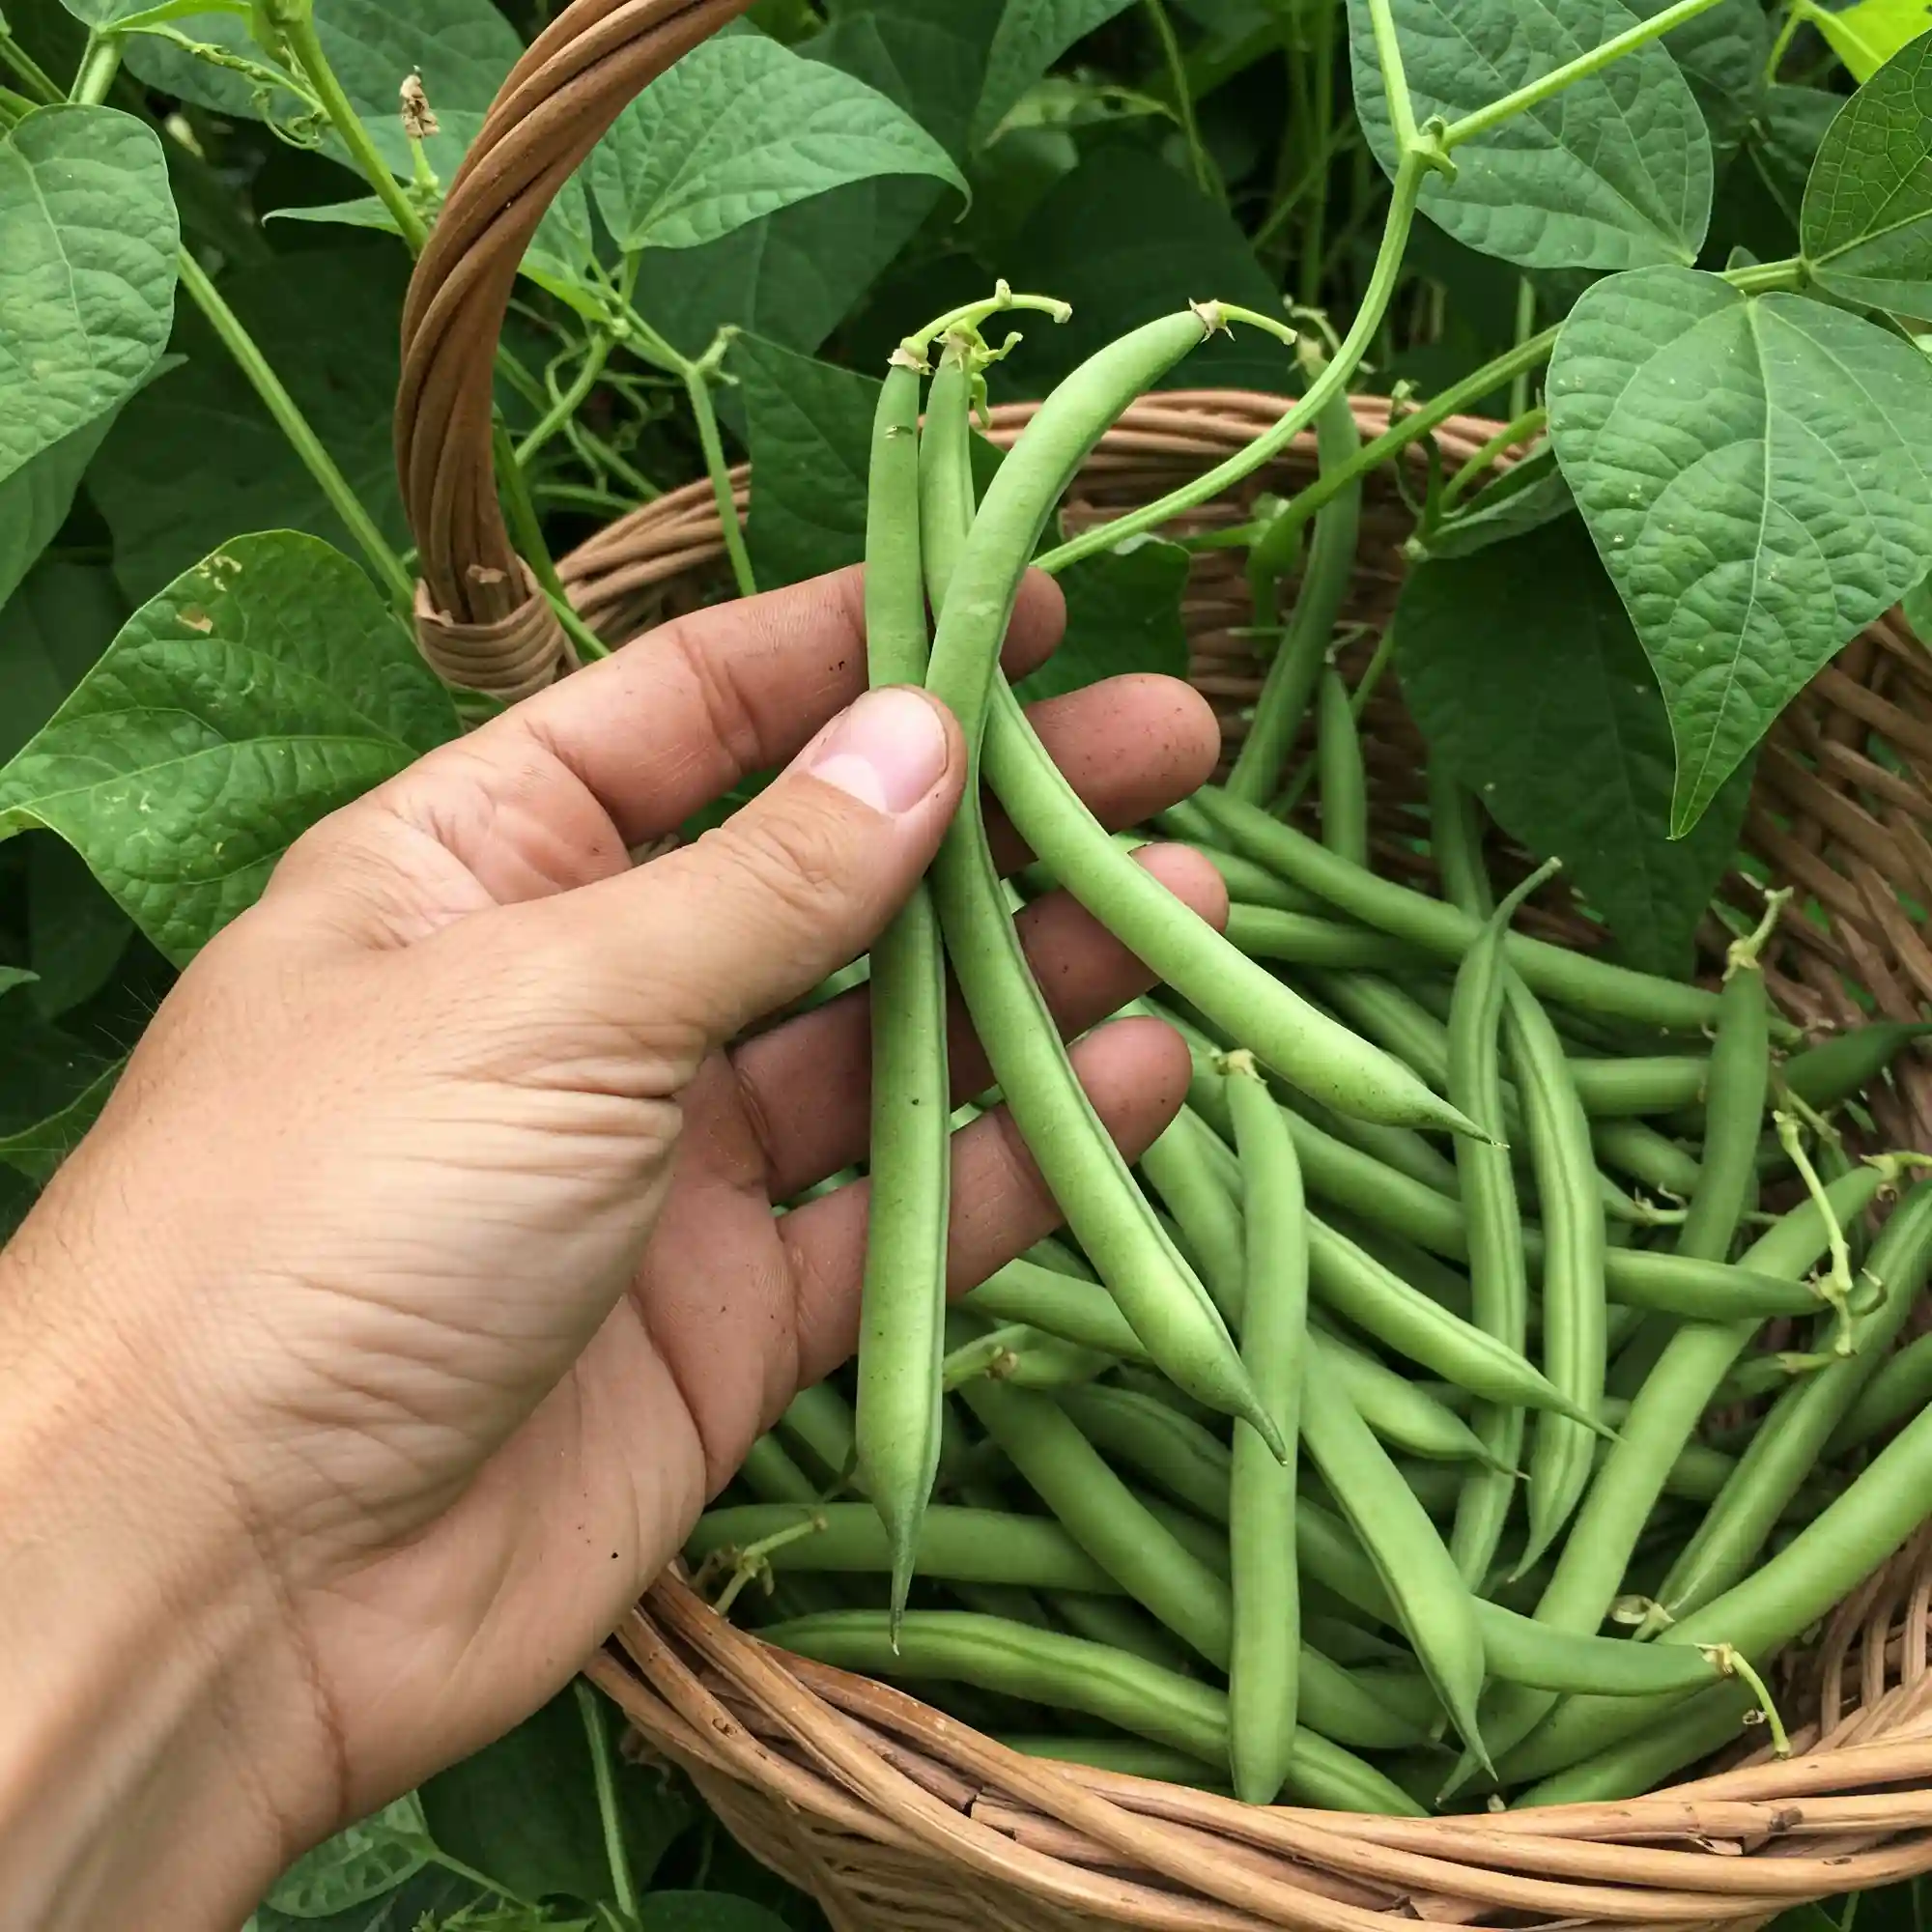
6. Harvesting Your Runner Beans

The moment you’ve been waiting for has arrived: harvest time! Harvesting runner beans is a rewarding experience, and there’s nothing quite like enjoying the fruits of your labor. Here’s how to know when your beans are ready and how to harvest them:
When to Harvest:
- Check for Maturity: Runner beans are ready for harvest when the pods are young and tender, typically about 5-7 days after flowering.
- Pod Size: The pods should feel firm and plump, but not overly full. If the beans inside the pod are starting to feel large or the pod starts to look slightly yellow, it may be past its prime.
- Taste Test: Snap a pod off the vine and taste a bean. It should be tender and flavorful. If the beans are tough or stringy, they may be overripe.
Harvesting Techniques:
- Snap the Pods: Gently snap the pods off the vine, leaving a short stem attached. This will help to prevent the plant from being damaged.
- Harvest Regularly: Regular harvesting encourages the plant to produce more beans. Aim to harvest every few days to keep up with the plant’s productivity.
- Wear Gloves: Consider wearing gloves while harvesting, as the bean plants can have small thorns that can irritate your skin.
Enjoying Your Harvest:
- Fresh Eating: Young runner beans are delicious eaten fresh. They can be steamed, stir-fried, or added to salads.
- Freezing: Runner beans can be frozen for later use. Blanch them in boiling water for a few minutes, then shock them in ice water to stop the cooking process. Drain and package them in freezer bags.
- Drying: Runner beans can also be dried for long-term storage. String the pods together and hang them in a warm, dry, and well-ventilated area. Once dry, the beans can be removed from the pods and stored in airtight containers.
Harvesting your runner beans is a satisfying experience. By following these tips, you can ensure that you enjoy a bountiful harvest of fresh, delicious beans all season long. Remember to savor the fruits of your labor and enjoy the satisfaction of growing your own food!
7. Troubleshooting Common Runner Bean Problems

Even the most experienced gardeners can encounter challenges when growing runner beans. However, by understanding common problems and knowing how to address them, you can increase your chances of a successful harvest.
Yellowing Leaves:
- Overwatering: Overwatering can lead to root rot, which can cause the leaves to turn yellow and wilt. Ensure that the soil is well-drained and avoid overwatering.
- Nutrient Deficiencies: Yellowing leaves can also be a sign of nutrient deficiencies, particularly nitrogen deficiency. Fertilize your plants regularly with a balanced fertilizer to provide the necessary nutrients.
- Pests: Some pests, such as aphids, can also cause yellowing and distortion of leaves. Monitor your plants regularly for pests and take appropriate control measures.
Lack of Flowering or Pod Production:
- Pollination Problems: Runner beans are primarily pollinated by bees. If there are not enough pollinators in your garden, the plants may not produce flowers or set pods. You can encourage pollination by planting bee-friendly flowers in your garden.
- Stressful Conditions: Stressful conditions, such as extreme heat, drought, or cold temperatures, can also inhibit flowering and pod production. Ensure that your plants receive adequate water and protection from extreme weather conditions.
- Nutrient Deficiencies: Insufficient fertilization can also affect flowering and pod production. Make sure to fertilize your plants regularly with a balanced fertilizer.
Other Common Problems:
- Pests: In addition to aphids, runner beans can also be affected by slugs, snails, and bean beetles. Monitor your plants regularly and take appropriate control measures, such as handpicking or using organic pest control methods.
- Diseases: Fungal diseases, such as bean rust and bean mosaic virus, can also affect runner beans. Ensure good air circulation and avoid overhead watering to prevent the spread of these diseases.
By understanding these common problems and taking proactive steps to address them, you can increase your chances of a successful runner bean harvest. Remember, patience and observation are key to a healthy and productive garden.
8. Frequently Asked Questions (FAQs)

Growing runner beans can sometimes present unique challenges, even for experienced gardeners. Here are some frequently asked questions to help you navigate common hurdles and ensure a successful harvest:
Q: How do I grow runner beans from seed in pots indoors?
A: Starting runner beans indoors can give them a head start and extend your growing season. Here’s a step-by-step guide:
- Choose the right container: Use seed starting trays or individual pots at least 6 inches deep.
- Fill with quality seed starting mix: Ensure the mix is well-draining and provides adequate nutrients for the seedlings.
- Sow the seeds: Plant the seeds about an inch deep and cover lightly with soil.
- Water gently: Water the seeds thoroughly but avoid overwatering.
- Provide warmth and light: Place the containers in a warm location with plenty of sunlight or under grow lights.
- Maintain consistent moisture: Keep the soil consistently moist but not soggy.
- Harden off the seedlings: Before transplanting outdoors, gradually acclimate the seedlings to outdoor conditions by placing them in a sheltered location for short periods each day.
- Transplant outdoors: Once the last frost has passed and the soil has warmed up, transplant the seedlings outdoors, spacing them about 6 inches apart.
Q: Why are my runner bean flowers falling off and not producing beans?
A: There are several reasons why your runner bean flowers might be dropping:
- Pollination issues: Runner beans are primarily pollinated by bees. If there are not enough pollinators in your garden, the flowers may not be pollinated successfully. You can encourage pollination by planting bee-friendly flowers in your garden and providing a source of clean water for bees.
- Stressful conditions: Stressful conditions, such as extreme heat, drought, or cold temperatures, can also cause flower drop. Ensure that your plants receive adequate water and protection from extreme weather conditions.
- Nutrient deficiencies: Insufficient fertilization can also affect flowering and pod production. Make sure to fertilize your plants regularly with a balanced fertilizer.
Q: How do I grow runner beans vertically to maximize space in a small garden?
A: Growing runner beans vertically is a great way to maximize space in a small garden. Here are some tips:
- Choose a climbing variety: Select a vigorous climbing variety of runner bean.
- Provide sturdy support: Use a trellis, fence, or other vertical structure to support the plants.
- Train the plants to climb: Gently guide the young plants to climb the support structure. You can tie them loosely to the support with twine or garden clips.
- Regularly check and adjust: As the plants grow, continue to check the support and adjust as needed to ensure the plants have adequate support.
Q: How long do runner beans take to grow?
A: Runner beans typically take 60-90 days from planting to harvest, depending on the variety and growing conditions.
Q: Can I eat runner bean flowers?
A: Yes, runner bean flowers are edible! They have a delicate flavor and can be used in salads or as a garnish.
Q: How do I store runner beans?
A: Fresh runner beans can be stored in the refrigerator for a few days. For longer storage, you can freeze them after blanching or dry the beans for later use.
By understanding these frequently asked questions and their answers, you can navigate the challenges of growing runner beans with confidence and enjoy a bountiful harvest. Remember, every gardener has a learning journey, and each season brings new insights and experiences. So, embrace the process, enjoy the journey, and savor the delicious rewards of your hard work!


")