Are you tired of seeing your precious spring seedlings wither from inconsistent watering? Do you dread the thought of spending hours hauling heavy watering cans, only to find your garden still struggling? I understand that frustration. It’s disheartening to put so much effort into your garden, only to see it fall short. That’s why I want to share my insights on spring garden irrigation systems. You deserve to have a thriving garden without the constant worry of watering. Let’s delve into how you can achieve that this spring.
1. Drip Irrigation: Precise Watering for Spring Seedlings

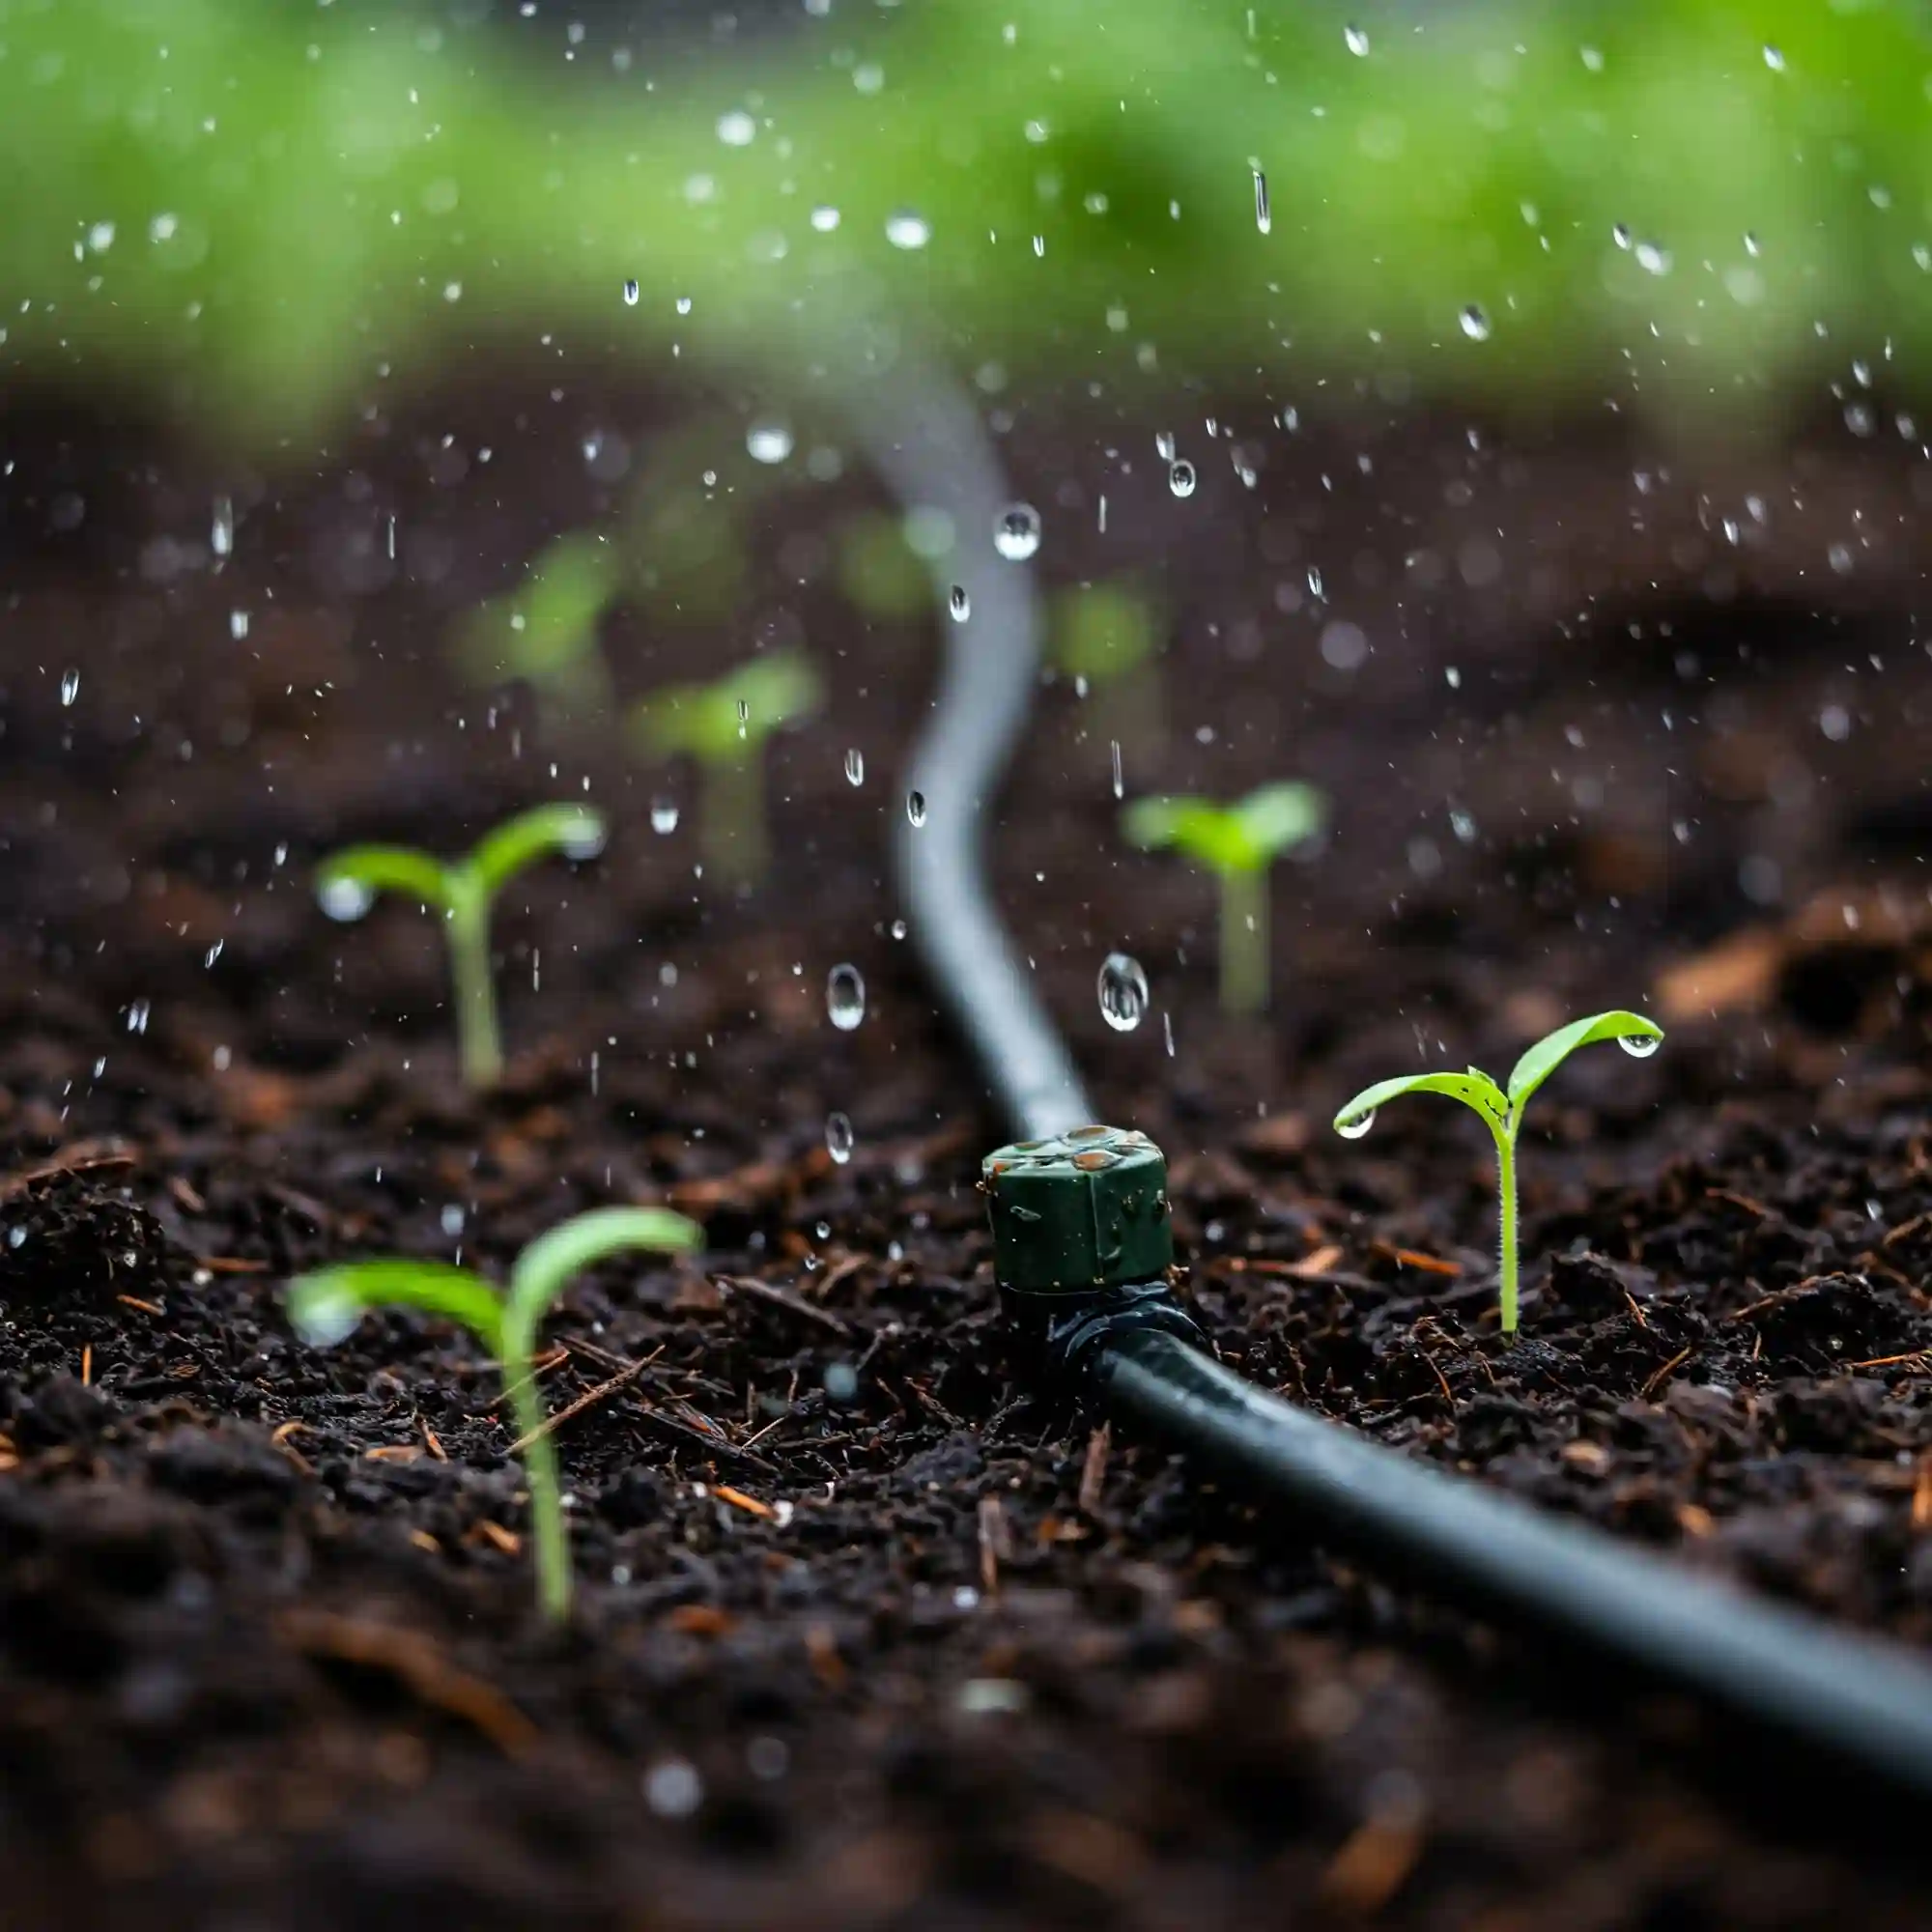
When it comes to nurturing delicate spring seedlings, precision is key. That’s where drip irrigation shines. I’ve found that drip systems are incredibly effective for delivering water directly to the root zone, minimizing evaporation and ensuring your plants receive the exact amount of moisture they need.
What is Drip Irrigation and Why is it Ideal for Spring?
Drip irrigation is a method of watering that uses a network of pipes, valves, and emitters to slowly deliver water to the base of plants. This slow, targeted approach is perfect for spring because it:
- Conserves Water: By delivering water directly to the roots, drip irrigation reduces water waste from evaporation and runoff.
- Promotes Healthy Growth: Consistent moisture levels support strong root development, which is crucial for young seedlings.
- Reduces Weed Growth: Since only the soil around the plants is watered, weeds are less likely to sprout.
- Prevents Soil Compaction: Gentle watering prevents soil erosion and compaction, which can hinder root growth.
In my experience, setting up a drip system for my vegetable garden has significantly improved seedling survival rates. The consistent moisture has led to healthier, more robust plants.
How to Set Up a Drip Irrigation System for Vegetable Gardens
Setting up a drip system might seem daunting, but it’s a straightforward process. Here’s a step-by-step guide:
- Plan Your Layout: Sketch out your garden layout and determine where you want your drip lines to run.
- Gather Your Materials: You’ll need drip tubing, emitters, connectors, a backflow preventer, a pressure regulator, and a timer.
- Install the Backflow Preventer and Pressure Regulator: These components protect your water supply and ensure consistent water pressure.
- Lay the Drip Tubing: Run the tubing along your garden beds, securing it with stakes.
- Install the Emitters: Place emitters at the base of each plant, spacing them according to your plants’ needs.
- Connect the System to Your Water Source: Attach the tubing to your faucet or hose using the appropriate connectors.
- Test and Adjust: Turn on the water and check for leaks. Adjust the emitters and tubing as needed.
- Add a Timer: Automate your watering schedule by adding a timer.
Drip Irrigation Components and Their Functions
| Component | Function |
| Drip Tubing | Carries water to the plants |
| Emitters | Control the flow of water |
| Connectors | Join tubing and other components |
| Backflow Preventer | Prevents contaminated water from entering the water supply |
| Pressure Regulator | Maintains consistent water pressure |
| Timer | Automates the watering schedule |
The Benefits of Using Drip Lines for Precise Water Delivery
Drip lines offer several advantages over traditional watering methods:
- Water Efficiency: Drip lines deliver water directly to the plant roots, minimizing waste.
- Reduced Disease Risk: By keeping foliage dry, drip irrigation reduces the risk of fungal diseases.
- Customizable Watering: Emitters allow you to control the flow of water to each plant, catering to individual needs.
- Time Savings: Automated drip systems free up your time for other gardening tasks.
I’ve noticed a significant reduction in plant diseases since switching to drip irrigation. The dry foliage and consistent moisture levels have created a healthier environment for my plants.
Tips for Adjusting Drip Irrigation for New Spring Growth
As your plants grow, you may need to adjust your drip irrigation system. Here are some tips:
- Increase Watering Frequency: New growth requires more water, so increase the frequency of watering as needed.
- Adjust Emitter Placement: As plants mature, adjust the placement of emitters to ensure they are still delivering water to the root zone.
- Monitor Soil Moisture: Regularly check soil moisture levels to ensure your plants are receiving adequate water.
- Use Mulch: Mulch helps retain soil moisture and reduces the need for frequent watering.
- Check for Leaks: Regularly inspect your system for leaks and repair them promptly.
Case Study: Success with Drip Irrigation
I remember a time when my tomato seedlings were struggling. Despite my best efforts with hand watering, they were consistently wilting. I decided to install a drip irrigation system, and within a week, I noticed a dramatic improvement. The consistent moisture allowed the seedlings to establish strong root systems, and they grew into healthy, productive plants.
Data:
- Studies show that drip irrigation can reduce water usage by up to 60% compared to traditional sprinkler systems.
- A well-maintained drip irrigation system can increase crop yields by 20-50%.
By implementing these tips and understanding the benefits of drip irrigation, you can ensure your spring seedlings thrive. Remember, consistent and precise watering is the foundation for a successful garden.
2. Sprinkler Systems: Efficient Coverage for Spring Lawns

Sprinkler systems are a popular choice for watering lawns, especially during the busy spring season. They offer a convenient and efficient way to ensure your lawn receives the moisture it needs to thrive. However, selecting the right sprinkler system and adjusting it for optimal performance are crucial for a healthy and lush lawn.
Understanding Different Types of Sprinkler Systems for Spring
There are several types of sprinkler systems available, each with its own advantages and drawbacks:
- Rotary Sprinklers: These traditional sprinklers rotate to cover a circular area. They are relatively inexpensive and easy to install.
- Impact Sprinklers: These sprinklers use a rotating arm to strike a deflector, creating a spray pattern. They are durable and can handle higher water pressure.
- Oscillating Sprinklers: These sprinklers move back and forth, creating a rectangular spray pattern. They are suitable for smaller areas and are often used for watering flower beds.
- Rotor Sprinklers: These high-pressure sprinklers rotate to cover large areas. They are ideal for watering large lawns and sports fields.
- Pop-Up Sprinklers: These in-ground sprinklers remain hidden until activated, creating a clean and unobtrusive appearance. They are often used in professional landscaping.
The best sprinkler system for your spring lawn will depend on the size of your lawn, the shape of your property, and your budget. Consider factors such as water pressure, coverage area, and desired spray pattern when making your decision.
How to Adjust Sprinkler Heads for Optimal Lawn Coverage
Proper sprinkler head adjustment is essential for efficient and even watering. Here are some tips:
- Check for Overlap: Ensure that adjacent sprinkler heads overlap slightly to avoid dry patches.
- Adjust the Spray Pattern: Adjust the sprinkler heads to create a consistent spray pattern across your lawn. Avoid overwatering or under-watering specific areas.
- Check for Obstructions: Remove any obstructions, such as trees or shrubs, that may interfere with the spray pattern.
- Monitor Water Pressure: Ensure that the water pressure is sufficient to provide adequate coverage. Low water pressure can result in uneven watering and poor performance.
Timing Your Sprinkler System for Spring Weather Changes
The amount of water your lawn needs will vary depending on the weather conditions. During the spring, you’ll need to adjust your watering schedule to account for rainfall, temperature fluctuations, and wind.
- Reduce Watering After Rain: If you receive significant rainfall, reduce the frequency of your sprinkler system.
- Increase Watering During Hot, Dry Periods: Increase the duration of your watering cycles during hot, dry spells.
- Water Early in the Morning: Water your lawn early in the morning to minimize evaporation and reduce the risk of fungal diseases.
- Avoid Watering During Windy Conditions: Wind can disperse water, reducing the effectiveness of your sprinkler system and increasing water waste.
Best Practices for Preventing Overwatering with Sprinklers
Overwatering can lead to a variety of problems, including shallow root growth, fungal diseases, and nutrient leaching. Here are some best practices for preventing overwatering:
- Water Deeply and Infrequently: Water your lawn deeply and infrequently to encourage deep root growth.
- Check Soil Moisture: Monitor soil moisture levels to determine how often you need to water.
- Use a Rain Gauge: A rain gauge can help you track rainfall and adjust your watering schedule accordingly.
- Consider Installing a Smart Sprinkler Controller: Smart sprinkler controllers can automatically adjust watering schedules based on weather conditions.
By following these guidelines, you can ensure your sprinkler system provides efficient and effective watering for your spring lawn, resulting in a lush, healthy landscape.
3. Soaker Hoses: Gentle Hydration for Spring Flower Beds

Soaker hoses are a gentle and effective way to water your spring flower beds. They slowly release water directly to the soil, minimizing water waste and preventing overwatering. This makes them ideal for delicate flowers that require consistent moisture but are susceptible to root rot.
Why Soaker Hoses are Perfect for Delicate Spring Flowers
Soaker hoses are porous hoses that slowly release water along their length. This gentle, even distribution of water mimics natural rainfall, creating a moist and consistent environment for your spring flowers. Here’s why they are perfect for delicate blooms:
- Minimize Overwatering: Soaker hoses prevent overwatering, which can lead to root rot and other fungal diseases. The slow, steady release of water allows the soil to absorb moisture gradually.
- Reduce Water Waste: By delivering water directly to the root zone, soaker hoses minimize water waste from evaporation and runoff. This is particularly important during the spring months when water resources may be limited.
- Protect Delicate Flowers: The gentle water flow from soaker hoses is less likely to damage delicate flowers or dislodge newly planted seedlings.
- Encourage Deep Root Growth: Consistent moisture encourages deep root growth, leading to healthier and more drought-tolerant plants.
In my experience, soaker hoses have been a game-changer for my spring flower beds. They have helped me to maintain consistent soil moisture without the risk of overwatering.
How to Lay Soaker Hoses for Even Moisture Distribution
Properly laying soaker hoses is essential for effective watering. Here are some tips:
- Clear the Area: Remove any debris or weeds from the area where you plan to lay the soaker hose.
- Coil the Hose: Coil the soaker hose loosely to avoid kinks.
- Lay the Hose Along the Base of Plants: Place the soaker hose along the base of your plants, ensuring it is in contact with the soil.
- Cover the Hose with Mulch: Cover the soaker hose with a layer of mulch to help retain moisture and prevent algae growth.
- Test for Leaks: Turn on the water and check for leaks. Repair any leaks promptly to prevent water waste.
Using Mulch with Soaker Hoses to Retain Soil Moisture
Mulching is a valuable practice when using soaker hoses. Mulch helps to:
- Retain Soil Moisture: Mulch acts as a barrier, preventing water evaporation and keeping the soil cool and moist.
- Suppress Weeds: Mulch helps to suppress weed growth, reducing competition for water and nutrients.
- Regulate Soil Temperature: Mulch helps to regulate soil temperature, protecting plant roots from extreme heat or cold.
I always use mulch around my soaker hoses to maximize their effectiveness. It helps to conserve water and create a more favorable environment for my spring flowers.
Setting Up Soaker Hoses for Raised Spring Flower Beds
Soaker hoses can also be used effectively in raised flower beds. Here are some tips:
- Lay the Hose Along the Bottom of the Bed: Place the soaker hose along the bottom of the raised bed to ensure even water distribution.
- Cover the Hose with Soil: Cover the soaker hose with a thin layer of soil to protect it from damage and prevent algae growth.
- Monitor Water Levels: Monitor the water levels in the raised bed to ensure that the plants are receiving adequate moisture.
By following these guidelines, you can effectively use soaker hoses to create a thriving and beautiful spring flower bed.
4. Micro-Sprinklers: Targeted Watering for Spring Containers

Micro-sprinklers are a fantastic choice for watering your spring container gardens. They offer a targeted and efficient way to deliver water to individual plants, preventing overwatering and ensuring that each plant receives the moisture it needs.
The Advantages of Micro-Sprinklers for Container Gardening in Spring
Micro-sprinklers are small, adjustable sprinklers that emit a fine mist of water. This gentle spray is ideal for container gardens because:
- Precise Watering: Micro-sprinklers deliver water directly to the base of each plant, minimizing water waste and preventing overwatering. Overwatering can lead to root rot and other problems in container plants.
- Reduced Runoff: Since the water is applied directly to the soil, there is minimal runoff, conserving water and preventing soil erosion.
- Ideal for Delicate Plants: The gentle spray from micro-sprinklers is perfect for delicate plants that are susceptible to damage from heavy watering.
- Flexibility: Micro-sprinklers are easy to adjust and reposition, allowing you to customize the watering pattern to suit the needs of each plant.
In my experience, micro-sprinklers have been a lifesaver for my spring container gardens. They have helped me to maintain consistent moisture levels without the risk of overwatering, resulting in healthier and more vibrant plants.
How to Install Micro-Sprinklers for Individual Plant Needs
Installing micro-sprinklers is a relatively simple process:
- Choose the Right Micro-Sprinklers: Select micro-sprinklers with adjustable spray patterns and flow rates to suit the needs of your plants.
- Connect the Micro-Sprinklers to a Water Source: Connect the micro-sprinklers to a garden hose or a dedicated water source using appropriate fittings.
- Adjust the Spray Pattern: Adjust the spray pattern of each micro-sprinkler to ensure that it is directed towards the base of the plant.
- Test the System: Turn on the water and check for leaks or uneven watering. Adjust the micro-sprinklers as needed to ensure that each plant receives adequate moisture.
Adjusting Water Pressure for Delicate Spring Container Plants
Water pressure can affect the performance of micro-sprinklers. If the water pressure is too high, the spray may be too forceful and damage delicate plants. Here are some tips for adjusting water pressure:
- Use a Pressure Regulator: Install a pressure regulator to reduce water pressure if it is too high.
- Adjust the Sprinkler Nozzle: Some micro-sprinklers have adjustable nozzles that allow you to control the flow rate and spray pattern.
- Monitor the Plants: Observe your plants for signs of overwatering or underwatering. Adjust the water pressure accordingly.
Combining Micro-Sprinklers with Timers for Automated Watering
Combining micro-sprinklers with timers can further enhance the convenience and efficiency of your watering system. Timers allow you to automate your watering schedule, ensuring that your plants receive the right amount of water at the right time.
By following these guidelines and using micro-sprinklers effectively, you can ensure that your spring container gardens thrive. Remember to monitor your plants closely and adjust your watering schedule as needed to accommodate changing weather conditions and plant growth.
5. Rain Barrels: Sustainable Spring Garden Watering
Rain barrels are an excellent way to conserve water and reduce your reliance on municipal water supplies, especially during the spring when water demand is high. By collecting rainwater, you can supplement your garden’s watering needs and reduce your environmental impact.
How to Set Up a Rain Barrel System for Spring Garden Irrigation
Setting up a rain barrel is a relatively simple process:
- Choose a Suitable Location: Select a location for your rain barrel that is close to a downspout and provides easy access for watering.
- Select a Rain Barrel: Choose a rain barrel that is the right size for your needs and fits your aesthetic preferences. Rain barrels are available in a variety of sizes and materials.
- Install the Diverter: Install a diverter on the downspout to direct rainwater into the rain barrel.
- Connect the Overflow Hose: Connect an overflow hose to the rain barrel to prevent overflow during heavy rainfall.
- Install a Spigot: Install a spigot at the bottom of the rain barrel to allow for easy access to the collected water.
- Connect a Hose: Connect a garden hose to the spigot to water your plants.
The Benefits of Using Rainwater for Plant Health and Water Conservation
Rainwater is an excellent source of water for your garden because it is:
- Naturally Soft: Rainwater is naturally soft and free of chlorine and other chemicals that can harm plants.
- Temperature-Controlled: Rainwater is naturally cool, which can help to prevent stress on plants during hot spring days.
- Nutrient-Rich: Rainwater can contain beneficial nutrients that can help your plants to thrive.
- Free: Collecting rainwater is a free and sustainable way to water your garden.
By using rainwater to water your garden, you can help to conserve water resources and reduce your environmental impact.
Integrating Rain Barrels with Existing Irrigation Systems
You can integrate rain barrels into your existing irrigation system to maximize water conservation. For example, you can use a pump to transfer water from the rain barrel to your drip irrigation system or sprinkler system. This can help to reduce your reliance on municipal water and save money on your water bills.
Tips for Maintaining Rain Barrels During the Spring Season
To ensure that your rain barrel system is functioning properly during the spring season, it is important to:
- Keep the Barrel Clean: Clean your rain barrel regularly to prevent mosquito breeding and algae growth.
- Monitor Water Levels: Monitor the water level in your rain barrel regularly and refill it as needed.
- Protect the Barrel from Freezing: If you live in a climate with freezing temperatures, take steps to protect your rain barrel from freezing. This may involve insulating the barrel or draining it completely.
By following these tips, you can ensure that your rain barrel system provides a reliable and sustainable source of water for your spring garden.
6. Automated Timers and Sensors: Smart Spring Watering Solutions
In today’s age of smart technology, there are innovative solutions to make your spring garden watering even more efficient and convenient. Automated timers and sensors offer a level of control and precision that can significantly enhance your gardening experience.
How to Use Timers for Efficient Spring Garden Watering Schedules
Timers are invaluable tools for automating your irrigation system and ensuring that your plants receive water consistently, even when you’re not around. Here’s how to effectively use timers:
- Choose the Right Timer: Select a timer that suits your needs and budget. Options range from simple mechanical timers to advanced digital models with programmable watering schedules.
- Program Your Timer: Set your desired watering schedule based on the specific needs of your plants and the prevailing weather conditions.
- Monitor Your System: Regularly check your system to ensure that the timer is functioning correctly and that your plants are receiving the appropriate amount of water.
- Adjust Your Schedule as Needed: As the spring season progresses, adjust your watering schedule to accommodate changing weather conditions and plant growth.
The Benefits of Moisture Sensors for Preventing Over or Under-Watering
Moisture sensors are valuable tools that can help you prevent overwatering or underwatering. These sensors measure soil moisture levels and automatically adjust the watering schedule accordingly. This ensures that your plants receive the precise amount of water they need, promoting healthy growth and reducing water waste.
- Consistent Moisture Levels: Moisture sensors help to maintain consistent moisture levels in the soil, which is crucial for healthy plant growth.
- Reduced Water Waste: By preventing overwatering, moisture sensors help to conserve water and reduce your water bill.
- Enhanced Plant Health: Consistent moisture levels can help to prevent stress and disease in your plants.
Setting Up Automated Systems for Different Spring Garden Needs
Automated systems can be tailored to meet the specific needs of different types of gardens. For example:
- Vegetable Gardens: Use drip irrigation with a timer to deliver water directly to the root zone of vegetable plants.
- Flower Beds: Combine soaker hoses with a timer to provide gentle and consistent watering for delicate flowers.
- Lawns: Utilize a sprinkler system with a timer to ensure even coverage and prevent overwatering.
- Container Gardens: Use micro-sprinklers with a timer to deliver precise amounts of water to individual container plants.
Integrating Smart Irrigation Systems for Remote Control and Monitoring
Smart irrigation systems offer even greater control and convenience. These systems can be controlled remotely using a smartphone app or voice assistant. This allows you to monitor your system’s performance, adjust watering schedules, and even receive alerts if there are any issues.
By incorporating automated timers and sensors into your spring garden watering strategy, you can create a more efficient, effective, and convenient system that promotes healthy plant growth while conserving water.
7. DIY Spring Garden Irrigation: Budget-Friendly Options

Not everyone has the budget or the desire to invest in a complex, store-bought irrigation system. The good news is that you can create effective and budget-friendly DIY irrigation solutions for your spring garden. These simple and resourceful methods can provide your plants with the water they need without breaking the bank.
Creating a DIY Drip Irrigation System with Recycled Materials
You can create a simple drip irrigation system using recycled materials such as plastic bottles and soda bottles. Here’s how:
- Poke Holes in the Bottles: Poke small holes in the bottom and sides of the plastic bottles.
- Fill the Bottles with Water: Fill the bottles with water.
- Invert the Bottles: Invert the bottles and place them upside down near the base of your plants.
- Adjust Water Flow: Adjust the size and number of holes to control the flow of water.
This DIY method provides a slow and steady drip of water to your plants, mimicking the natural rainfall and reducing the risk of overwatering.
Using Repurposed Containers for Simple Watering Solutions
Repurpose household items like old milk jugs or plastic cups to create simple watering devices. Here’s how:
- Poke Holes in the Containers: Poke small holes in the bottom and sides of the containers.
- Fill the Containers with Water: Fill the containers with water.
- Place the Containers Near Plants: Place the containers near the base of your plants, allowing the water to slowly seep into the soil.
These simple DIY watering solutions can be a great way to provide your plants with the moisture they need without spending a lot of money.
Setting Up a Basic Soaker Hose System for Small Spring Gardens
Soaker hoses are a relatively inexpensive way to water your spring garden. You can create a simple soaker hose system by:
- Coiling the Soaker Hose: Coil the soaker hose loosely and place it along the base of your plants.
- Connect the Hose to a Water Source: Connect the soaker hose to a garden hose or a faucet.
- Turn on the Water: Turn on the water and allow the soaker hose to slowly release water into the soil.
This simple setup can provide your plants with consistent moisture without the need for expensive equipment.
Tips for Budget-Friendly Spring Garden Irrigation
Here are some additional tips for creating budget-friendly spring garden irrigation solutions:
- Collect Rainwater: Collect rainwater in a rain barrel and use it to water your garden.
- Water Early in the Morning: Water your garden early in the morning to minimize evaporation and reduce water waste.
- Mulch Your Garden: Mulch helps to retain soil moisture, reducing the need for frequent watering.
- Water Deeply and Infrequently: Water your plants deeply and infrequently to encourage deep root growth.
By implementing these budget-friendly tips and strategies, you can create a thriving spring garden without breaking the bank. Remember, even simple DIY solutions can be effective in providing your plants with the water they need.
FAQ:

This section addresses some of the most frequently asked questions about spring garden irrigation systems. Here, I’ll provide concise and informative answers to help you make informed decisions and ensure a successful gardening season.
When to set up spring garden irrigation systems after last frost?
It’s best to set up your spring garden irrigation systems after the last predicted frost date. This typically occurs in late spring, depending on your specific region. Setting up your irrigation system too early can expose it to frost damage, while waiting too long may delay the establishment of your plants. Consult local gardening resources or weather forecasts to determine the average last frost date in your area.
Best drip irrigation system for spring vegetable gardens?
The best drip irrigation system for spring vegetable gardens will depend on the specific needs of your plants and the size of your garden. However, look for systems that offer adjustable emitters, allowing you to customize the water flow to each plant. Consider using drip tape for row plantings and individual emitters for smaller plants or those with specific water requirements.
How to install a spring garden irrigation system with a timer?
Installing a spring garden irrigation system with a timer is a straightforward process. First, connect the irrigation system to your water source. Then, connect the timer to the water supply and program it with your desired watering schedule. Ensure the timer is securely mounted and protected from the elements.
Efficient spring garden irrigation systems for raised beds in clay soil?
Drip irrigation or soaker hoses are excellent options for raised beds in clay soil. Clay soil can retain water, leading to overwatering and root rot. Drip irrigation and soaker hoses deliver water directly to the root zone, minimizing water runoff and preventing oversaturation.
DIY spring garden irrigation system using rain barrels and soaker hoses?
Creating a DIY spring garden irrigation system using rain barrels and soaker hoses is a sustainable and cost-effective solution. Connect a hose to the spigot on your rain barrel and attach a soaker hose to the end. Coil the soaker hose around the base of your plants and turn on the water. This simple setup provides a gentle and efficient way to water your garden.
Troubleshooting common problems with spring garden sprinkler irrigation systems?
Common problems with sprinkler irrigation systems include low water pressure, uneven coverage, and clogged sprinkler heads. If you encounter low water pressure, check for any obstructions in the line. Uneven coverage can be addressed by adjusting the sprinkler heads or moving them to different locations. Clogged sprinkler heads can be cleaned with a wire or needle.
Optimal watering schedule for spring garden irrigation systems with new seedlings?
New seedlings require frequent watering to establish their root systems. However, overwatering can lead to root rot. A good rule of thumb is to water seedlings deeply and frequently, but allow the top inch of soil to dry out slightly between waterings. Adjust the watering schedule as the seedlings grow and mature.
Choosing the right spring garden irrigation systems for water conservation?
Drip irrigation and soaker hoses are excellent choices for water conservation. These systems deliver water directly to the root zone, minimizing evaporation and runoff. Consider using mulch around your plants to further reduce water loss.
How to adjust spring garden irrigation systems for changing weather conditions?
Monitor your plants closely and adjust your watering schedule accordingly. During periods of heavy rainfall, reduce or eliminate supplemental watering. During hot, dry periods, increase the frequency or duration of watering. Consider using a rain gauge to track rainfall and adjust your watering schedule accordingly.
Where to buy affordable spring garden irrigation systems online and locally?
Affordable spring garden irrigation systems can be purchased online from retailers such as Amazon, Home Depot, and Lowe’s. You can also find a wide variety of irrigation components at local hardware stores and garden centers.