Have you ever looked at your garden and felt like it was missing that special something? Like a touch of personality, a dash of whimsy? I know I have. It’s frustrating when you pour your heart into your garden, but it still feels… incomplete. You want a garden that reflects your style, a garden that sparks joy every time you step outside. That’s where a DIY project like a heart-shaped garden planter comes in. It’s the perfect way to add a unique and personal touch to your outdoor space, and it’s a project you can enjoy from start to finish. In this guide, I’ll share my experience and knowledge to help you build your own heart-shaped garden planter, step by step.
Choosing Your Heart-Shaped Planter Design

Before you even pick up a saw or hammer, let’s dream a little! The design of your heart-shaped garden planter is more than just aesthetics; it’s about expressing your unique style and vision for your outdoor space. Think of it as a blank canvas waiting for your personal touch.
Consider these key factors when choosing your design:
- Garden Style: What’s the overall vibe of your garden? Is it a rustic cottage garden overflowing with blooms? A sleek, minimalist modern space? A vibrant tropical paradise? Your planter’s design should complement the existing style of your garden.
- Plant Choices: What kind of plants do you envision growing in your heart-shaped planter? Succulents, herbs, vibrant flowers, or even a small vegetable garden? The size and shape of your planter will influence your plant selection. For example, a deep planter is ideal for root vegetables, while a shallow planter is perfect for succulents.
- Location, Location, Location: Where will your heart-shaped planter live? On your patio? Along a garden path? Hanging from a tree? The location will determine the size and style of your planter. For example, a large, heavy planter might not be the best choice for a small balcony.
- Maintenance Level: How much time and effort are you willing to dedicate to maintaining your planter? Some designs, like intricate interwoven branches, may require more upkeep than a simple, classic heart shape.
Now, let’s explore some design ideas to spark your imagination:
- Classic Heart: This is the timeless foundation for your heart-shaped planter. It’s a simple, symmetrical design that allows the beauty of your plants to truly shine. You can create a classic heart using various materials like wood, metal, or even concrete.
- Heart with a Pedestal: Adding a pedestal elevates your planter, making it a focal point in your garden. Imagine a heart-shaped planter perched on a small stand or column. This design adds a touch of elegance and allows you to showcase trailing plants beautifully.
- Interwoven Heart: Embrace the natural world with an interwoven heart design. You can use branches, twigs, or even grapevine to create a rustic and organic look. This design is perfect for a cottage garden or a woodland setting.
- Hanging Heart: If space is limited, or you want to add a vertical element to your garden, consider a hanging heart-shaped planter. You can hang it from a tree branch, a pergola, or even a wall hook. This design is ideal for trailing plants like ivy, ferns, or strawberries.
- Vertical Heart: For a modern and space-saving option, a vertical heart-shaped planter is a fantastic choice. You can create a living wall by attaching several small heart-shaped planters to a vertical surface. This design is perfect for small balconies or patios.
Remember, these are just a few ideas to get your creative juices flowing. Don’t be afraid to experiment and come up with your own unique designs. The most important thing is to have fun and enjoy the process of creating something beautiful for your garden.
Gathering Your Tools and Materials

Alright, let’s talk shop! Now that you’ve got your heart set on a design (pun intended!), it’s time to gather the essential tools and materials that will transform your vision into reality. Think of this step as preparing your artist’s palette – you want to have everything you need within easy reach to make the creative process smooth and enjoyable. I’ve found that a well-organized workspace not only saves time but also reduces frustration and allows me to focus on the joy of building.
Tools of the Trade:
- Saw: The type of saw you choose depends on the complexity of your design and the type of wood you’re using. For straight cuts on thinner wood, a handsaw will do the trick. However, if you’re working with thicker wood or have intricate curves in your design, a jigsaw is your best friend. I personally love the versatility of a jigsaw – it allows me to make both straight and curved cuts with precision.
- Hammer: A trusty hammer is essential for driving nails and securing wooden pieces. A medium-sized hammer is a good all-around choice. If you’re using screws instead of nails, you’ll need a screwdriver instead.
- Measuring Tape: Precision is key when building anything, and a measuring tape is your best friend for ensuring accurate cuts and a symmetrical heart shape. I always double-check my measurements before making any cuts – it’s better to be safe than sorry!
- Pencil: A good old-fashioned pencil is perfect for marking your cuts on the wood. I prefer a carpenter’s pencil, as it has a thicker lead that’s easier to see.
- Sandpaper: Sandpaper is essential for smoothing out any rough edges after cutting and giving your finished planter a professional look. I recommend starting with a medium-grit sandpaper to remove any larger imperfections and then finishing with a fine-grit sandpaper for a smooth, polished surface.
- Clamps: Clamps are incredibly helpful for holding wooden pieces together while the glue dries. They’re especially useful for more complex designs or when working with multiple pieces of wood. I always keep a variety of clamps on hand for different projects.
- Safety Glasses: Safety first! Always wear safety glasses when using power tools like saws. It’s a small precaution that can prevent serious eye injuries.
Materials for Your Masterpiece:
- Wood: The type of wood you choose will depend on whether you’re building an indoor or outdoor planter.
- Outdoor Planters: For outdoor use, you need a wood that can withstand the elements. Cedar, redwood, and treated pine are excellent choices, as they are naturally resistant to rot and decay. These woods also have a beautiful natural grain that adds to the charm of your planter. I’ve found that cedar has a particularly lovely aroma.
- Indoor Planters: For indoor planters, you have more options. You can still use cedar, redwood, or treated pine, but you can also consider other types of wood, such as pallet wood, plywood, or even reclaimed wood. Pallet wood is a great option for a rustic look, and reclaimed wood adds a unique character to your finished piece. Just make sure the wood is clean and free of any harmful chemicals.
- Nails or Screws: You’ll need nails or screws to fasten the wood pieces together. Screws are generally stronger and provide a more secure hold, especially for larger planters or those that will be holding heavier plants. I typically use screws for my outdoor planters and nails for smaller indoor planters.
- Wood Glue: Wood glue adds extra strength to the joints and helps prevent the wood from splitting. It’s a small investment that makes a big difference in the durability of your planter. I always use wood glue in addition to nails or screws.
- Paint or Stain (Optional): Painting or staining your heart-shaped garden planter can enhance its appearance and protect the wood from the elements. This is where you can really let your creativity shine! You can choose a color that complements your garden or create a bold statement piece. I personally love the look of natural wood, so I often opt for a clear sealant instead of paint or stain. A clear sealant protects the wood without obscuring its natural beauty.
- Potting Soil: Use a high-quality potting soil that’s appropriate for the types of plants you’ll be growing. Potting soil provides the necessary nutrients and drainage for your plants to thrive.
- Plants: Last but not least, choose plants that you love and that are suitable for the growing conditions in your area. Consider the amount of sunlight your planter will receive and the mature size of the plants you choose.
Now that you’ve gathered all your tools and materials, you’re ready to start building your heart-shaped garden planter! In the next section, we’ll walk through the step-by-step instructions for constructing your planter.
Step-by-Step Instructions for Building Your Planter

Alright, let’s get our hands dirty! This is where the magic happens – where your vision transforms into a tangible, beautiful heart-shaped garden planter. I’ve broken down the construction process into clear, manageable steps, perfect for both seasoned DIY enthusiasts and those just starting their crafting journey. Remember, building is a process of learning and discovery. Don’t be afraid to experiment, adapt, and make the project your own!
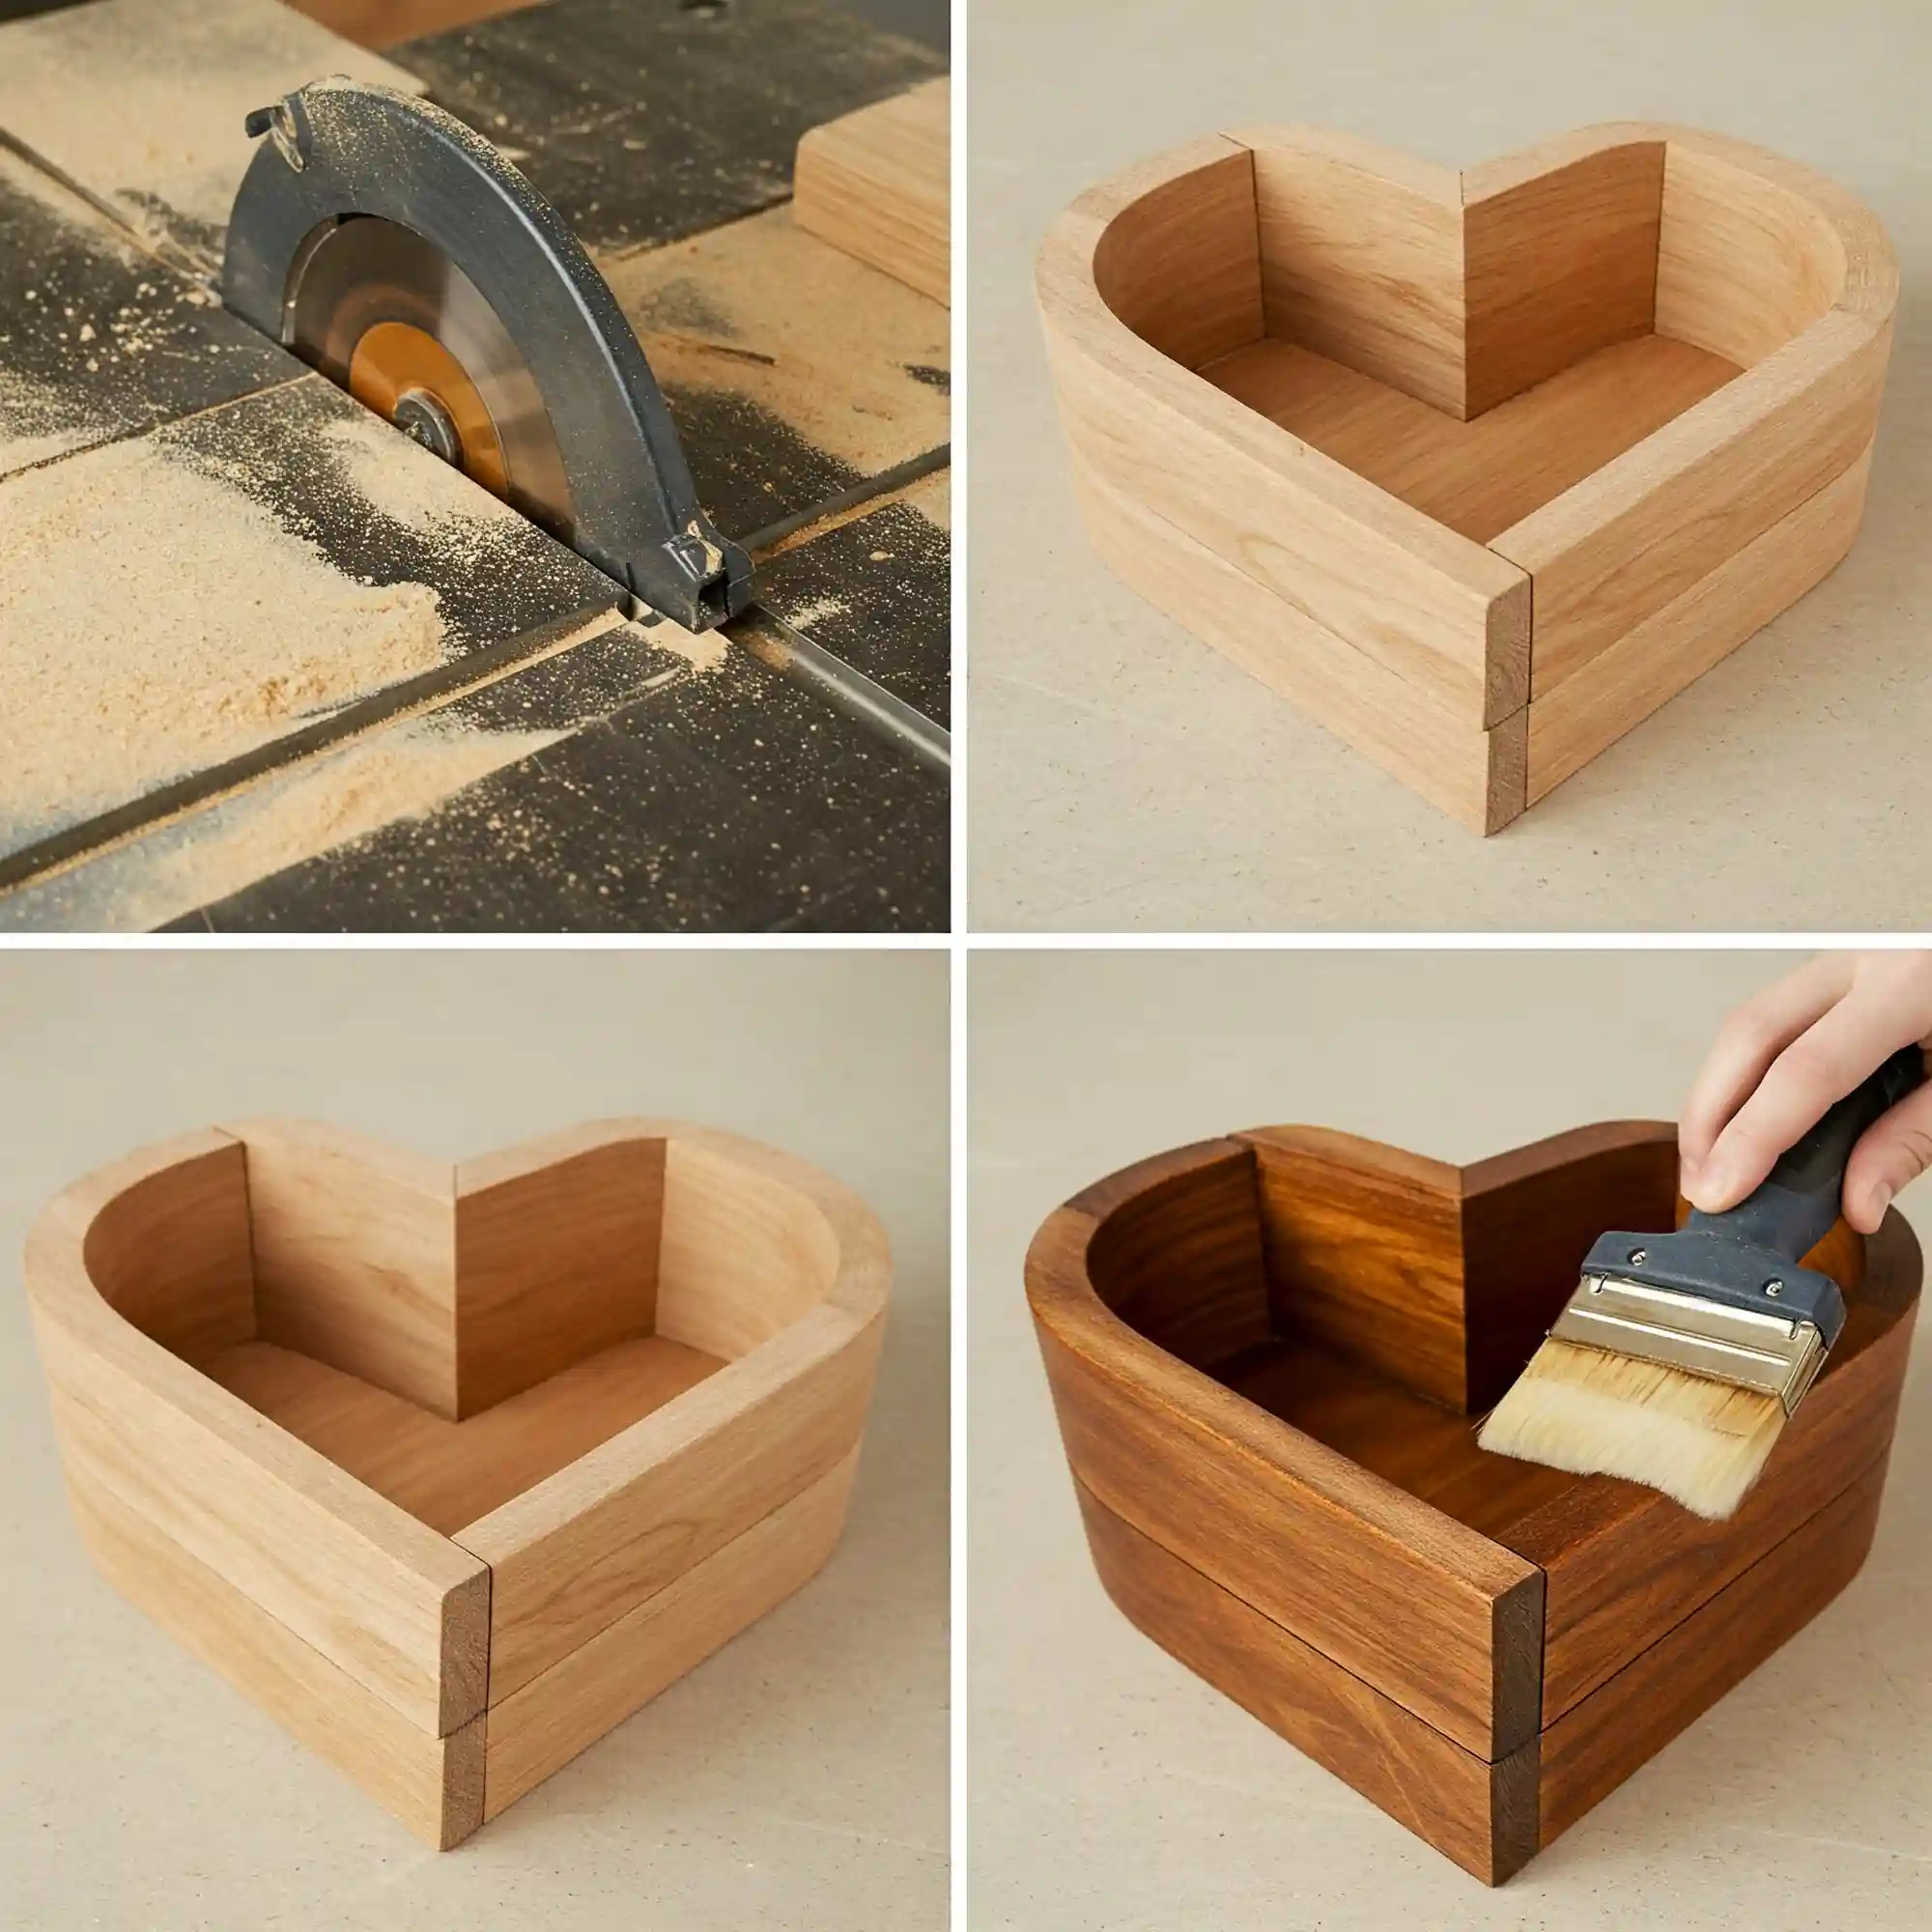
1. Cutting the Wood: The Foundation of Your Heart
This stage is all about precision and careful execution. Your design, whether it’s a classic heart or something more intricate, will guide your cuts. I always recommend creating a template first – it’s like having a blueprint for your project. You can draw your heart shape on a piece of cardboard or paper, then trace it onto your wood.
- Template Creation: If you’re feeling artistic, freehand drawing is an option. If you prefer a more precise shape, you can find heart templates online and print them out. I’ve even used cookie cutters as templates in a pinch!
- Transferring the Design: Once you have your template, lay it on your chosen wood and carefully trace the outline with a pencil. A carpenter’s pencil with a thicker lead makes the lines easier to see.
- Choosing Your Saw: Now, select your saw. For straight cuts on thinner wood, a handsaw will work perfectly. However, if your design involves curves or you’re working with thicker wood, a jigsaw is your best bet. I personally love the versatility of a jigsaw – it handles curves like a dream and makes even the most intricate designs achievable.
- Cutting with Care: Before you start cutting, always double-check your measurements and make sure your wood is securely clamped to your workbench. Safety glasses are a must! If you’re using a jigsaw, make sure the blade is appropriate for the type of wood you’re cutting. Take your time, follow the lines carefully, and let the saw do the work. Don’t force it.
2. Assembling the Heart: Bringing the Shape to Life
With your wood pieces cut, it’s time to assemble the heart shape. This is where the magic really starts to happen!
- Applying the Glue: Start by applying a thin, even layer of wood glue to the edges of the wood pieces that will be joined. Don’t overdo it with the glue – a little goes a long way.
- Aligning and Pressing: Carefully align the wood pieces and press them together firmly. Make sure the pieces are flush and that the heart shape is symmetrical.
- Clamping for Security: Use clamps to hold the pieces together while the glue dries. This is crucial for creating a strong and durable bond. I usually let the glue dry for at least 24 hours before moving on to the next step.
- Adding Extra Support: Once the glue is dry, you can add extra support by using nails or screws. Screws are generally stronger and provide a more secure hold, especially for larger planters or those that will be holding heavier plants. If you’re using nails, make sure they are long enough to penetrate the wood securely.
3. Sanding the Edges: A Touch of Polish
With the heart shape assembled, it’s time to smooth out any rough edges and give your planter a professional finish.
- Choosing Your Sandpaper: Start with a medium-grit sandpaper to remove any larger imperfections. Then, switch to a fine-grit sandpaper for a smooth, polished surface.
- Sanding with Care: Sand the edges of the planter carefully, following the contours of the heart shape. Don’t apply too much pressure – let the sandpaper do the work.
- Checking Your Progress: Periodically check your progress to make sure the edges are smooth and even. You can run your hand along the edges to feel for any rough spots.
4. Painting or Staining: Adding Your Personal Touch
Now, the fun part – adding your personal touch! Painting or staining your heart-shaped garden planter can enhance its appearance and protect the wood from the elements.
- Choosing Your Finish: Consider the overall style of your garden when choosing your paint or stain. Do you want a vibrant color that pops? A subtle stain that highlights the natural wood grain? Or a classic white that complements any setting?
- Applying the Finish: Follow the instructions on the paint or stain can. I recommend applying multiple thin coats for even coverage. Allow each coat to dry completely before applying the next.
- Sealing for Protection: If you’re using a stain, you may want to apply a clear sealant to protect the wood from the elements.
5. Adding Drainage: Ensuring Plant Health
Proper drainage is essential for the health of your plants. This step ensures that excess water can escape, preventing root rot and other problems.
- Drilling Drainage Holes: Drill several small holes in the bottom of the planter. I recommend using a drill bit that’s slightly smaller than the diameter of the drainage holes.
- Adding a Drainage Layer (Optional): You can also add a layer of gravel or pebbles to the bottom of the planter to improve drainage.
6. Adding Soil: Preparing the Bed
With your planter built and ready, it’s time to add the potting soil.
- Choosing Your Soil: Use a high-quality potting soil that’s appropriate for the types of plants you’ll be growing.
- Filling the Planter: Fill the planter with potting soil, leaving a small space at the top.
7. Planting Your Garden: Bringing it to Life
The final step – planting your garden! Choose plants that you love and that are suitable for the growing conditions in your area. Consider the amount of sunlight your planter will receive and the mature size of the plants you choose.
- Planting with Care: Carefully plant your chosen plants in the potting soil.
- Watering and Caring: Water your plants regularly and provide them with the care they need to thrive.
Congratulations! You’ve built your own heart-shaped garden planter! Now you can enjoy the fruits (or flowers!) of your labor and add a touch of romance to your garden.
Planting and Caring for Your Heart-Shaped Garden
Your heart-shaped garden planter is built, and now the real magic begins: bringing it to life with plants! This is where your garden truly becomes a reflection of your personal style and a source of joy. Choosing the right plants and providing them with proper care is essential for creating a thriving and beautiful garden. I’ve learned that gardening is a journey of observation, patience, and connection with nature. It’s a process of learning what works best for your specific environment and the plants you choose to nurture.
Choosing the Perfect Plants:
The type of plants you choose will depend on several factors, including:
- Location: Where will your heart-shaped planter be located? Will it be in full sun, partial shade, or full shade? Some plants thrive in direct sunlight, while others prefer more shade. I’ve learned that understanding the light requirements of your chosen plants is crucial for their success.
- Climate: What is the climate like in your area? Some plants are more tolerant of heat or cold than others. Consider your local growing zone when selecting plants. I always check the USDA Plant Hardiness Zone Map to ensure I’m choosing plants that will thrive in my region.
- Size: How big will the plants get? Make sure you choose plants that are appropriate for the size of your heart-shaped planter. You don’t want plants that will quickly outgrow their container.
- Personal Preference: Ultimately, the best plants for your heart-shaped garden planter are the ones you love! Choose plants that bring you joy and that you’ll enjoy caring for.
Here are some ideas for plants that work well in heart-shaped planters:
- Succulents: Succulents are a great choice for heart-shaped planters, as they are drought-tolerant and come in a wide variety of shapes, colors, and textures. They’re also relatively low-maintenance, making them perfect for busy gardeners. I especially love how they can add a modern and sculptural feel to a garden.
- Herbs: A heart-shaped herb garden is not only beautiful but also practical! You can grow your favorite culinary herbs right outside your kitchen door. Imagine snipping fresh basil or thyme for your next meal – it’s a truly delightful experience.
- Flowers: Add a pop of color to your garden with flowering plants. Choose flowers that complement the style of your heart-shaped planter and the overall aesthetic of your garden. I’ve found that petunias, pansies, and geraniums are particularly well-suited for container gardening.
- Vegetables: You can even grow small vegetables in a heart-shaped planter! Consider compact varieties of tomatoes, peppers, or lettuce. Imagine harvesting fresh vegetables from your own garden – it’s incredibly rewarding!
Planting Your Heart-Shaped Garden:
Once you’ve chosen your plants, it’s time to get planting!
- Preparing the Soil: Make sure your potting soil is loose and well-draining. You can add some compost or other organic matter to improve the soil’s fertility.
- Planting with Care: Gently remove the plants from their containers and place them in the heart-shaped planter. Make sure the roots are not crowded and that the plants are at the correct depth.
- Watering Thoroughly: After planting, water the plants thoroughly. This will help settle the soil and ensure that the roots are well-hydrated.
Caring for Your Heart-Shaped Garden:
Proper care is essential for keeping your heart-shaped garden looking its best.
- Watering Regularly: Water your plants regularly, especially during hot, dry weather. Check the soil moisture before watering – it should feel slightly moist to the touch. Avoid overwatering, as this can lead to root rot. I’ve found that a good rule of thumb is to water deeply and less frequently, rather than shallowly and more often.
- Fertilizing: Fertilize your plants regularly to provide them with the nutrients they need to thrive. Use a balanced fertilizer that’s appropriate for the types of plants you’re growing.
- Pruning and Deadheading: Prune your plants as needed to encourage new growth and remove any dead or dying leaves or flowers. Deadheading spent flowers will also help prolong the blooming period.
- Pest and Disease Control: Keep an eye out for pests and diseases. If you notice any problems, take action quickly to prevent them from spreading. There are many organic pest control and disease management options available.
- Seasonal Care: Adjust your watering and fertilizing schedule as needed throughout the growing season. You may also need to protect your plants from frost or extreme heat.
Gardening is a continuous learning process. Don’t be afraid to experiment and try new things. The most important thing is to have fun and enjoy the process of creating a beautiful and thriving garden.
Creative Ideas for Heart-Shaped Garden Planters

So, you’ve built your heart-shaped garden planter, you’ve chosen your plants, and you’re ready to add that extra touch of magic. This is where your creativity can truly take center stage! Think of your heart-shaped planter as a blank canvas, waiting for your unique artistic expression. I’ve discovered that personalizing my garden projects is one of the most rewarding aspects of gardening. It’s a way to infuse my own style and create something truly special.
Beyond the Basics: Unleashing Your Inner Artist
While the basic heart shape is beautiful in its simplicity, there are countless ways to personalize your planter and make it a one-of-a-kind creation. Let’s explore some ideas to spark your imagination:
Material Magic:
- Wood Variations: Don’t limit yourself to just one type of wood. Experiment with different wood finishes – a weathered, rustic look, a sleek, polished finish, or even a combination of different wood types. I’ve seen some stunning planters created by combining light and dark woods to create contrasting patterns.
- Metal Mania: Consider incorporating metal elements into your design. A metal frame around the heart shape, or even metal accents like decorative nails or hinges, can add an industrial chic vibe. I’ve even seen heart-shaped planters made entirely of recycled metal, which adds a unique and eco-friendly touch.
- Terracotta Treasures: Terracotta pots are a classic choice for gardening, and they can also be used to create a heart-shaped planter. You can arrange several smaller terracotta pots in a heart shape, or even break larger pots and use the pieces to create a mosaic-like heart.
- Recycled Wonders: Get creative with recycled materials! Old pallets, reclaimed wood, even discarded plastic containers can be transformed into beautiful heart-shaped planters. This is a fantastic way to reduce waste and give new life to old materials.
Decorative Details:
- Paint Power: Painting your heart-shaped planter is a fantastic way to add a pop of color and personality. You can choose a color that complements your garden or create a bold statement piece with a vibrant hue. Consider using stencils to add patterns or designs.
- Stain Sensations: Staining your planter can highlight the natural wood grain and add a touch of warmth and richness. There are a variety of wood stains available, from light, natural tones to deep, rich shades.
- Mosaic Marvels: Create a mosaic design on your planter using tiles, broken pottery, or even colorful glass pieces. This is a beautiful way to add texture and visual interest.
- Personalized Touches: Add personalized touches to your planter with hand-painted designs, stencils of your initials, or even small plaques with inspirational quotes or plant names.
Thematic Gardens:
- Herb Haven: Create a heart-shaped herb garden with your favorite culinary herbs. Imagine the fragrant aroma wafting through your garden – it’s a sensory delight!
- Succulent Showcase: Succulents are incredibly versatile and come in a wide variety of shapes, colors, and textures. A heart-shaped succulent garden is a stunning and low-maintenance addition to any garden.
- Flower Fantasy: Fill your heart-shaped planter with your favorite flowers! Choose flowers that complement the style of your planter and the overall aesthetic of your garden.
- Cottage Charm: Create a charming cottage garden in your heart-shaped planter with a mix of flowers, herbs, and trailing vines.
Beyond the Planter:
- Location, Location, Location: Think about where you’ll place your heart-shaped planter. Will it be a focal point in your garden? A subtle accent? Or a hidden gem? The location will influence the size and style of your planter.
- Adding Accessories: Consider adding accessories to your planter, such as small garden gnomes, decorative stones, or even a small birdhouse. These little touches can add whimsy and personality to your garden.
Remember, the possibilities are endless! Don’t be afraid to experiment, try new things, and let your creativity guide you. The most important thing is to have fun and create a heart-shaped garden planter that you truly love.
Frequently Asked Questions (FAQs)
I’ve gathered some of the most common questions I get asked about building and caring for heart-shaped garden planters. I remember when I first started my gardening journey, I had a million questions! It’s completely normal to feel a bit overwhelmed, especially when trying a new project. So, I hope these FAQs provide you with the answers and reassurance you need to confidently embark on your heart-shaped planter adventure.
How do I choose the right size for my heart-shaped garden planter?
This is a great question, and the answer really depends on a few key factors:
- Available Space: First, consider where you plan to place your planter. Measure the space and make sure the planter will fit comfortably without feeling cramped. I’ve learned the hard way that a planter that’s too large can overwhelm a small space, while one that’s too small can get lost in a larger garden.
- Plant Size and Type: Think about the types of plants you want to grow. Different plants have different root systems and growth habits. Small succulents will thrive in a smaller planter, while larger flowering plants or vegetables will need more room to spread their roots. I always research the mature size of the plants I choose to ensure they’ll have enough space to grow.
- Aesthetic Preferences: Ultimately, the size of your planter is also a matter of personal preference. Do you want a large, statement piece that commands attention? Or a smaller, more subtle planter that blends in with its surroundings? I’ve found that sketching out different sizes and visualizing them in my garden helps me make the best decision.
What type of wood is best for a heart-shaped garden planter?
The type of wood you choose will depend on whether your planter will be used indoors or outdoors:
- Outdoor Planters: For outdoor use, you need a wood that can withstand the elements. Cedar, redwood, and treated pine are excellent choices, as they are naturally resistant to rot and decay. These woods also have a beautiful natural grain that adds to the charm of your planter. I’ve found that cedar has a particularly lovely aroma that adds to the sensory experience of my garden.
- Indoor Planters: For indoor use, you have more options. You can still use cedar, redwood, or treated pine, but you can also consider other types of wood, such as pallet wood, plywood, or even reclaimed wood. Pallet wood is a great option for a rustic look, and reclaimed wood adds a unique character to your finished piece. Just make sure the wood is clean and free of any harmful chemicals.
How do I ensure proper drainage for my heart-shaped garden planter?
Proper drainage is crucial for preventing root rot and ensuring the health of your plants. Here are a few tips:
- Drill Drainage Holes: Drill several small holes in the bottom of the planter. I recommend using a drill bit that’s slightly smaller than the diameter of the drainage holes.
- Add a Drainage Layer: You can also add a layer of gravel or pebbles to the bottom of the planter to improve drainage. This creates a space for excess water to collect, preventing the soil from becoming waterlogged.
- Use Well-Draining Soil: Choose a potting soil that’s specifically designed for container gardening. These soils are typically lighter and more porous than garden soil, which helps improve drainage.
What kind of plants are suitable for a heart-shaped garden planter?
The best plants for your heart-shaped garden planter will depend on the size of the planter, its location, and your personal preferences. Here are a few ideas:
- Succulents: Succulents are a great choice for heart-shaped planters, as they are drought-tolerant and come in a wide variety of shapes, colors, and textures.
- Herbs: A heart-shaped herb garden is not only beautiful but also practical! You can grow your favorite culinary herbs right outside your kitchen door.
- Flowers: Add a pop of color to your garden with flowering plants. Choose flowers that complement the style of your heart-shaped planter and the overall aesthetic of your garden.
- Small Vegetables: You can even grow small vegetables in a heart-shaped planter! Consider compact varieties of tomatoes, peppers, or lettuce.
How do I care for my heart-shaped garden planter and the plants inside?
Caring for your heart-shaped garden planter is an ongoing process, but it’s also a rewarding one! Here are some essential tips:
- Watering: Water your plants regularly, especially during hot, dry weather. Check the soil moisture before watering – it should feel slightly moist to the touch. Avoid overwatering, as this can lead to root rot.
- Fertilizing: Fertilize your plants regularly to provide them with the nutrients they need to thrive. Use a balanced fertilizer that’s appropriate for the types of plants you’re growing.
- Pruning and Deadheading: Prune your plants as needed to encourage new growth and remove any dead or dying leaves or flowers. Deadheading spent flowers will also help prolong the blooming period.
- Pest and Disease Control: Keep an eye out for pests and diseases. If you notice any problems, take action quickly to prevent them from spreading.
How can I make my heart-shaped garden planter more unique and personalized?
This is where your creativity can truly shine! There are countless ways to personalize your heart-shaped garden planter. Consider painting or staining it, adding decorative details, or even creating a themed garden.
Where can I find inspiration for heart-shaped garden planter designs?
Online platforms like Pinterest and Instagram are great resources for finding creative and inspiring designs for heart-shaped garden planters. You can also find ideas in gardening magazines and books.