
Why are plant leaves turning yellow in an Australian garden? Check 3 things first: where the yellow sits on the plant, whether the leaf feels soft or crisp, and whether the soil feels wet or dry. Those 3 checks split 11 causes into one likely fix, and the rest of this page walks each cause in turn.
I have learned that the finger test in the soil settles more yellow-leaf cases than any fertilizer.
Work from the top when the yellow appears. Start with the pattern, then the soil, then the fix. Skip the fertilizer until the pattern points to hunger.
Yellow leaves mean chlorophyll loss. Chlorophyll, the pigment behind the green color, drives photosynthesis, and its loss is called chlorosis. A plant loses chlorophyll when roots fail, when water runs short or long, when one nutrient runs out, when light runs low, or when pests or disease drain the leaf. Pattern names the group. Soil and season name the cause. The fix follows the cause. Feeding the wrong cause makes the yellow worse.
1. Fix Overwatering to Restore Air to Waterlogged Roots
Overwatering turns leaves yellow because roots drown in soil with no air, and the fix starts with stopping water until the soil dries.
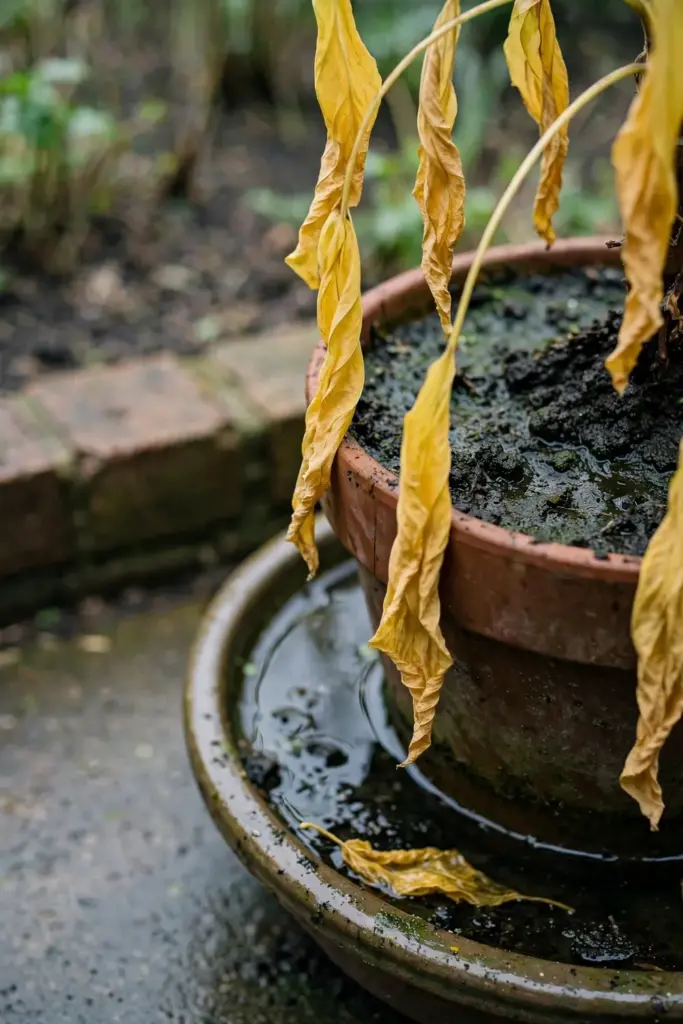
Wet roots cannot breathe. Soil holds air in the gaps between crumbs, and water fills those gaps after heavy watering or rain. Roots in airless soil stop taking up water and nutrients, even while the soil stays wet. Leaves turn a soft, limp yellow and drop. The soil surface may grow algae, and the mix may smell sour. A pot with no drainage hole, a saucer that stays full, or a clay bed after rain all create the same airless root zone.
Stop watering at once. Tip out any water that sits in the saucer. Lift the pot to check the base, and move the pot where air moves around it. Let the top layer dry before you water again. Check the drainage holes for blockage, and clear soil or roots that plug them. A plant in a bed needs a different move. Stop the hose, fork the surface lightly to break a sealed crust, and let the bed drain. Water only when the top layer dries.
Skipping this fix kills roots. Roots that stay wet turn dark and soft, and the plant wilts in wet soil because dead roots move no water. A plant with dead roots cannot recover from feed. A plant with living roots recovers once air returns. Check the stem base for softness. A firm base with new growth at the tips means the plant still holds living roots. A soft base with no new growth means the damage runs deep, and the plant may not recover.
2. Water Deeply to Reverse Drought Yellowing
Underwatering turns leaves yellow because dry roots cannot move water to the leaf, and deep watering restores the flow.
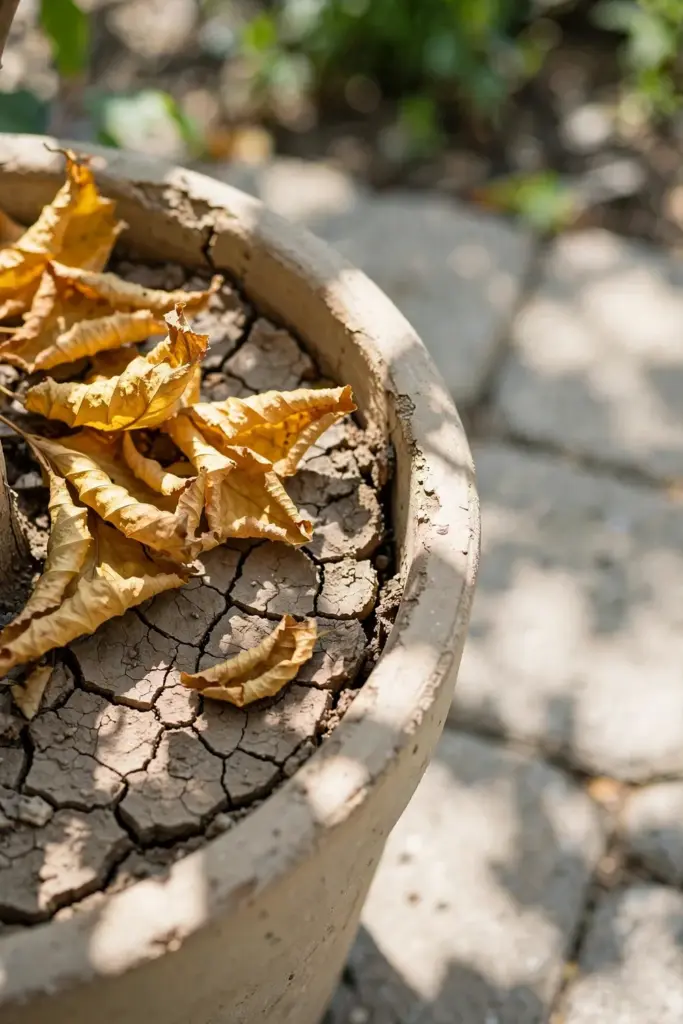
Dry soil pulls water from the leaf before it pulls water from the hose. Leaves turn yellow from the edges inward, feel dry and crisp, and drop. The soil pulls away from the pot edge, and the pot feels light in the hand. A plant in a bed shows the same signs after a hot, dry spell, with the outer leaves yellowing first and the inner leaves holding green longer. Wind dries pots faster than beds, and a pot on a hot wall dries faster than a pot on grass.
Soak slowly until water runs from the base. Water at the soil, not over the leaves, so the water reaches the roots. Let the pot drain, then check the soil with a finger. The top layer should feel damp through, not wet on top and dry below. Repeat only after the top layer dries again. A fast pour runs down the pot edge and leaves the center dry, so a slow soak beats a fast pour. Seedlings dry faster than established plants, so how often to water seedlings sets a baseline for the first weeks.
Mulch holds moisture in a bed. Spread mulch over the root zone and keep it clear of the stem. A mulch layer slows evaporation and keeps the soil temperature steady. A plant that wilts each afternoon in a pot may need a larger pot, a cooler spot, or a shade screen in the hottest part of the day. Move the pot before you change the feed. A dry plant fed with fertilizer takes up salts with no water to carry them, and the salt adds a second stress on top of the drought.
3. Feed Nitrogen to Green Old Leaves First
Nitrogen deficiency turns old lower leaves yellow first because nitrogen moves from old leaves to new growth, and a balanced feed restores the color.
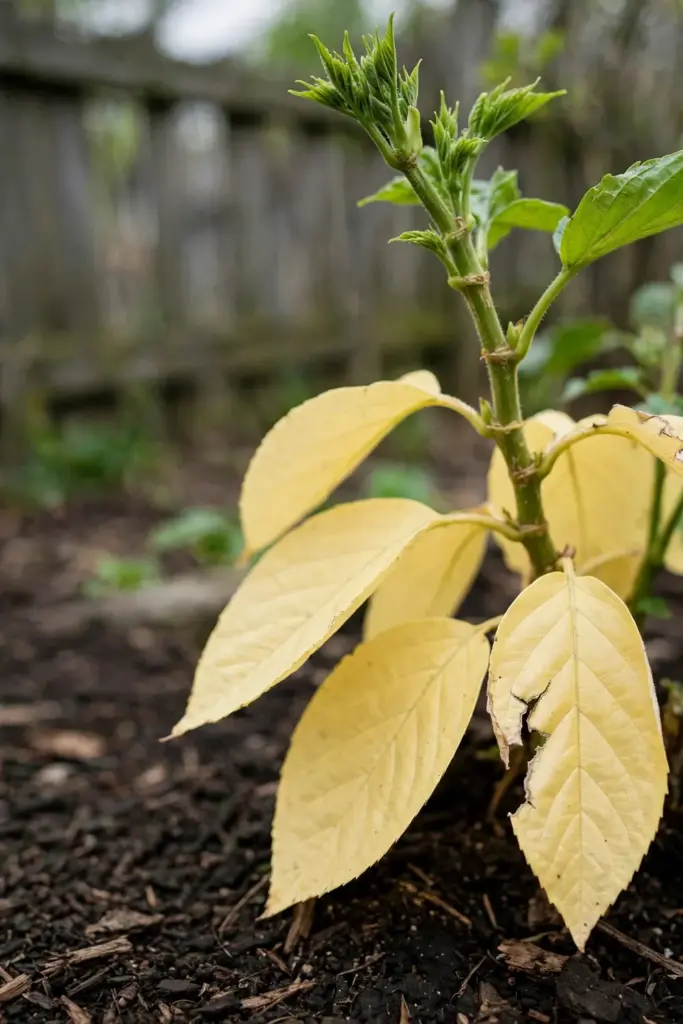
Nitrogen sits inside chlorophyll and inside the proteins that build new leaves. A plant short of nitrogen pulls nitrogen from old leaves and sends it to the growing tips. Old leaves turn a pale, uniform yellow while new leaves stay greener. Growth slows, and the whole plant looks pale. A plant in sandy soil shows this pattern often, because sandy soil drains fast and carries nitrogen away with the water. A plant in a pot shows it too, because each watering washes a little nitrogen from a small volume of mix.
Read the pattern before you feed. Uniform yellow on old lower leaves points to nitrogen. Yellow between green veins on new leaves points elsewhere. Yellow on one side of the plant points to light or damage, not to hunger. The Cornell leaf-symptom guide lists nitrogen among the mobile nutrients that show first on older leaves. A mobile nutrient moves inside the plant, so the plant can strip old leaves to feed new growth. That movement creates the old-leaf-first pattern.
Feed with a balanced fertilizer at the label rate. Water the plant first, then feed, so the roots take up the feed in damp soil. A dry plant fed with fertilizer takes up salts with no water to dilute them. Repeat feeding only when new growth shows a response. Old yellow leaves often stay yellow even after a feed, because the plant already stripped them. Judge the feed by new leaves, not by old leaves. New leaves that open green mean the feed worked. New leaves that open yellow mean the cause sits elsewhere, and the next cause names it.
4. Correct Iron Deficiency to Green New Leaves Between Veins
Iron deficiency turns new leaves yellow between green veins because iron stays put in old leaves and cannot reach new growth, and the fix starts with soil pH, not with iron alone.
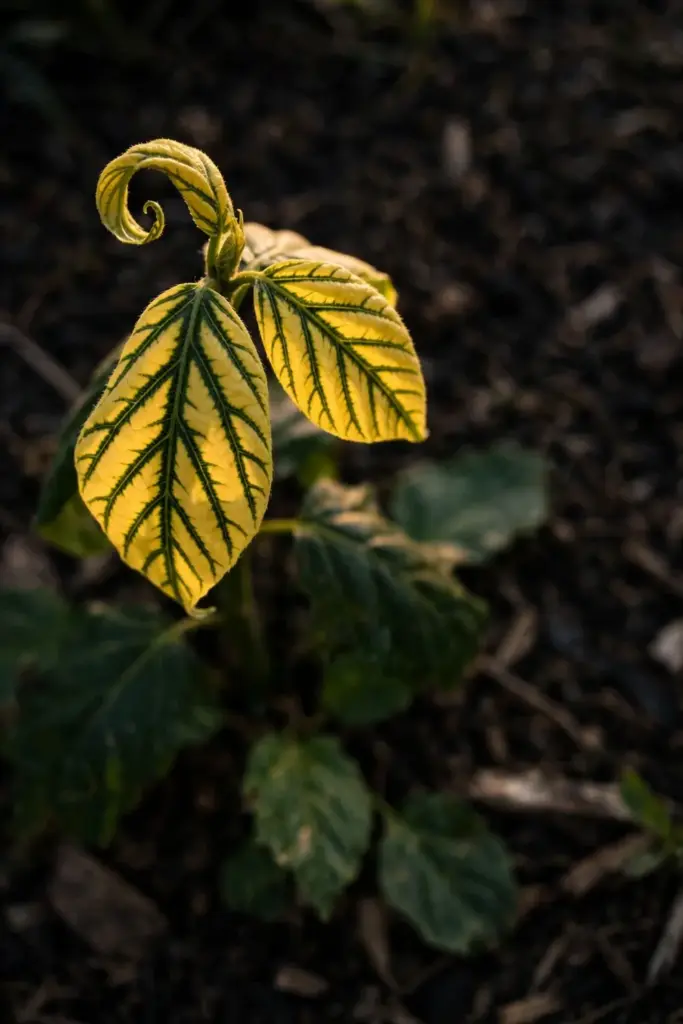
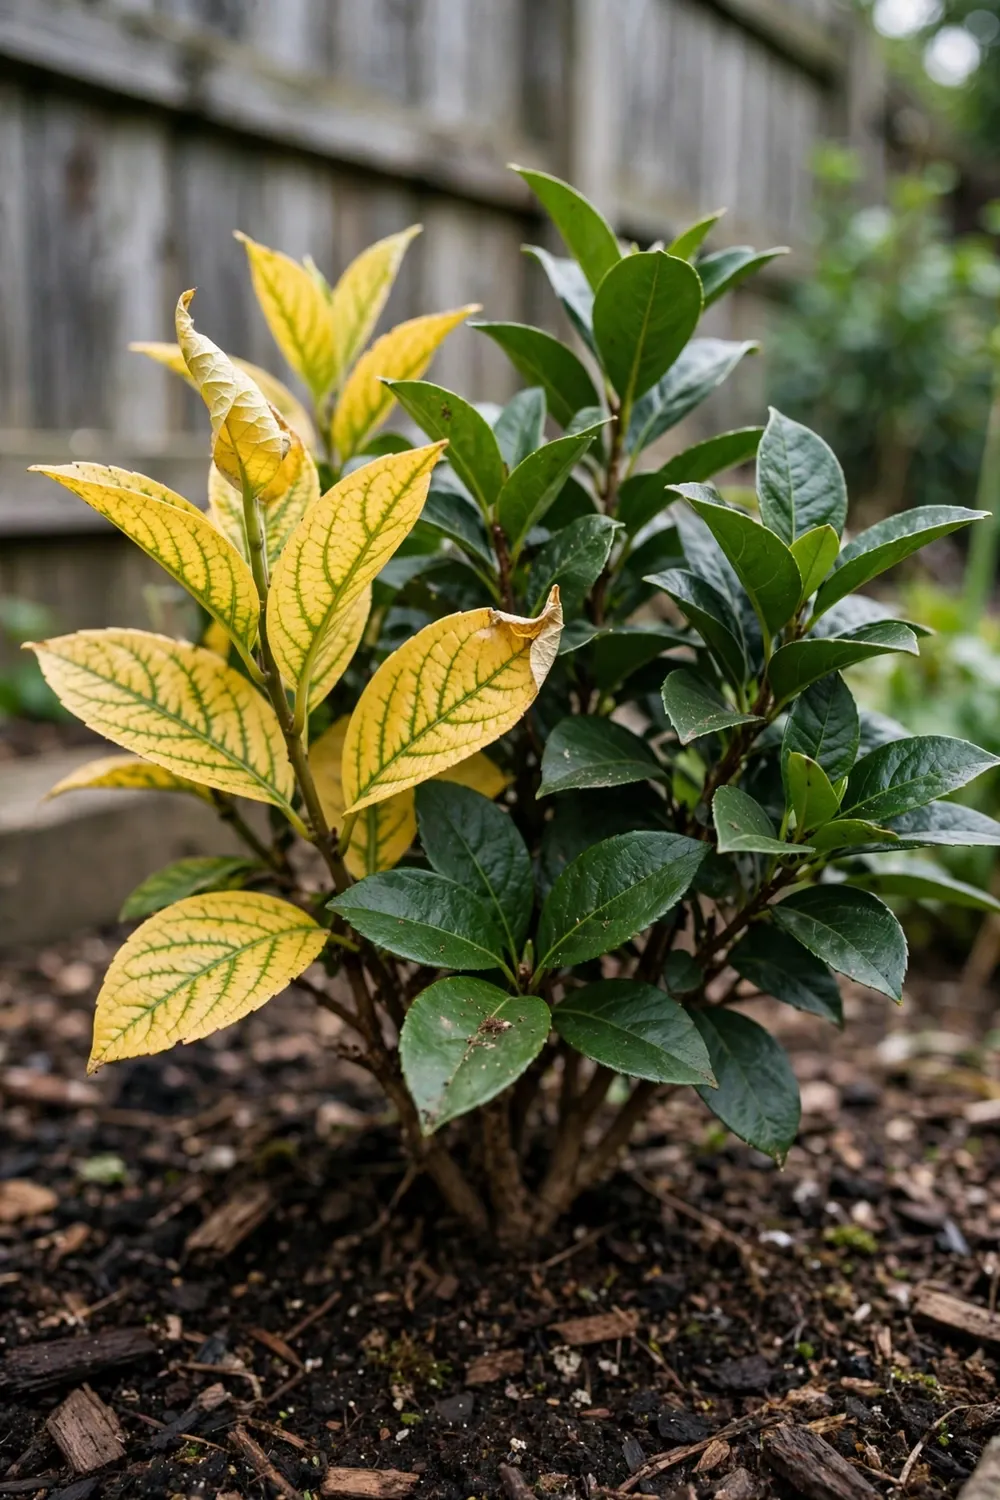
Iron drives chlorophyll formation in new leaves. Iron cannot move from old leaves to new leaves, so new leaves yellow first while old leaves stay green. The veins stay green and the tissue between the veins turns yellow, a pattern called interveinal chlorosis. The contrast looks sharp, with green veins on a yellow leaf. The pattern starts at the shoot tips and spreads down the plant when the shortage runs on.
Alkaline soil locks iron away. Soil may hold enough iron, and the plant still starves, because high pH turns iron into a form roots cannot take up. The LSU AgCenter iron chlorosis notes place iron chlorosis on acid-loving plants when soil pH rises above 6.5, and pH 7.0 marks neutral. A plant fed with iron in alkaline soil greens for a short spell, then yellows again, because the soil locks the new iron too. Drainage matters here as well. Waterlogged soil blocks iron uptake, so an overwatered plant can show iron chlorosis with no iron shortage in the soil.
Acid-Loving Plants Show Iron Deficiency First
Acid-loving plants show iron chlorosis first because they evolved in acid soil with free iron. Azalea, camellia, gardenia, blueberry, and citrus all sit in this group. A garden bed limed for vegetables turns hostile to these plants, because lime raises pH and locks iron. A pot filled with alkaline tap water over a season drifts the same way. Test the soil before you feed iron. A test that reads alkaline points to pH as the lock. A test that reads acid points elsewhere, and iron feed alone may still miss the cause.
Native Plants in Alkaline Soil Need a Different Fix
Native plants in alkaline soil need a different fix because many natives evolved on acid or neutral soils with low phosphorus. A native blend feed suits these plants, and a general high-phosphorus feed can harm them. A banksia or grevillea with yellow new leaves in a limed bed may suffer phosphorus harm on top of iron lockout. Test first, then feed a native blend at the label rate. Move the plant only when the site stays wrong after the test. A plant in the wrong soil fights the soil all season, and no feed wins that fight.
5. Correct Magnesium Deficiency to Green Old Leaves Between Veins
Magnesium deficiency turns old leaves yellow between green veins because magnesium moves out of old leaves, and the fix restores magnesium after a soil test.
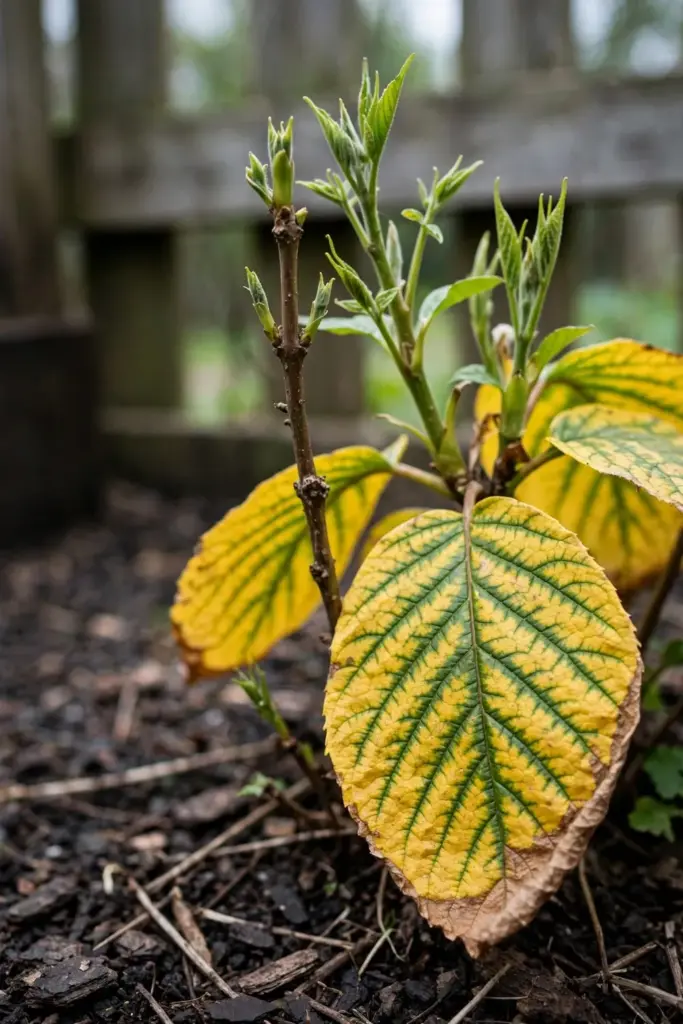
Magnesium sits at the center of the chlorophyll molecule, so a shortage hits color directly. Magnesium moves inside the plant, so the plant strips old leaves to feed new growth. Old leaves show yellow between green veins, with the veins holding green longer than the tissue between them. The pattern looks like iron deficiency, and the location separates them. Iron deficiency starts on new leaves. Magnesium deficiency starts on old leaves. A leaf that yellows between veins on the lower plant points to magnesium. A leaf that yellows between veins on the shoot tips points to iron.
Sandy soil loses magnesium fast. Each watering carries a little magnesium from a sandy bed or a small pot. A plant fed with a high-potassium fertilizer can show magnesium shortage too, because potassium competes with magnesium uptake. A plant in a pot fed one fertilizer all season can drift into the same trap. The University of Arizona nutrient-deficiency guide lists interveinal yellowing among the patterns that separate magnesium, iron, and zinc shortages. Use that separation before you buy a product. A product that fixes iron will not fix magnesium, and a product that fixes magnesium will not fix iron.
Test the soil before you feed magnesium. A test that confirms low magnesium justifies a magnesium product at the label rate. A test that reads normal magnesium points to pH or drainage as the lock, and a magnesium product adds salts with no gain. Apply the product to damp soil, then water it in. Judge the fix by new growth. Old leaves with yellow between veins often stay marked, and new leaves that open green mean the fix worked. New leaves that open yellow between veins mean the cause sits elsewhere, and the pH check below names the next step.
6. Test Soil pH to Unlock Nutrients That Alkaline or Acid Soil Hides
Soil pH locks nutrients out when the pH sits outside the band the plant tolerates, and a soil test names the lock before you feed.
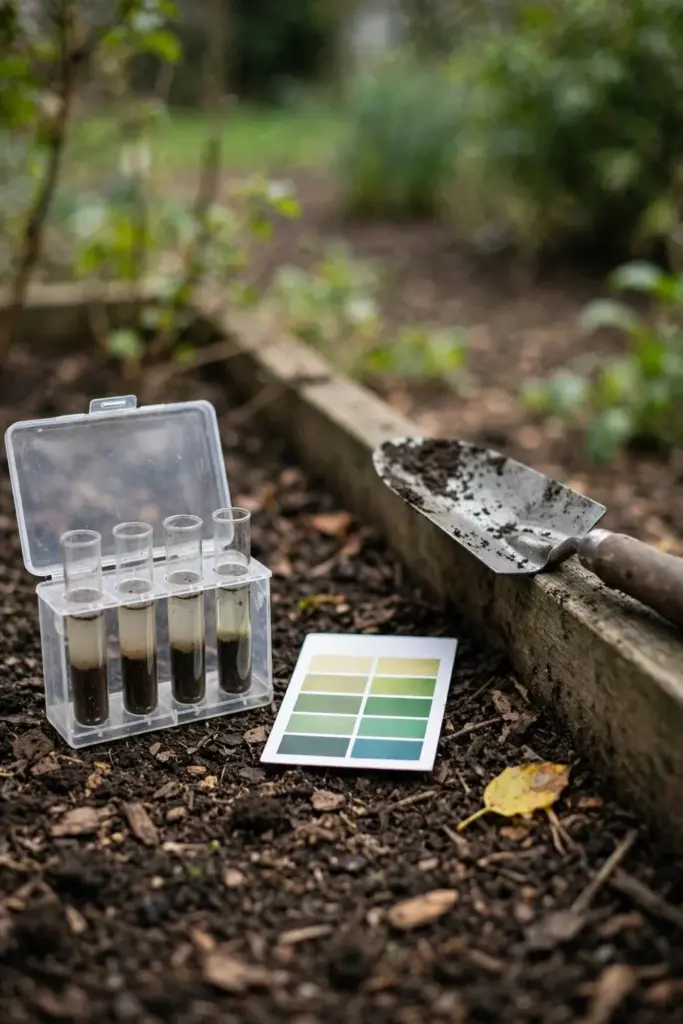
Soil pH measures how acid or alkaline the soil sits. A low pH means acid soil. A high pH means alkaline soil. Nutrient availability shifts with pH, so each nutrient has a band where roots take it up freely. Iron, manganese, and zinc lock in alkaline soil. Phosphorus, calcium, and magnesium lock in strongly acid soil. Aluminum turns toxic in strongly acid soil and damages roots. A plant fed in the wrong pH takes up little of the feed, and the feed salts build up in the soil. The NSW soil pH guide shows nutrient availability shifting with pH, with strongly acid and strongly alkaline soils each locking a different set.
Australian soils span the full pH range. Coastal sandy soils often sit acid. Inland clay soils often sit alkaline. A bed built from brought-in soil can sit far from the local soil. A pot filled with one bag of mix can drift with the water used on it. Hard tap water pushes pH up over a season. Pine bark mulch and compost push pH down slowly. A soil test removes the guess. A test kit from a garden center gives a reading in minutes, and a lab test gives a reading plus nutrient levels. Long-term pH work sits inside building soil health, not inside one feed.
Raise pH with lime when the test reads too acid for the plant. Lower pH with sulfur when the test reads too alkaline for the plant. Follow the test advice and the product label. Lime and sulfur act slowly, so retest before you repeat the dose. A plant moved to the right pH greens on its own, and a plant fed in the wrong pH yellows again after each feed. Match the plant to the soil first. Acid-loving plants belong in acid soil. Alkaline-tolerant plants belong in alkaline soil. A plant in the wrong pH fights the soil all season.
7. Repair Roots, Drainage, and Compaction to Restore Uptake
Damaged roots turn leaves yellow because broken roots cannot take up water or nutrients, and the fix restores drainage and air around the root zone.
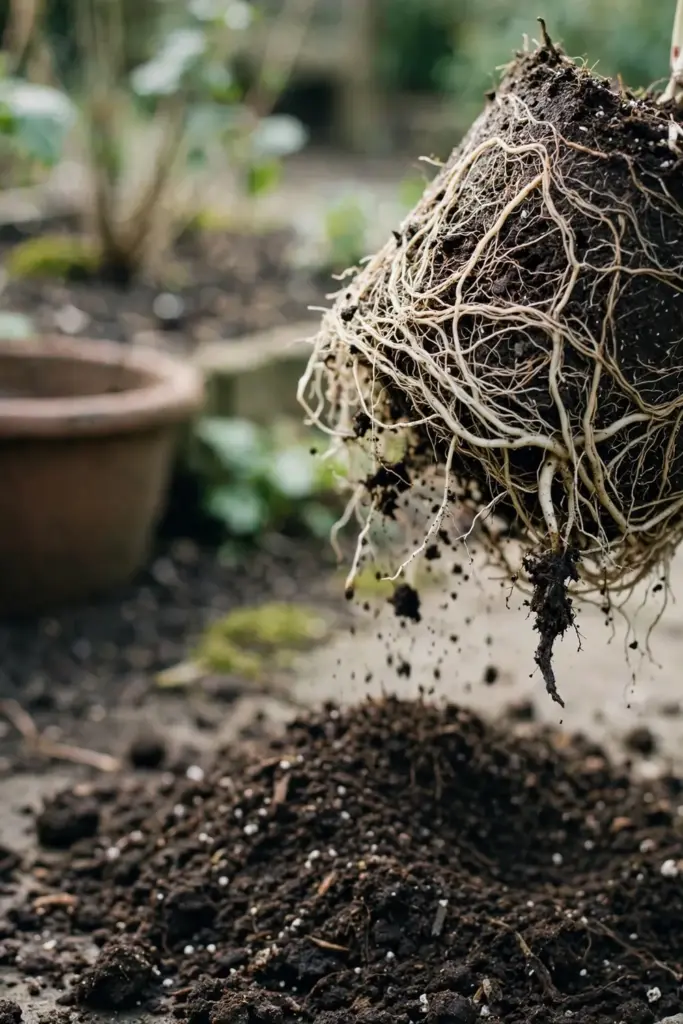
Roots feed the leaf. A root system with dead tips, rot, or girdling cannot move water, even in wet soil. Leaves yellow while the soil stays damp, and the plant wilts in the afternoon. A pot with roots circling the base in a tight mat shows the same failure. A bed with compacted soil shows it too, because compacted soil holds no air and sheds water off the surface. A trench dug through the root zone, a new path laid over roots, or a transplant handled roughly all break roots.
Read the roots before you feed. Slide the plant from its pot and look at the root ball. White or pale roots mean living roots. Dark, soft, or foul roots mean dead roots. A root ball with a dense mat at the base means the pot ran small. A bed with a hard crust and puddles means compaction. A stem base that feels soft means rot has reached the crown, and the plant may not recover. Cut dead roots back to firm tissue with clean secateurs. Repot a rootbound plant into a larger pot with fresh mix. Loosen a compacted bed with a fork, working around the roots, and add compost to open the structure.
Keep mulch clear of the stem. Mulch piled against the stem holds moisture on the bark and rots the crown. A clear ring around the stem lets air reach the bark. Water a repotted plant lightly until new growth shows, because a pruned root system takes up less water than a full one. Feed only after new growth opens, because feed on a pruned root system adds salts with no uptake. A plant with restored roots greens from the tips down, and new leaves open green when the root zone works again.
8. Flush Salt Build-Up to Stop Fertilizer Burn in Pots and Beds
Salt build-up turns leaf tips yellow because excess fertilizer salts pull water from roots, and flushing the soil with plain water removes the excess.
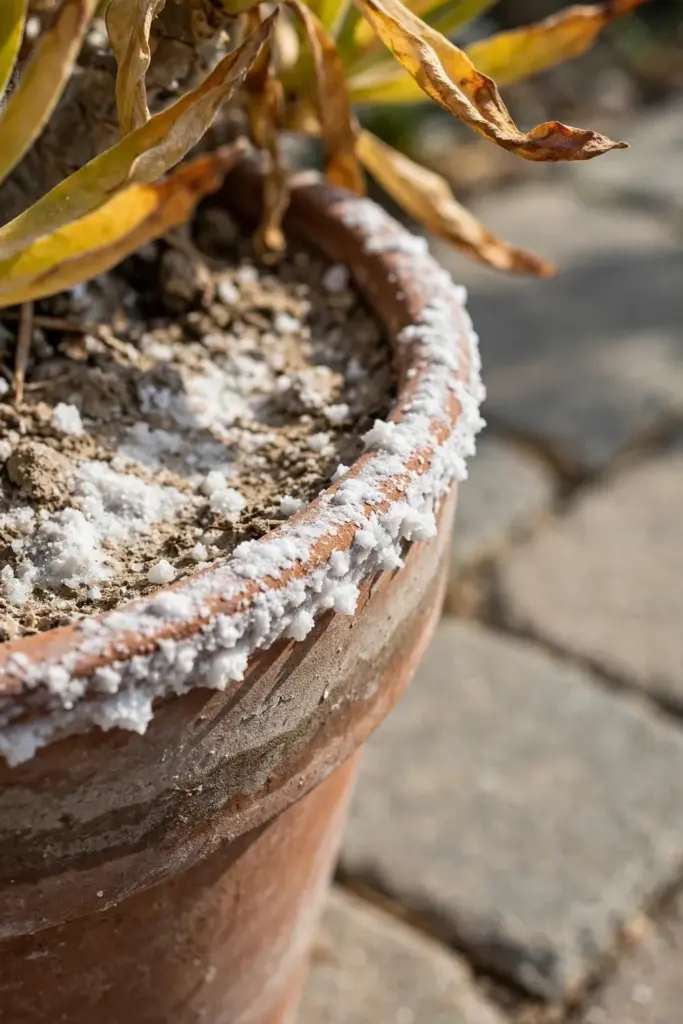
Fertilizer salts feed the plant in small doses and burn it in large doses. Each feed leaves salts behind. Hard tap water leaves salts behind too. A pot with no drainage holds every salt. A bed under a roof line collects salts where rain never washes them. Leaves yellow first at the tips and edges, then brown and crisp. A white crust on the soil surface or on the pot rim marks the same build-up. A plant fed often with no flush shows this pattern even when the soil test reads rich.
Flush with plain water. Water slowly until water runs freely from the base, then let the pot drain. Repeat the flush once more after the pot drains. Skip feed until new growth greens. A plant in a bed needs a long, slow soak with plain water, not a fast blast that runs off the surface. A pot with a heavy crust needs fresh mix. Tip the plant out, shake off the old mix, trim dead roots, and repot into fresh mix. A fresh mix resets the salt load, so pick the best potting soil gives a baseline for drainage and structure.
| Salt Sign | Where You See It | First Fix |
|---|---|---|
| Yellow and brown leaf tips | Old and new leaves, tips first | Flush with plain water, skip feed |
| White crust on soil or pot rim | Soil surface, pot rim, saucer | Flush, then repot with fresh mix when crust persists |
| Yellow after a heavy feed | Whole plant, days after feeding | Flush, then feed at the label rate only after new growth |
Feed at the label rate after the flush. A label rate feeds the plant without stacking salts. A double rate does not double growth, and it doubles the salt load. A plant fed in dry soil takes up salts with no water to dilute them, so water first, then feed. A plant in a small pot needs a flush more often than a plant in a bed, because a small volume of mix holds salts faster. Judge the flush by new growth. New leaves that open green mean the salts cleared. New leaves with yellow tips mean salts remain, and a repot with fresh mix comes next.
9. Balance Light to Stop Shade Yellowing and Sun Scorch
Light extremes turn leaves yellow because low light starves chlorophyll and harsh sun scorches leaf tissue, and the fix moves the plant toward bright, indirect light.
Low light yellows the whole plant slowly. Leaves turn pale yellow, growth stalls, and lower leaves drop. A plant set far from a window, under a dense tree, or behind a tall fence shows this pattern. The plant stretches toward the light, with long stems and small leaves. A plant moved indoors for winter shows it too, because indoor light runs far weaker than outdoor light. Move the plant toward brighter light in stages. A sudden move from shade to full sun scorches leaves that grew in shade, so shift the plant over days, not in one move.
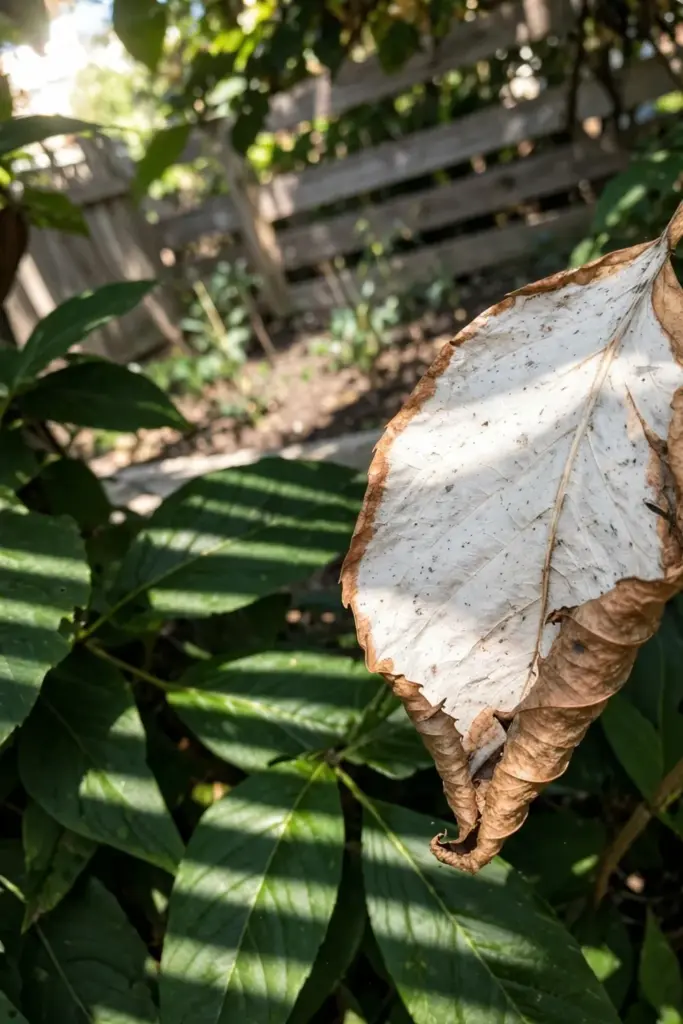
Harsh sun scorches leaves fast. Bleached patches appear on the exposed side, with crisp brown edges around the bleached tissue. A pot on a reflective wall, on pale pavers, or on a metal bench heats fast, and the reflected heat burns leaves that would cope in a bed. A cold snap yellows leaves too, with a sudden wash of yellow after a frost night. A plant caught by frost drops leaves to protect the crown, and new growth returns when warmth returns. Cover a frost-tender plant before a cold night, and move a scorched pot to morning sun with afternoon shade. A shade screen stops scorch without starving the plant of light.
10. Control Pests and Disease to Stop Sap Loss and Leaf Damage
Pests and disease turn leaves yellow because sap loss and leaf damage cut chlorophyll, and the fix starts with identification before any spray.
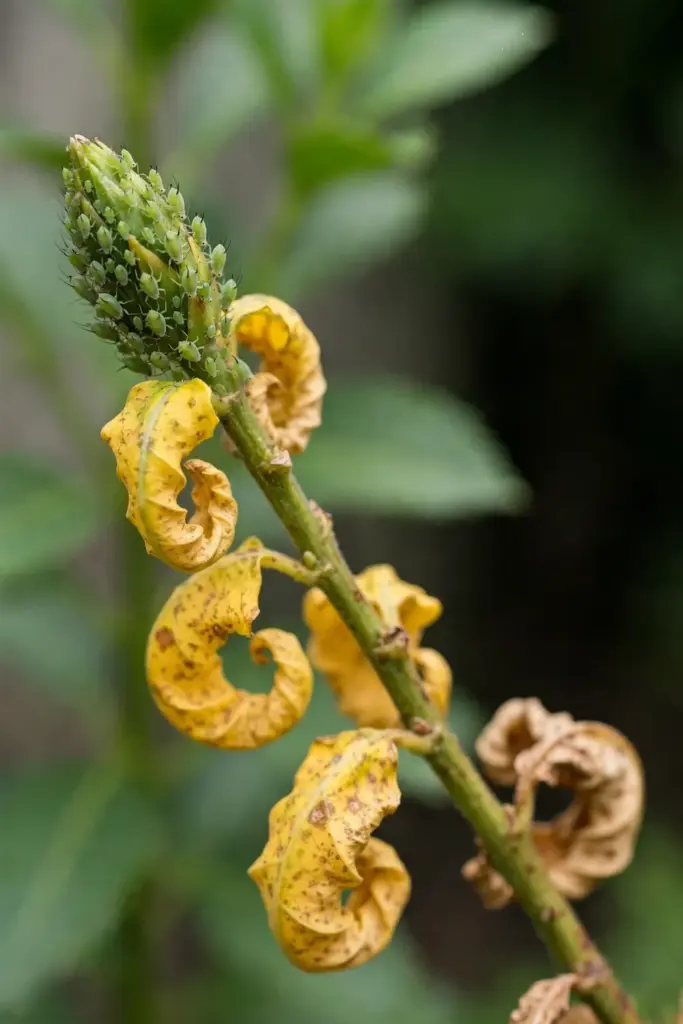
A pest drains the leaf. A disease blocks the leaf. Both yellow the leaf, and each needs a different fix. A spray that kills aphids will not cure a virus, and a feed that greens a hungry plant will not stop a mite. Read the leaf before you reach for a product. Look under the leaf, along the stem, and at the soil. Pests hide under leaves. Disease shows as spots, wilting, or a pattern that follows the veins.
Sap-Sucking Insects Drain Leaves From Below
Sap-sucking insects drain leaves from below because they feed on the sap that carries sugars and nutrients. Aphids cluster on shoot tips and under leaves, and whiteflies rise in a cloud when the plant shakes. Spider mites leave fine webbing and a speckled yellow pattern. Scale insects sit as hard bumps along stems. Mealybugs leave white waxy tufts in leaf joints. Leaves yellow in patches where feeding runs heaviest, and sticky residue coats the leaves below the colony. A strong jet of water knocks aphids and mites off the plant. Insecticidal soap at the label rate covers the insects it touches. Beneficial insects eat aphids and mites, so organic pest control sets the frame for a spray that spares the predators. Repeat the wash after a few days, because eggs hatch after the first wash and the second wash catches the hatch.
Fungal and Viral Yellowing Needs Removal, Not Feed
Fungal and viral yellowing needs removal, not feed, because feed cannot cure an infection. Fungal leaf spots start as yellow patches that brown in the center, often after wet weather with poor air flow. Powdery mildew coats leaves with a white film and yellows the tissue below. Viral yellowing shows as a mosaic pattern, with yellow and green patches in a marbled leaf, often with twisted growth. A virus has no cure, and an infected plant spreads the virus through sap-sucking insects. Remove badly infected leaves, and remove a virus-infected plant from the bed. Improve air flow, space plants so leaves dry fast, and water at the soil, not over the leaves. Clean secateurs between cuts, because sap on the blades carries infection to the next plant.
11. Accept Natural Aging and Transplant Shock Without Overfeeding
Natural aging and transplant shock turn a few lower leaves yellow without a fix, and the right move is to remove the spent leaves and leave the feed alone.
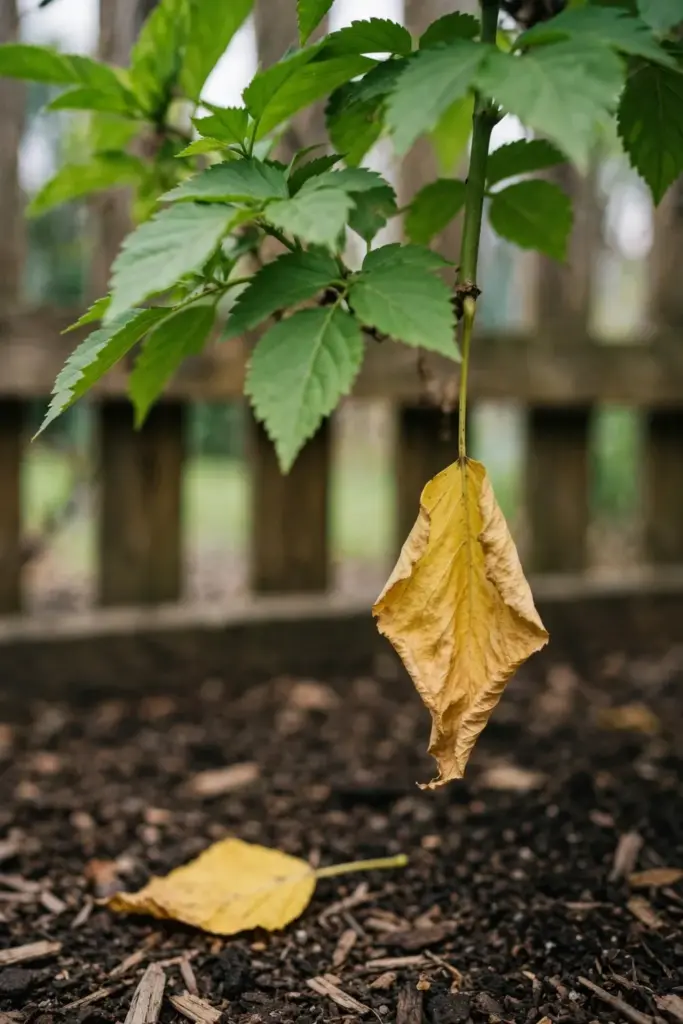
Old leaves retire. A healthy plant drops one or two lower leaves as it grows, with the rest of the plant holding green. The yellow leaf feels soft, then dry, then falls. The plant opens new green leaves at the tips while the old leaf falls. This pattern needs no feed, no spray, and no soil test. Pull the spent leaf gently when it loosens. A leaf that resists a gentle pull still feeds the plant, so leave it until it loosens.
Transplant shock yellows a moved plant for a short spell. Roots broken in the move take up less water, and the plant drops leaves to match the smaller root system. The plant yellows in the first days after a move, then steadies. Water steadily, shade the plant in the hottest part of the day, and wait for new growth. Feed makes shock worse, because a pruned root system takes up salts with no water to dilute them. A plant that opens new green leaves has settled. A plant that yellows through the whole canopy after a move needs a root check, and the root repair steps above name the fix.
12. Read the Pattern to Name Why Plant Leaves Turn Yellow
The pattern on the leaf names the cause group, so read where the yellow sits, how it spreads, and what the soil feels like before you pick a fix.
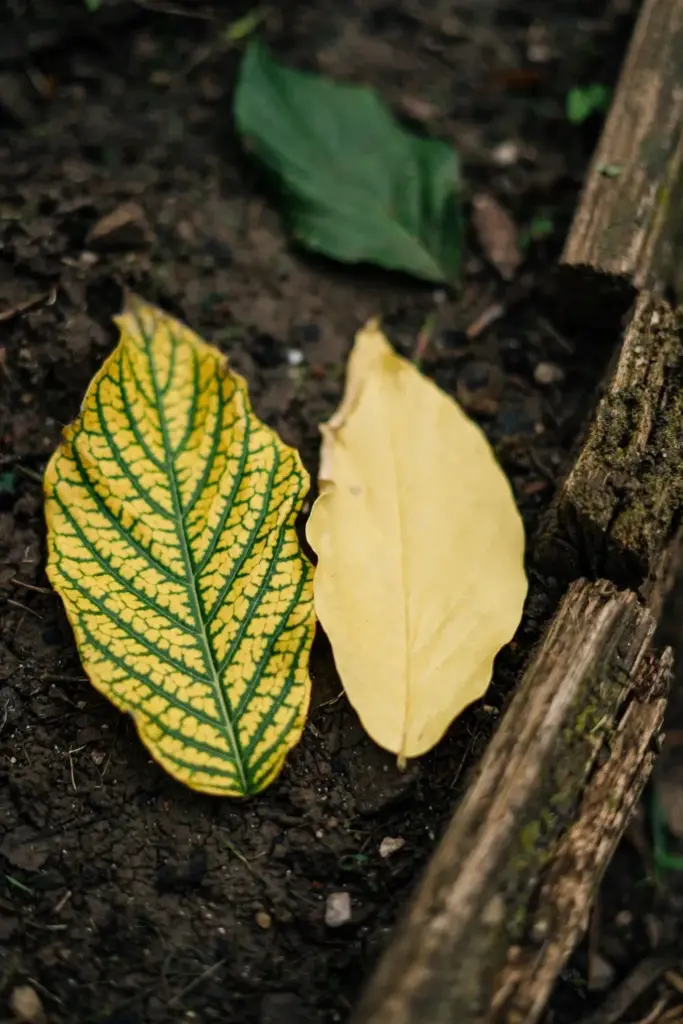
Start with location. Old leaves first points one way. New leaves first points the other way. Whole-leaf yellow points to a different group than yellow between green veins. Tips and edges point to salts, light, or weather. Patches and spots point to pests or disease. One yellow leaf on an otherwise green plant points to aging. A whole canopy turning yellow at once points to roots, water, or a sudden shock. Write down the location before you guess. A note taken at the plant beats a memory formed at the shop.
Feel the leaf and the soil. A soft, limp yellow leaf with wet soil points to overwatering. A dry, crisp yellow leaf with dry soil points to underwatering. White crust on the soil points to salts. Sticky residue under the leaf points to pests. Spots point to disease. The finger test in the soil settles the water question in seconds. The soil test settles the pH and nutrient question in days. A fix picked from the pattern alone risks feeding a plant that needs water, or watering a plant that needs air.
Old Leaves First Points to Mobile Nutrients
Old leaves first points to mobile nutrients because the plant moves mobile nutrients from old leaves to new growth. Nitrogen and magnesium both move this way. Uniform yellow on old leaves points to nitrogen. Yellow between green veins on old leaves points to magnesium. A plant with old-leaf yellowing and slow growth needs a soil test, then a feed at the label rate. A plant with old-leaf yellowing and wet soil needs drainage first, because wet roots cannot take up a feed.
New Leaves First Points to Immobile Nutrients
New leaves first points to immobile nutrients because the plant cannot move immobile nutrients from old leaves to new growth. Iron and zinc both stay put. Yellow between green veins on new leaves points to iron, and the pH test comes first. A plant with new-leaf yellowing in alkaline soil needs pH work before iron feed. A plant with new-leaf yellowing in acid soil needs a different check, and drainage and root damage sit at the top of that list.
| Pattern | Where the Yellow Sits | Most Likely Cause | First Fix |
|---|---|---|---|
| Uniform yellow, soft and limp | Old leaves, whole plant | Overwatering | Stop water, drain, let soil dry |
| Yellow edges, dry and crisp | Old leaves, edges first | Underwatering | Deep soak, mulch, move pot from heat |
| Uniform yellow, pale plant | Old leaves first | Nitrogen deficiency | Soil test, balanced feed at label rate |
| Yellow between green veins | New leaves first | Iron deficiency, alkaline lockout | Test pH, correct pH, then iron |
| Yellow between green veins | Old leaves first | Magnesium deficiency | Soil test, magnesium at label rate |
| Yellow tips, white crust | Leaf tips, soil surface | Salt build-up | Flush with plain water, skip feed |
| Patches, sticky residue, webbing | Patches, under leaves | Pests | Wash, soap at label rate, predators |
| Spots, mosaic, twisted growth | Spots or whole leaf | Disease | Remove infected leaves, improve air |
| One lower leaf, rest green | One old leaf | Natural aging | Remove the spent leaf, no feed |
13. Frequently Asked Questions About Yellow Leaves in Australian Gardens
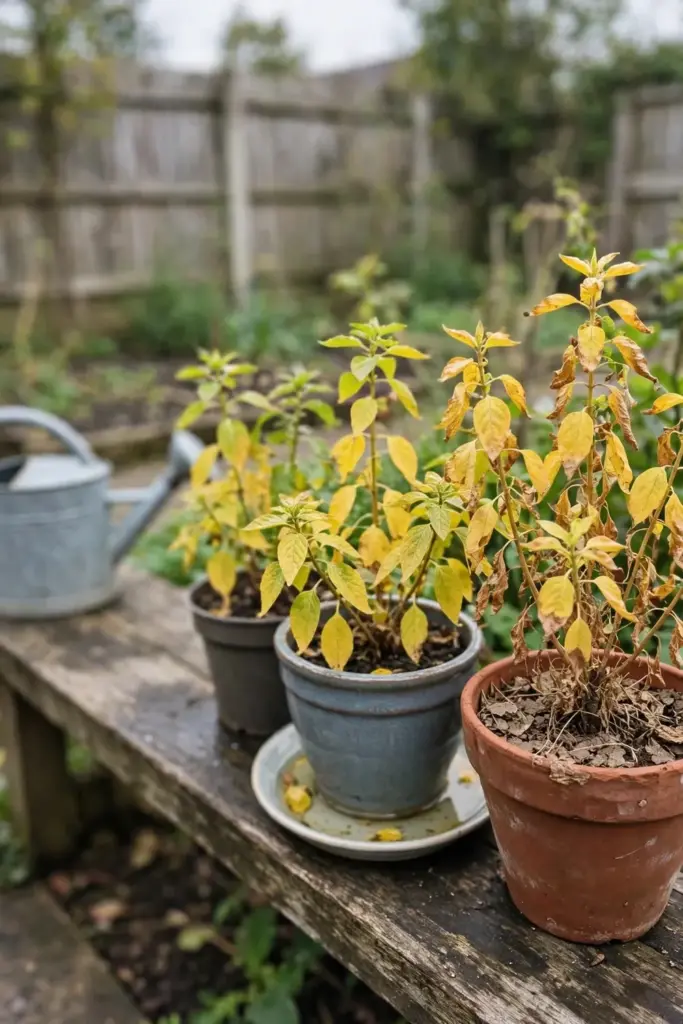
A yellow leaf rarely greens again once chlorophyll has left the tissue. The plant has already stripped that leaf of nutrients, and the leaf cannot rebuild chlorophyll in dead tissue. Judge the fix by new growth, not by old leaves. New leaves that open green mean the fix worked. New leaves that open yellow mean the cause still stands. Remove spent leaves once they loosen.
Remove a yellow leaf once it loosens with a gentle pull, and leave a leaf that still resists. A leaf that resists still feeds the plant a little, while a loose leaf has finished its work. Pull spent leaves from a diseased plant with care, and clean the secateurs after the cut, because sap on the blades carries infection. New growth fills the gaps when the cause is fixed.
Potted plants turn yellow faster than garden plants because a small volume of mix swings fast. A pot dries faster than a bed, waterlogs faster than a bed, and builds salts faster than a bed. A pot with no drainage hole traps every feed. A pot on a hot wall heats the root zone past what a bed reaches. Check the drainage hole, flush salts, and repot when roots circle the base. A larger pot steadies water, salts, and nutrients.
Yellowing does not always mean a nutrient deficiency. Water, roots, pH, light, pests, disease, and aging all yellow leaves with no nutrient shortage in the soil. A plant fed in wet soil stays yellow, because wet roots cannot take up the feed. A plant fed in alkaline soil stays yellow, because pH locks iron away. Read the pattern first, then test the soil, then feed only when the pattern and the test both point to hunger.
Test the soil when the pattern points to nutrients, when a feed has already failed, or when the plant sits in a new bed or a new pot. A test that reads alkaline or acid names the lock before you spend on a product. A test that reads normal nutrients points to water, roots, or light as the cause. Retest after lime or sulfur, because both act slowly and a second dose before the first acts overshoots the mark.
14. Fix the Cause, Then Watch New Growth for the Verdict
Fix the cause first, then judge the plant by new growth, because yellow leaves rarely green again.
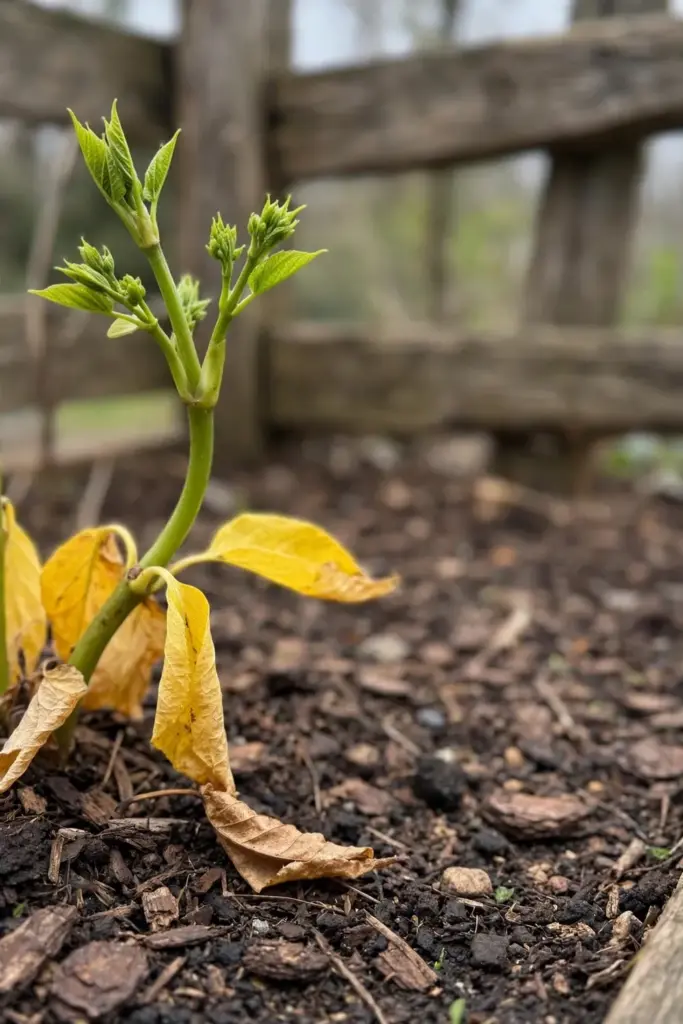
Start with the pattern. Old leaves first, new leaves first, between veins, tips, or patches. Each pattern names a group. Then check the soil with a finger and a test. Wet or dry, acid or alkaline, salty or clean. Then pick one fix and give it time. A plant watered, fed, sprayed, and repotted on the same day hides which fix worked, and the next yellow leaf leaves no trail to follow. One fix at a time keeps the lesson clear.
Watch the shoot tips. New leaves that open green mean the fix worked. New leaves that open yellow mean the cause still stands, and the pattern table names the next check. Keep a short note on the plant, the pattern, the test, and the fix. A note taken at the plant saves a second guess next season, and a garden that records its fixes greens faster than a garden that repeats them.