

Have you ever felt the frustration of trying to grow exotic vegetables, only to be met with disappointing results? The desire for fresh, unique produce is strong, but the lack of clear, detailed guidance can leave you feeling lost and discouraged. You crave the satisfaction of nurturing a plant from tuber to harvest, but the complexities of growing something like konjac can seem daunting. I’ve been there, and I understand. That’s why I’ve compiled this detailed guide, breaking down the process of growing konjac into practical, actionable steps. You’ll learn everything you need to know to cultivate this fascinating vegetable, ensuring a bountiful harvest and the satisfaction of mastering a new gardening skill.
Understanding Konjac: The Basics You Need to Know
Konjac, scientifically known as Amorphophallus konjac, is a fascinating tuberous vegetable that has gained popularity for its unique culinary and dietary applications. You might have encountered it in the form of shirataki noodles or as a key ingredient in various gluten-free and low-calorie dishes. But beyond its culinary uses, understanding the basics of this plant is crucial for successful cultivation.
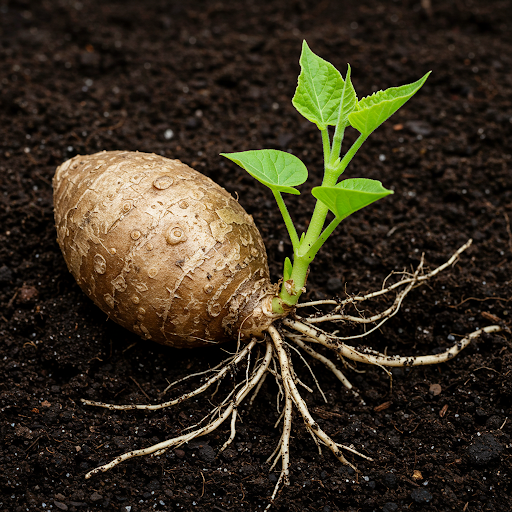
Originally native to Southeast Asia, konjac has been cultivated for centuries in regions like Japan and China. It’s not just a food source; it’s a part of cultural traditions, often used in traditional medicine as well. The plant itself is quite striking. It starts with a large, bulbous tuber, from which a single, large leaf emerges. This leaf, often mottled with green and white patterns, can grow quite large, adding an exotic touch to any garden.
One of the most remarkable aspects of konjac is its nutritional profile. It’s primarily known for its high content of glucomannan, a soluble dietary fiber that has been linked to numerous health benefits. Glucomannan can help regulate blood sugar levels, lower cholesterol, and promote weight loss. This makes konjac a valuable addition to a healthy diet.
When it comes to culinary uses, konjac is incredibly versatile. The tuber is processed to create various products, including:
- Shirataki Noodles: These are low-calorie, gluten-free noodles that are perfect for those looking to reduce their carbohydrate intake.
- Konjac Flour: Used as a thickening agent in soups and sauces, it’s a great alternative to traditional flours.
- Konjac Jelly: A popular dessert in many Asian countries, it’s a light and refreshing treat.
To successfully grow konjac, it’s essential to understand its distinguishing features. The plant’s lifecycle begins with the tuber, which sprouts in warm, humid conditions. The leaf grows rapidly, providing shade and capturing sunlight for photosynthesis. After a period of growth, the plant may produce a large, dramatic flower, though this is not always guaranteed. The tuber continues to grow underground, storing nutrients for the next growing season.
Understanding these basics will help you appreciate the unique characteristics of konjac and prepare you for the steps involved in its cultivation. You should know that the Konjac is a perennial plant, which means that it can grow for more than two years.
Key Facts About Konjac
- Konjac is primarily grown for its tuber, which is rich in glucomannan.
- It thrives in warm, humid climates with partial shade.
- The plant’s large leaf provides a unique aesthetic to gardens.
- Konjac is used to make shirataki noodles, konjac flour, and konjac jelly.
Nutritional Information
| Nutrient | Amount per 100g (Cooked) |
| Calories | 10 |
| Fiber | 4g |
| Carbohydrates | 3g |
| Protein | 0.5g |
Important Considerations:
Konjac is not frost-tolerant, so it’s best suited for regions with mild winters. In colder climates, you can grow it in containers and bring them indoors during the winter months. It’s also important to note that raw konjac contains calcium oxalate crystals, which can cause irritation. Therefore, it’s crucial to process the tuber properly before consumption.
By understanding these fundamentals, you’ll be well on your way to successfully growing konjac in your own garden. You’ll find that with the right care and attention, this fascinating plant can provide you with a unique and rewarding gardening experience.
Selecting and Preparing Konjac Tubers or Corms for Planting

The quality of your konjac tubers or corms will significantly impact the success of your cultivation efforts. Sourcing healthy planting material is the foundation for a bountiful harvest.
Where to Source Konjac Tubers or Corms:
- Local Nurseries and Garden Centers: Check with local nurseries and garden centers specializing in Asian vegetables or unusual plants. They may carry konjac tubers or be able to order them for you.
- Online Retailers: Reputable online plant nurseries often offer a wide selection of tubers and corms, including konjac. Be sure to choose a reputable seller with positive customer reviews.
- Gardening Communities: Connect with local gardening communities and forums. You might find fellow gardeners willing to share their excess tubers or point you towards reliable sources.
Selecting the Best Planting Material:
When selecting konjac tubers or corms, look for the following:
- Size and Firmness: Choose tubers or corms that are plump, firm, and free of any signs of rot, mold, or damage.
- Eye Development: Look for prominent “eyes” or growth points on the tuber or corm. These are the areas where new shoots will emerge.
- Absence of Pests and Diseases: Carefully inspect the tubers or corms for any signs of insect infestations or fungal diseases.
Proper Storage of Tubers Before Planting:
If you can’t plant your tubers or corms immediately, proper storage is essential to maintain their viability.
- Cool, Dry Location: Store tubers in a cool, dry place, such as a basement or garage, where temperatures remain relatively stable.
- Proper Ventilation: Ensure good air circulation around the tubers to prevent moisture buildup, which can lead to rot.
- Avoid Direct Sunlight: Protect the tubers from direct sunlight, which can cause them to dry out and shrivel.
Preparing the Tubers for Optimal Germination:
Before planting, you can take a few steps to encourage optimal germination.
- Soaking: Gently soak the tubers or corms in lukewarm water for a few hours to rehydrate them.
- Scarification (Optional): For some tubers, lightly scarifying the surface with a clean knife can help stimulate growth. However, this step is not always necessary.
By carefully selecting and preparing your konjac tubers or corms, you’re setting the stage for a successful growing season. Remember to choose healthy planting material, store it properly, and take any necessary steps to encourage germination.
Preparing the Ideal Growing Environment for Konjac
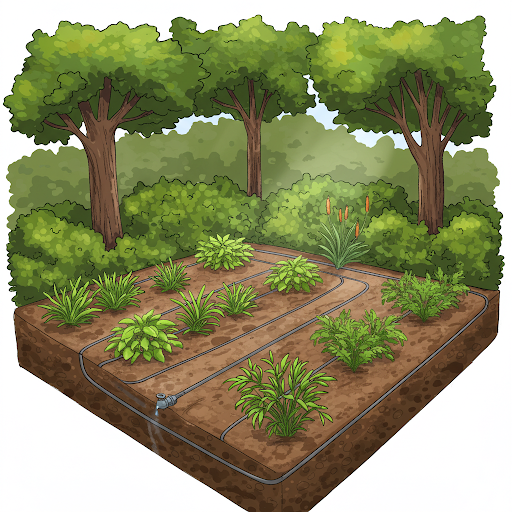
Konjac thrives in specific environmental conditions. Understanding these requirements will help you create the perfect growing space for your plants.
Climate and Growing Zones:
Konjac is a tropical or subtropical plant that prefers warm, humid climates. It’s best suited for USDA Hardiness Zones 9-11. In colder regions, you can grow konjac in containers and bring them indoors during the winter months.
Soil Requirements:
Konjac requires well-draining soil to prevent root rot. The ideal soil should be:
- Loamy: A mixture of sand, silt, and clay that provides good drainage and retains moisture.
- Rich in Organic Matter: Incorporate compost or well-rotted manure to improve soil fertility and drainage.
- Slightly Acidic to Neutral: A pH range of 6.0 to 7.0 is ideal for optimal growth.
Sunlight and Shade:
Konjac prefers partial shade. While it needs some sunlight for photosynthesis, too much direct sunlight can scorch the leaves. Aim for a location that receives dappled sunlight or morning sun with afternoon shade.
Watering:
Konjac requires consistent moisture, but overwatering can lead to root rot. Water deeply and allow the soil to dry slightly between waterings. Mulching around the base of the plant can help retain moisture and suppress weeds.
Ventilation and Humidity:
Good air circulation is essential to prevent fungal diseases. Ensure that the growing area has adequate ventilation. High humidity levels are also beneficial for konjac growth.
By carefully considering these factors and creating the optimal growing environment, you’ll provide your konjac plants with the best possible conditions for healthy growth and development.
Step-by-Step Guide to Planting Konjac Tubers or Corms
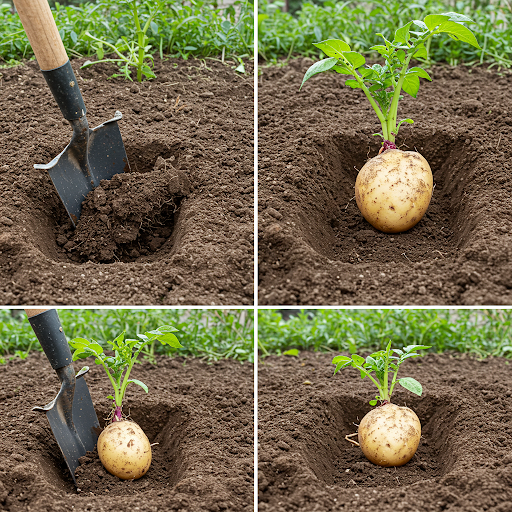
Now that you’ve prepared your tubers or corms and created the ideal growing environment, it’s time to plant them. Follow these steps for a successful planting:
Optimal Planting Time and Season:
- Spring is the ideal time to plant konjac tubers or corms, typically after the last frost has passed.
- The specific timing will vary depending on your location and climate.
Planting Depth and Spacing:
- Plant the tubers or corms about 4-6 inches deep in the soil.
- Space the plants 18-24 inches apart to allow for adequate growth and development.
Techniques for Planting in Garden Beds or Containers:
- Garden Beds: Prepare the planting area by loosening the soil and incorporating compost or well-rotted manure. Dig planting holes to the appropriate depth and spacing, gently place the tubers or corms in the holes, and cover them with soil.
- Containers: Use large containers with drainage holes to accommodate the growth of konjac plants. Fill the containers with a well-draining potting mix, plant the tubers or corms as described above, and water thoroughly.
Mulching:
- After planting, apply a layer of organic mulch, such as wood chips or straw, around the base of the plants.
- Mulching helps retain moisture, suppress weeds, and regulate soil temperature.
By following these steps and paying attention to the specific needs of your konjac plants, you’ll ensure a successful planting and set the stage for healthy growth and development.
Essential Konjac Plant Care: Watering, Fertilizing, and Maintenance

Providing consistent care for your konjac plants is crucial for their healthy growth and development. This includes regular watering, fertilization, and ongoing maintenance.
Watering:
Konjac plants require consistent moisture but are susceptible to root rot if overwatered. Here are some tips for proper watering:
- Water deeply: Water thoroughly to ensure the soil is evenly moistened, but avoid waterlogging.
- Check soil moisture regularly: Stick your finger into the soil to check for moisture. Water when the top few inches of soil feel dry.
- Mulching: Apply a layer of organic mulch, such as wood chips or straw, around the base of the plants to help retain moisture and suppress weeds.
- Adjust watering based on weather conditions: Increase watering during dry periods and reduce watering during wet weather.
Fertilizing:
Konjac plants benefit from regular fertilization to promote healthy growth and development.
- Use a balanced fertilizer: Apply a balanced fertilizer, such as a 10-10-10 formulation, according to package directions.
- Fertilize during the growing season: Apply fertilizer once or twice during the growing season, typically after the plants have established themselves.
- Consider organic fertilizers: Organic fertilizers, such as compost tea or fish emulsion, can provide essential nutrients while improving soil health.
Maintenance:
- Weeding: Keep the area around the plants free of weeds, which can compete for water and nutrients.
- Mulching: Reapply mulch as needed to maintain a consistent moisture level and suppress weeds.
- Support (Optional): If the plants develop large leaves, you may need to provide support to prevent them from being damaged by wind or heavy rain.
By following these care practices, you can ensure that your konjac plants thrive and produce a bountiful harvest.
Protecting Konjac from Pests and Diseases
While konjac is generally a robust plant, it can still be susceptible to certain pests and diseases. By taking proactive measures, you can protect your plants and ensure a healthy harvest.
Common Pests:
- Slugs and Snails: These slimy creatures can devour young konjac plants. Handpicking them at night or setting out traps can help control their population.
- Aphids: These small, sap-sucking insects can weaken plants. You can control aphids by spraying them with a strong jet of water or using insecticidal soap.
Diseases:
- Fungal Diseases: Konjac is susceptible to fungal diseases, such as root rot, especially in poorly drained soils. Proper watering and good air circulation can help prevent these issues.
Organic and Natural Pest Control Methods:
- Neem Oil: Neem oil is a natural insecticide that can effectively control a wide range of pests, including aphids and other soft-bodied insects.
- Companion Planting: Planting companion plants, such as marigolds or nasturtiums, can help deter certain pests and attract beneficial insects.
- Diatomaceous Earth: Diatomaceous earth is a natural, non-toxic powder that can be used to control slugs and snails.
Preventing Fungal Diseases:
- Proper Drainage: Ensure that the soil is well-drained to prevent waterlogging, which can lead to root rot.
- Avoid Overhead Watering: Water the base of the plants to avoid wetting the foliage, which can increase the risk of fungal diseases.
- Good Air Circulation: Space plants appropriately to allow for adequate air circulation around the foliage.
By implementing these organic and natural pest control methods and taking preventive measures, you can protect your konjac plants from common threats and ensure a healthy harvest.
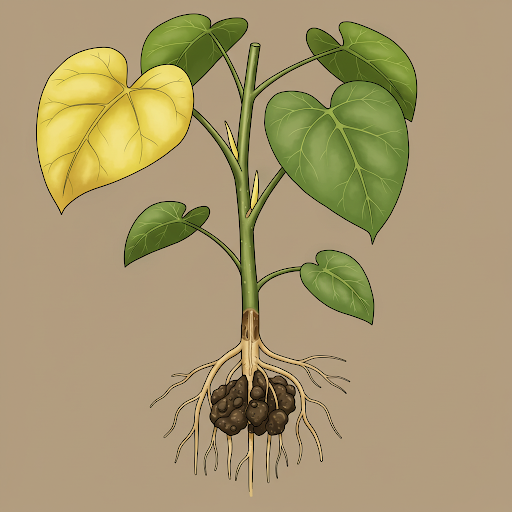
Knowing When and How to Harvest Konjac Tubers

Knowing when to harvest your konjac tubers is crucial to ensure you obtain the largest and most flavorful yield. Here are some signs that indicate your plants are ready for harvest:
- Leaf withering and yellowing: As the growing season progresses, the leaves of the konjac plant will begin to wither and turn yellow. This is a natural process and signals that the plant is entering its dormancy period.
- Tuber maturity: Once the leaves have withered, the tuber has typically reached its full size and maturity.
Proper Harvesting Techniques:
- Gently lift the plant: Carefully lift the entire plant from the ground.
- Gently remove the tuber: Gently remove the soil from around the tuber. Be careful not to damage the tuber during this process.
- Clean the tuber: Wash the tuber thoroughly to remove any remaining soil.
- Inspect for damage: Check the tuber for any signs of damage or disease.
Storing Harvested Tubers:
- Dry thoroughly: Allow the harvested tubers to dry completely in a well-ventilated area.
- Store in a cool, dry place: Store the dried tubers in a cool, dry location, such as a basement or garage.
- Protect from frost: Ensure the storage area is protected from frost, which can damage the tubers.
Potential Yields and Expected Harvest Size:
- The size of the harvested tubers can vary depending on various factors, including growing conditions and plant variety.
- Typically, you can expect to harvest tubers ranging from several pounds to several kilograms each.
By following these guidelines, you can harvest your konjac tubers at the optimal time and ensure a bountiful yield.
Utilizing Konjac: Culinary and Other Applications

Now that you’ve successfully harvested your konjac tubers, it’s time to enjoy the fruits of your labor. Konjac offers a variety of culinary and other applications, making it a versatile and valuable addition to your home garden.
How to Process Konjac for Culinary Use:
Before using konjac tubers for culinary purposes, they must be properly processed. This typically involves:
- Peeling: Carefully peel the outer skin of the tuber.
- Washing: Wash the peeled tuber thoroughly to remove any remaining dirt or debris.
- Drying: Dry the tuber completely to prevent spoilage.
- Grinding: Grind the dried tuber into a fine powder. This powder is known as konjac flour.
Recipes and Cooking Tips for Shirataki Noodles and Konjac Flour:
- Shirataki Noodles: * Rinse shirataki noodles thoroughly to remove any residual odor.
- Add them to soups, stir-fries, or pasta dishes for a low-calorie, gluten-free alternative.
- Season with your favorite sauces and spices.
- Konjac Flour:
- Use konjac flour as a thickening agent in soups, stews, and sauces.
- It can also be used as a gluten-free flour substitute in baking.
- Experiment with different recipes to discover its versatility in the kitchen.
Other Uses of Konjac:
- Dietary Supplements: Konjac glucomannan is often used in dietary supplements for weight management and blood sugar control.
- Traditional Medicine: Konjac has been used in traditional medicine for various purposes, such as promoting digestive health and relieving constipation.
By exploring the various culinary and other applications of konjac, you can fully appreciate the value of this unique and versatile vegetable. Whether you’re enjoying a bowl of shirataki noodles or incorporating konjac flour into your baking, you’ll be savoring the fruits of your gardening efforts.
Troubleshooting Common Konjac Growing Challenges
While konjac is a relatively low-maintenance plant, you may encounter some challenges during its cultivation. Here are some common issues and how to address them:
Root Rot:
- Symptoms: Yellowing leaves, wilting, and a foul odor from the soil are signs of root rot.
- Prevention: Ensure proper drainage in the soil and avoid overwatering.
- Treatment: If root rot is detected, remove the affected plant and dispose of it to prevent the spread of disease.
Pests and Diseases:
- Slugs and Snails: These pests can damage young plants. Handpicking them at night or using slug traps can help control their population.
- Aphids: These small insects can sap the plant’s nutrients. You can control aphids by spraying them with a strong jet of water or using insecticidal soap.
- Fungal Diseases: Fungal diseases can affect konjac, especially in humid conditions. Proper spacing between plants and good air circulation can help prevent these issues.
Frost Damage:
- Symptoms: Frost damage can cause leaf discoloration and wilting.
- Prevention: Protect konjac plants from frost by covering them with frost blankets or moving them indoors during cold snaps.
Nutrient Deficiencies:
- Symptoms: Yellowing leaves, stunted growth, and poor overall plant health can indicate nutrient deficiencies.
- Treatment: Apply a balanced fertilizer to provide the necessary nutrients for healthy growth.
By recognizing and addressing these common challenges, you can ensure that your konjac plants thrive and produce a bountiful harvest.
FAQ:
Q: How long does it take for konjac to grow?
A: Konjac typically takes 12 to 18 months to mature and be ready for harvest.
Q: Can konjac be grown in containers?
A: Yes, konjac can be grown in large containers with well-draining soil and adequate shade.
Q: What is the best soil for growing konjac?
A: Konjac prefers well-draining, loamy soil with a slightly acidic to neutral pH.
Q: How often should I water konjac?
A: Water konjac consistently to keep the soil moist, but avoid overwatering to prevent root rot.
Q: Is konjac a perennial or annual plant?
A: Konjac is a perennial plant in its native tropical climates.
Q: How do I know when konjac is ready to harvest?
A: The leaves will start to wither and turn yellow, indicating the tuber is mature.
Q: Can I grow konjac from seeds?
A: While possible, it is more common and efficient to grow konjac from tubers or corms.
Q: What are the main pests that attack konjac?
A: Slugs and snails are the most common pests.
Q: How do I prevent root rot in konjac?
A: Ensure well-draining soil and avoid overwatering.
Q: What is the ideal temperature for growing konjac?
A: Konjac thrives in warm, humid climates with temperatures between 68°F and 86°F (20°C and 30°C).
Conclusion:
Growing konjac can be a rewarding experience, providing you with a unique and nutritious vegetable to enjoy. By following the steps outlined in this guide, you can successfully cultivate this fascinating plant in your own garden. Remember to pay attention to the specific needs of your konjac plants, provide proper care, and address any challenges that may arise. With a little patience and attention, you’ll be enjoying the fruits of your labor in no time.
Final Tip: Experiment with different growing methods and techniques to discover what works best for you and your specific growing conditions. Don’t be afraid to try new things and learn from your experiences.


")

