
Do you dream of a diverse and bountiful harvest from your garden, but feel limited by the typical vegetables you’ve grown in the past? Tired of the same old tomatoes and zucchini? Then it’s time to explore the fascinating world of corm vegetables!
Growing corms can be a rewarding and unique gardening experience. However, many gardeners are intimidated by the idea of cultivating these unusual plants. They might wonder, “How do I even plant these things?” or “What kind of care do corms require?” These are valid concerns, but with the right knowledge and guidance, you can successfully cultivate a thriving patch of corm vegetables. This guide will equip you with the essential information and practical tips to grow corms with confidence, unlocking a new dimension of gardening enjoyment.
Understanding Corms: More Than Just Bulbs
When most gardeners think of planting underground, bulbs immediately come to mind. However, the world of underground plant structures is more diverse than you might think. Corms are one such fascinating type, often mistaken for bulbs but with distinct characteristics.
What are corms?
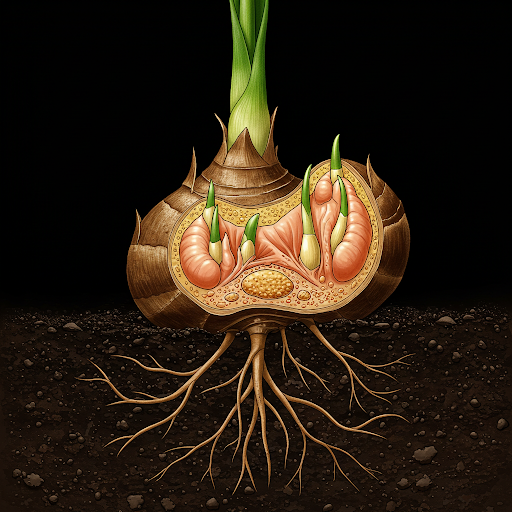
Corms are short, swollen underground stems that serve as storage organs for plants. They are solid and fleshy, unlike bulbs, which are composed of layers of fleshy scales. Corms store nutrients that the plant uses during dormancy and for the development of new shoots. Think of a corm as a miniature, underground potato – it’s a solid mass of plant tissue rather than a layered structure.
How are corms different from bulbs, tubers, and rhizomes?
Corms are often confused with bulbs, tubers, and rhizomes, but they have distinct characteristics:
- Bulbs: Bulbs are composed of layers of fleshy scales that surround a central bud. Examples of bulb plants include onions and tulips.
- Tubers: Tubers are swollen underground stems that store food for the plant. They have “eyes” or buds that can sprout into new plants. Examples of tuber plants include potatoes and yams.
- Rhizomes: Rhizomes are horizontal underground stems that can sprout new shoots and roots. Examples of rhizome plants include ginger and bamboo.
Why are corms an excellent choice for home gardeners?
Corms are an excellent choice for home gardeners for several reasons:
- Relatively easy to grow: Compared to some other underground vegetables, corms are generally low-maintenance and can thrive with basic care.
- Unique and flavorful: Corm vegetables offer a diverse range of flavors and textures, adding exciting new dimensions to your culinary repertoire.
- Versatility: Many corms can be grown in various conditions, from small containers to large garden beds.
- Decorative appeal: Some corms, like gladiolus, produce stunning blooms, adding visual interest to your garden.
Common types of corm vegetables
Some common types of corm vegetables include:
- Taro: Known for its starchy root, taro is a versatile vegetable that can be boiled, steamed, or fried.
- Water chestnuts: These crisp and refreshing vegetables are often used in Asian cuisine.
- Gladiolus: While primarily grown for their vibrant flowers, some gladiolus varieties produce edible corms.
Understanding the plant life cycle from corm to harvest
Understanding the corm’s structure and life cycle is crucial for successful cultivation. Corms typically go through a period of dormancy, during which they store energy. When conditions are favorable, they sprout, sending up shoots and leaves. After flowering and fruiting, the parent corm may wither, while new, smaller cormels (baby corms) develop around the base. These cormels can then be harvested and planted to produce new plants.
By understanding the unique characteristics of corms, you can better appreciate their growth habits and tailor your care accordingly.
Selecting and Preparing Your Corms for Planting
Before you can enjoy the rewards of growing corm vegetables, you need to start with healthy corms. Careful selection and proper preparation are crucial for a successful harvest.
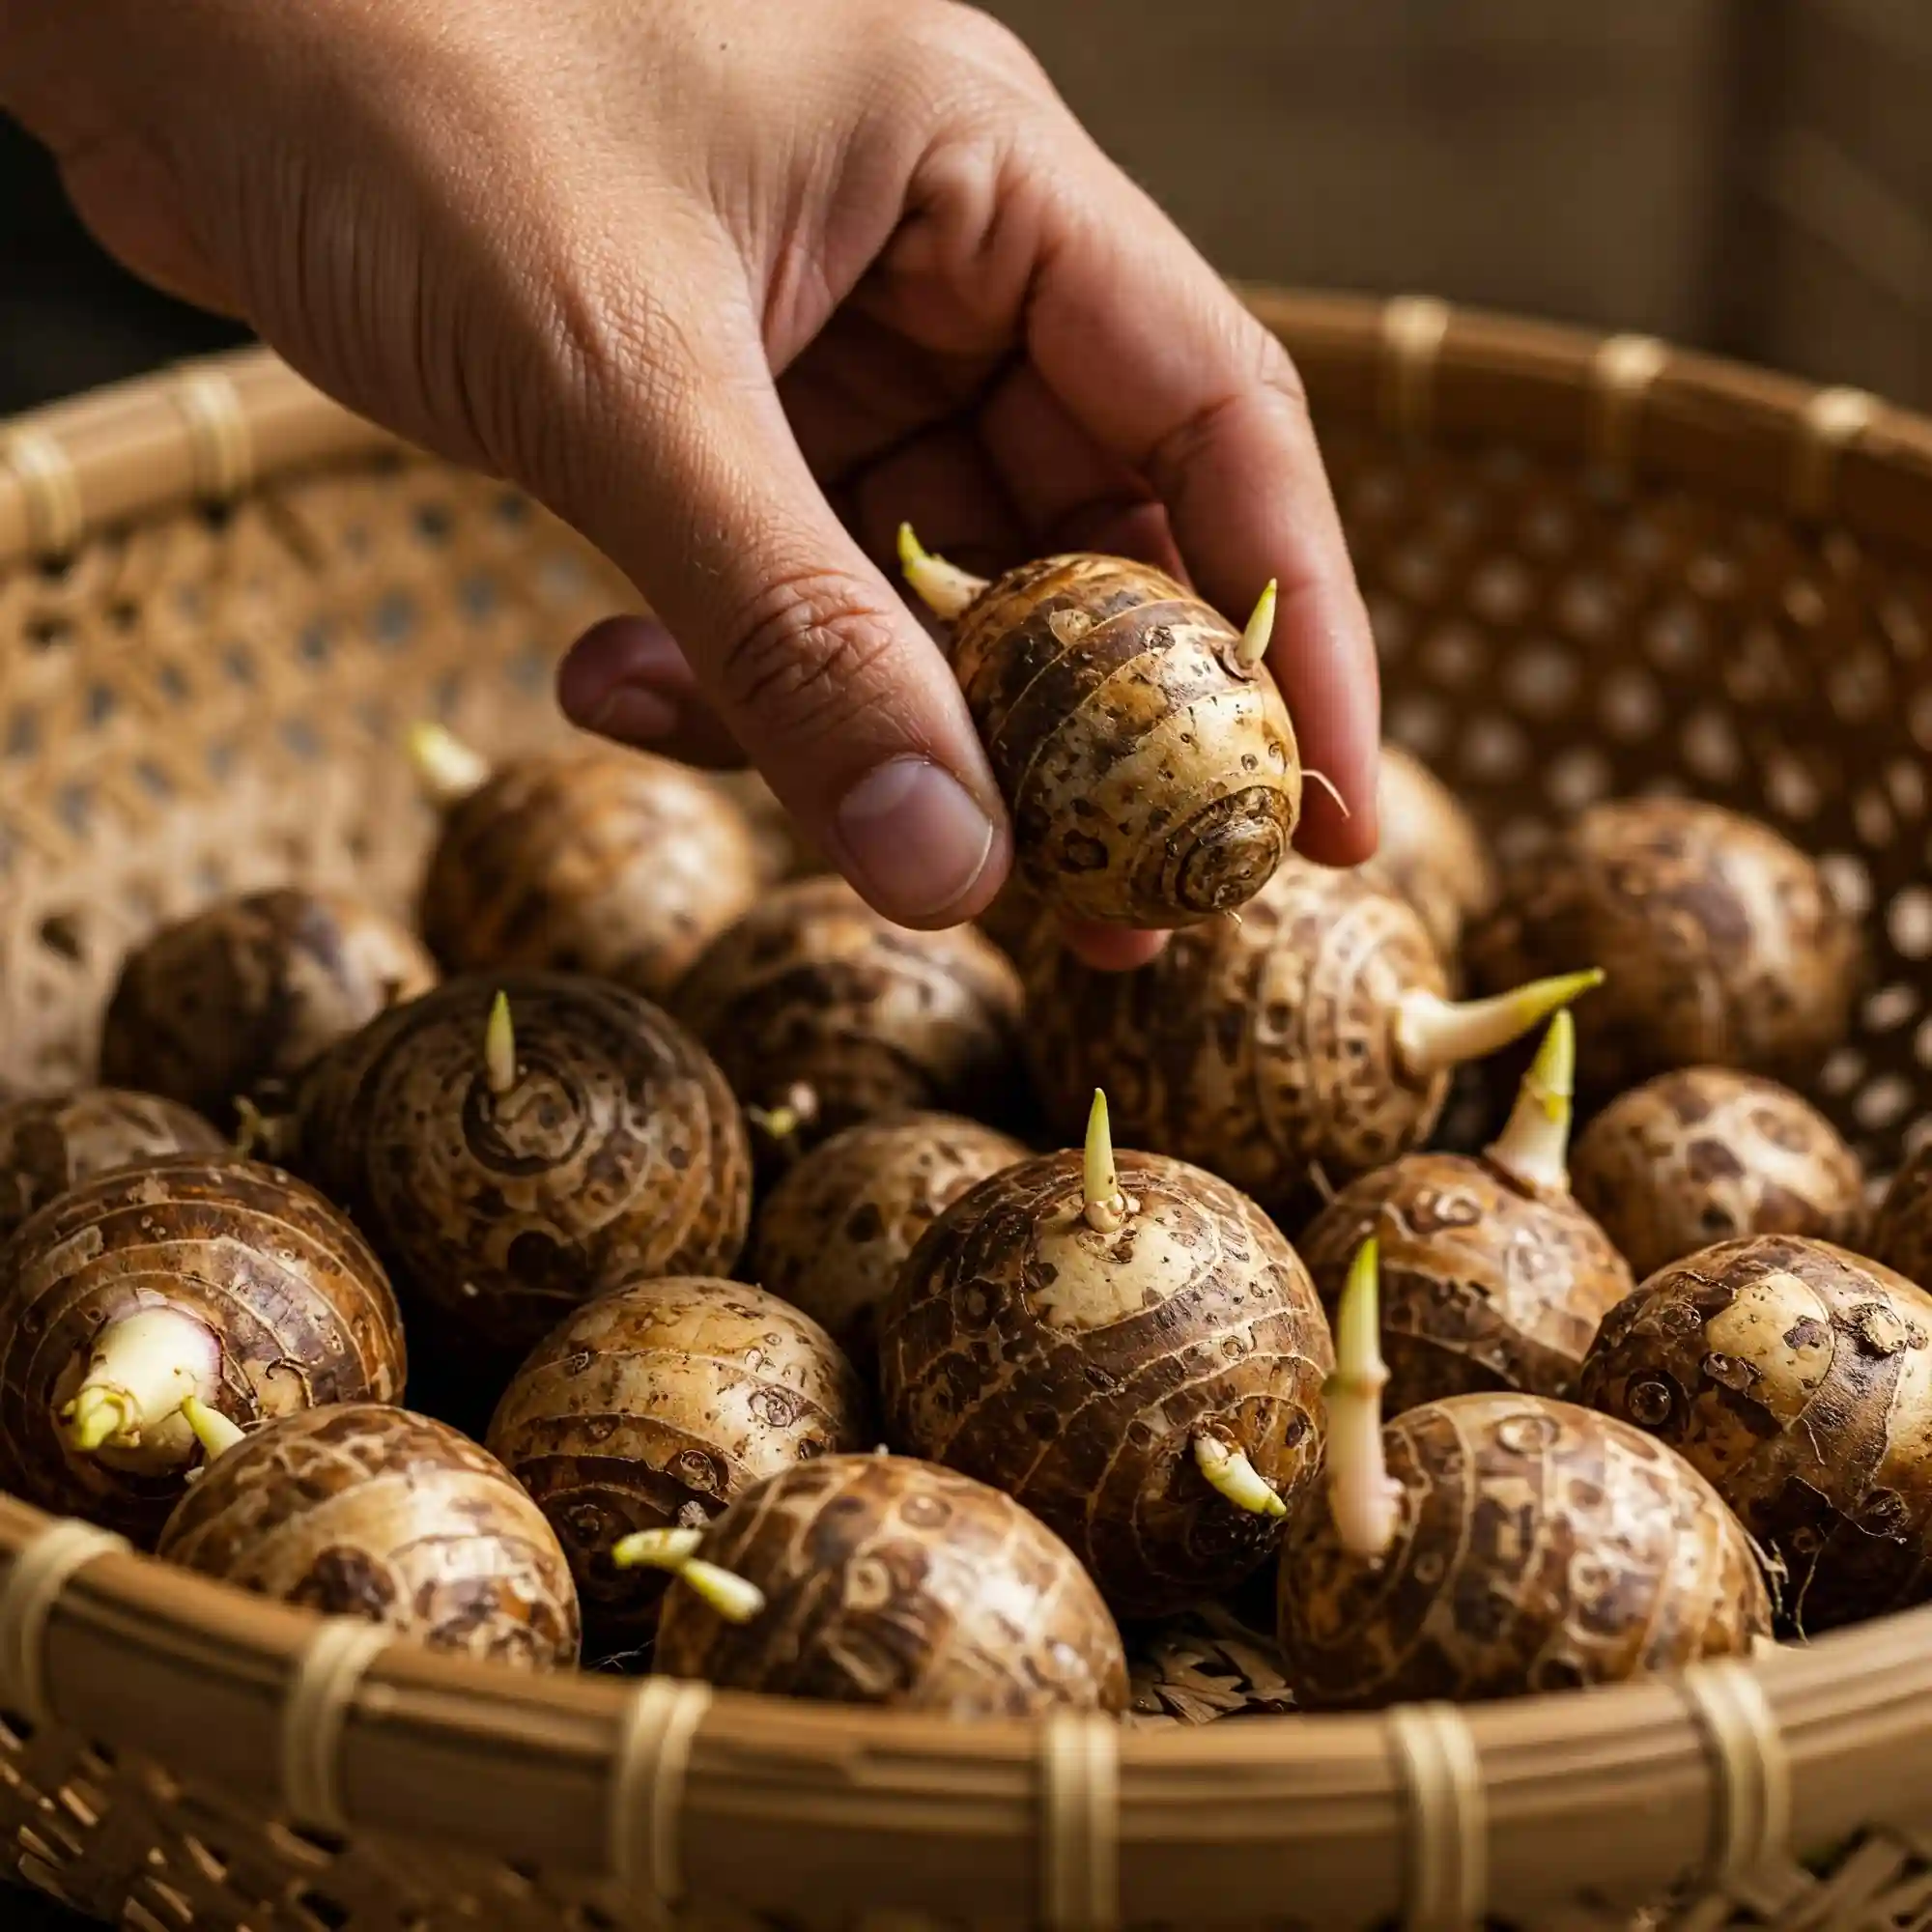
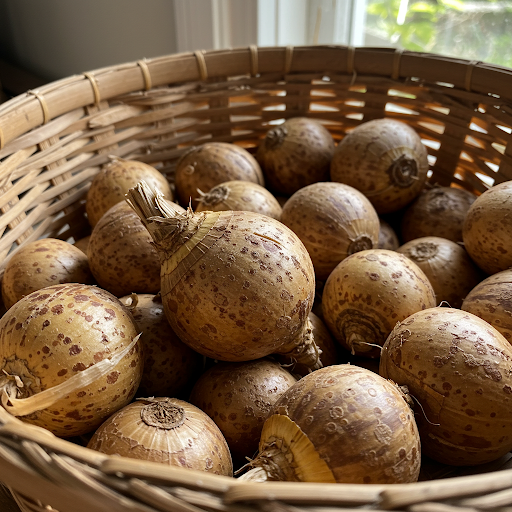
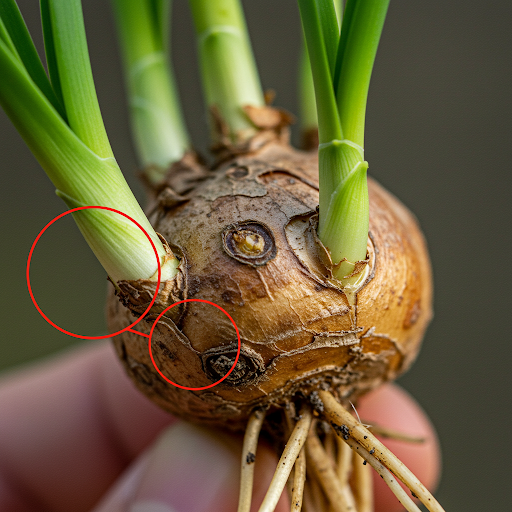
How to identify healthy corms for planting
When choosing corms, look for firm, plump specimens with no signs of rot, mold, or damage. Healthy corms should feel heavy for their size, indicating they are full of moisture and nutrients. Check for visible sprout points, which are small bumps or nicks on the surface of the corm where new growth will emerge. Avoid corms that are shriveled, discolored, or have soft spots.
Where to source quality corms for your garden
You can find quality corms from a variety of sources:
- Local garden centers and nurseries: Many local nurseries carry a selection of corm vegetables, often with knowledgeable staff who can provide growing advice.
- Online retailers: Online retailers offer a wide variety of corms, often at competitive prices. Be sure to choose reputable sellers with positive customer reviews.
- Seed exchanges and clubs: Joining a local seed exchange or gardening club can connect you with other gardeners who may have extra corms to share.
The importance of pre-planting preparation: cleaning, soaking, and sprouting
Before planting, it’s essential to prepare your corms to ensure optimal growth. This may involve:
- Cleaning: Gently brush off any loose soil or debris from the corms. You can also soak them in a mild disinfectant solution (such as a diluted bleach solution) for a few minutes to help prevent diseases.
- Soaking: Soaking corms in lukewarm water for a few hours can encourage faster sprouting. Some gardeners also add a few drops of liquid fertilizer to the water.
- Sprouting: For some corms, sprouting before planting can promote quicker growth. Place the corms in a shallow tray filled with a slightly moist medium, such as vermiculite or perlite. Keep the tray in a warm, well-lit location until sprouts emerge.
Detailed steps for preparing corms to maximize growth potential
Here are some specific steps you can take to prepare your corms for planting:
- Inspect each corm carefully: Discard any corms that show signs of damage or disease.
- Clean the corms: Gently brush off any loose soil or debris.
- Soak the corms (optional): Place the corms in a bowl of lukewarm water for 2-4 hours.
- Sprout the corms (optional): Place the corms in a shallow tray filled with a slightly moist medium, such as vermiculite or perlite. Keep the tray in a warm, well-lit location until sprouts emerge, typically within a few weeks.
By following these steps, you can ensure your corms are healthy and ready to produce a bountiful harvest.
Incorporating Personal Experience and Empathy
I understand that selecting and preparing corms for planting might seem a bit daunting, especially for beginner gardeners. However, by taking the time to choose healthy corms and prepare them properly, you’re setting yourself up for success. Remember, every gardener starts somewhere, and even small steps can make a big difference.
Optimal Growing Conditions for Corms Vegetables
Providing the right growing conditions is essential for cultivating healthy and productive corm vegetables. Understanding the specific needs of your chosen corm variety will help you create an environment that promotes optimal growth and development.
What are the ideal soil conditions for growing corms?
Corms thrive in well-drained soil that is rich in organic matter. The ideal soil pH is slightly acidic to neutral (between 6.0 and 7.0). Avoid planting corms in heavy clay soil, as it can retain too much moisture and lead to root rot. If your soil is heavy clay, you can improve drainage by adding organic matter such as compost or well-rotted manure.
Understanding sunlight requirements and how to provide them
Most corm vegetables require full sun to partial shade. Aim for at least 6 hours of direct sunlight per day. If you are planting in a shady area, choose a variety that can tolerate lower light levels.
Watering schedules and techniques for healthy corm development
Corms require consistent moisture but do not tolerate waterlogged soil. Water deeply and regularly, especially during dry periods. Allow the top inch or two of soil to dry out between waterings. Avoid overhead watering, as this can lead to fungal diseases. Instead, water at the base of the plants.
Temperature and climate considerations for successful cultivation
Corms are generally warm-season crops. They prefer warm temperatures and can be damaged by frost. The ideal temperature range for most corms is between 60°F and 80°F. If you live in a region with cold winters, you may need to lift and store your corms indoors during the winter months.
Providing the right growing conditions for your specific corm variety
Different corm vegetables have specific growing requirements. For example, taro prefers warm, humid conditions and can be grown in waterlogged soils, while water chestnuts require shallow water for optimal growth. Research the specific needs of your chosen corm variety to ensure you provide the best possible growing conditions.
By understanding the ideal soil conditions, sunlight requirements, watering schedules, and temperature preferences for your corm vegetables, you can create a thriving environment that promotes healthy growth and development. Remember, each corm variety has unique needs, so it’s essential to research the specific requirements of your chosen plants.
Incorporating Personal Experience and Empathy
I understand that providing the right growing conditions for your corm vegetables may seem overwhelming, especially if you are a beginner gardener. However, by understanding the basic principles of soil, sunlight, water, and temperature, you can create a thriving environment for your plants. Remember to research the specific needs of your chosen corm variety and adjust your care accordingly. With a little patience and attention, you can enjoy a bountiful harvest of delicious and nutritious corm vegetables.
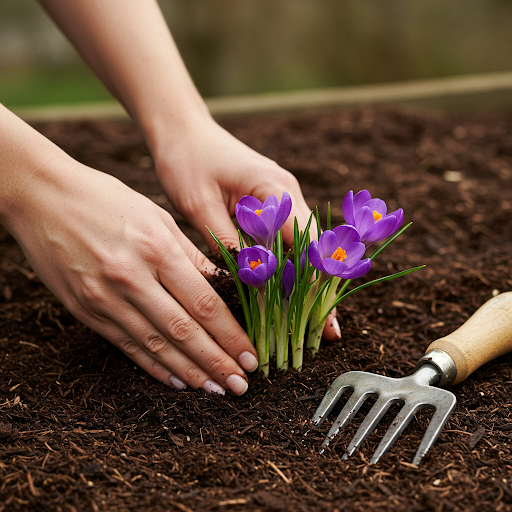
Step-by-Step Guide: How to Plant Corms Vegetables
Planting corms is a straightforward process, but there are a few key steps to ensure success.
Detailed instructions on how to plant corms in the ground or in containers
- Prepare the soil: Ensure the soil is well-drained and enriched with organic matter. If planting in containers, use a well-draining potting mix.
- Dig planting holes: The depth of the planting hole should be about two to three times the height of the corm. Space the holes according to the specific requirements of your corm variety.
- Place the corms: Gently place the corms in the planting holes, pointed side up.
- Cover the corms: Backfill the holes with soil, firming gently to ensure good contact with the corms.
Proper spacing and depth for optimal growth
The proper spacing and depth for planting corms will vary depending on the specific variety. Consult the seed packet or a gardening guide for specific recommendations. In general, plant corms at a depth of about two to three times their height. Space the corms according to their mature size, allowing enough room for proper air circulation and root development.
Tips for planting different varieties of corms vegetables
- Taro: Plant taro corms in shallow water or moist soil.
- Water chestnuts: Plant water chestnuts in shallow water, ensuring the corms are partially submerged.
- Gladiolus: Plant gladiolus corms at a depth of about 4-6 inches.
How to plant corms vegetables to ensure a strong root system
To encourage strong root development, ensure the soil is well-drained and moist. Avoid overwatering, as this can lead to root rot. Gently firm the soil around the corms to ensure good contact. You can also add a layer of mulch around the base of the plants to help retain moisture and suppress weeds.
By following these simple steps and considering the specific needs of your corm variety, you can successfully plant your corms and set the stage for a bountiful harvest.
Incorporating Personal Experience and Empathy
I know that planting corms can seem a bit daunting, especially if you’re new to gardening. However, by following these simple steps and taking your time, you’ll be well on your way to enjoying a successful harvest. Remember, every gardener starts somewhere, and even small steps can make a big difference.
Nurturing Your Corms: Care and Maintenance
Providing consistent care and attention to your corm vegetables is essential for healthy growth and a bountiful harvest. Here are some key practices to keep in mind:
Fertilizing techniques for healthy corm development
Fertilizing your corm vegetables can provide them with the necessary nutrients for robust growth. Apply a balanced fertilizer, such as a 10-10-10 formulation, around the base of the plants when they start to actively grow. Avoid over-fertilizing, as this can damage the plants. You can also use organic fertilizers such as compost or well-rotted manure.
Mulching practices to retain moisture and suppress weeds
Mulching around your corm plants offers several benefits:
- Moisture retention: Mulch helps to retain soil moisture, reducing the frequency of watering.
- Weed suppression: Mulch can help to suppress weed growth, reducing competition for water and nutrients.
- Temperature regulation: Mulch can help to moderate soil temperature, protecting the corms from extreme heat or cold.
Use a layer of organic mulch, such as straw, wood chips, or shredded leaves, around the base of the plants. Avoid piling mulch directly against the stems of the plants, as this can promote rot.
Pest and disease management for corms vegetables
While generally pest and disease resistant, corms can be susceptible to certain problems. Keep an eye out for common pests such as aphids, slugs, and snails. You can control these pests by handpicking them off the plants or using organic pest control methods such as insecticidal soap or neem oil.
Some common diseases that can affect corms include:
- Rot: Rot can be caused by overwatering or poor drainage. To prevent rot, ensure the soil is well-drained and avoid overwatering.
- Fungal diseases: Fungal diseases can be a problem in wet conditions. To prevent fungal diseases, avoid overhead watering and ensure good air circulation around the plants.
How to propagate and care for various corms vegetables in pots
Many corm vegetables can be successfully grown in containers. Choose a pot that is large enough to accommodate the mature size of the plant and ensure it has adequate drainage holes. Use a well-draining potting mix and follow the same care guidelines as for in-ground planting.
By providing consistent care and attention to your corm vegetables, you can help them thrive and produce a bountiful harvest. Remember to monitor your plants regularly, address any issues promptly, and enjoy the process of nurturing these unique and rewarding plants.
Incorporating Personal Experience and Empathy
I understand that caring for your corm vegetables may require some ongoing attention. However, by providing consistent care and addressing any issues promptly, you can ensure their health and vitality. Remember, every garden has its own unique challenges, and learning to adapt and overcome them is part of the joy of gardening. Enjoy the process of nurturing your plants and watching them grow and flourish!
Harvesting and Storing Your Corms Vegetables
The culmination of your gardening efforts is the harvest! Knowing when and how to harvest your corm vegetables will ensure you enjoy the fruits of your labor.
Knowing when to harvest corms for peak flavor and quality
The timing of harvest will vary depending on the specific corm variety and your local climate. Generally, you can harvest corms when the foliage begins to die back. This is a sign that the corms have matured and are ready to be harvested.
Harvesting techniques to avoid damaging the corms
When harvesting, gently lift the corms from the soil using a garden fork or trowel. Be careful not to damage the corms, as this can affect their storage quality.
Proper cleaning and curing methods for long-term storage
After harvesting, gently brush off any excess soil from the corms. Allow the corms to dry in a warm, well-ventilated area for a few days. This curing process helps to harden the skin of the corms and prevent rot.
Storing corms for future use
Once the corms are dry, store them in a cool, dry, and dark location. You can store them in mesh bags, paper bags, or wooden boxes. Maintain good air circulation around the corms to prevent rot.
Tips for storing different types of corms
- Taro: Taro corms can be stored for several months in a cool, dry place.
- Water chestnuts: Water chestnuts can be stored in a cool, moist location for several weeks.
- Gladiolus: Gladiolus corms can be stored for several months in a cool, dry place.
By following these guidelines, you can ensure that your harvested corms remain fresh and viable for future planting or consumption.
Incorporating Personal Experience and Empathy
I know that harvesting your own homegrown corms can be a rewarding experience. By following these guidelines and taking care during the harvesting and storage process, you can enjoy the fruits of your labor for months to come. Remember, proper handling and storage are crucial for preserving the quality of your harvested corms.
Troubleshooting Common Issues When Growing Corms
While corms are generally resilient plants, they can still encounter some common growing challenges. By understanding these potential issues and knowing how to address them, you can ensure a successful harvest.
Addressing common growth problems: rot, pests, and diseases
- Rot: Rot is a common problem that can affect corms, especially if they are overwatered or planted in poorly drained soil. Symptoms of rot include soft, mushy corms and wilting foliage. To prevent rot, ensure the soil is well-drained and avoid overwatering. If you notice signs of rot, remove the affected corms from the soil and discard them.
- Pests: Common pests that can affect corms include aphids, slugs, and snails. Aphids can sap the plant’s nutrients, while slugs and snails can chew on the leaves and corms. To control pests, you can handpick them off the plants or use organic pest control methods such as insecticidal soap or neem oil.
- Diseases: Fungal diseases, such as leaf spot and powdery mildew, can also affect corms. These diseases can be prevented by avoiding overhead watering and ensuring good air circulation around the plants. If you notice signs of disease, remove and destroy affected plant parts.
Solutions for poor growth and low yields
If your corm plants are not growing well or producing low yields, there are several possible solutions:
- Check the soil: Ensure the soil is well-drained and rich in organic matter. If the soil is too compacted, amend it with compost or other organic matter.
- Adjust watering: Make sure you are watering your plants adequately but not overwatering. Allow the top inch or two of soil to dry out between waterings.
- Provide adequate sunlight: Most corms require full sun to partial shade. If your plants are not receiving enough sunlight, they may not grow well.
- Fertilize appropriately: Apply a balanced fertilizer to provide your plants with the necessary nutrients. Avoid over-fertilizing, as this can damage the plants.
- Control pests and diseases: Address any pest or disease problems promptly to prevent further damage to your plants.
How to prevent common diseases when growing corms vegetables outdoors
- Avoid overhead watering: Overhead watering can spread fungal diseases. Water at the base of the plants instead.
- Ensure good air circulation: Space your plants adequately to allow for good air circulation around them.
- Keep the area around your plants clean: Remove any weeds or debris that could harbor pests and diseases.
- Use disease-resistant varieties: Choose corm varieties that are known to be resistant to common diseases.
Identifying and resolving nutrient deficiencies
Nutrient deficiencies can also affect the growth and development of your corm plants. Symptoms of nutrient deficiencies can include yellowing leaves, stunted growth, and poor flowering. If you suspect a nutrient deficiency, you can have your soil tested to determine which nutrients are lacking. You can then amend the soil or fertilize your plants accordingly.
By understanding and addressing common growing problems, you can ensure that your corm plants thrive and produce a bountiful harvest. Remember, prevention is key, so take steps to avoid common issues and provide your plants with the best possible growing conditions.
Incorporating Personal Experience and Empathy
I understand that encountering growing problems can be frustrating, but it’s important to remember that even experienced gardeners face challenges. By carefully observing your plants, identifying potential issues early on, and taking appropriate action, you can overcome these challenges and enjoy a successful harvest. Don’t hesitate to seek advice from other gardeners or consult reliable resources if you encounter any problems you can’t solve on your own.
FAQ
This section addresses some of the most frequently asked questions about growing corm vegetables.
What is the best soil for growing corms vegetables?
The best soil for growing corms is well-drained and rich in organic matter. A slightly acidic to neutral pH is ideal. Avoid planting corms in heavy clay soil, as it can retain too much moisture and lead to rot.
Detailed steps on how to grow edible corms vegetables at home
Here are the basic steps for growing edible corms vegetables:
- Select healthy corms and prepare them for planting.
- Choose a sunny location with well-drained soil.
- Plant the corms at the appropriate depth and spacing.
- Water regularly, but avoid overwatering.
- Fertilize as needed.
- Monitor for pests and diseases.
- Harvest the corms when they are mature.
How to propagate and care for various corms vegetables in pots
Many corm vegetables can be successfully grown in containers. Choose a pot that is large enough to accommodate the mature size of the plant and ensure it has adequate drainage holes. Use a well-draining potting mix and follow the same care guidelines as for in-ground planting.
Best practices for harvesting and storing homegrown corms vegetables
Harvest corms when the foliage begins to die back. Gently lift the corms from the soil and brush off any excess soil. Allow the corms to dry in a warm, well-ventilated area for a few days. Store the dried corms in a cool, dry, and dark location.
How to prevent common diseases when growing corms vegetables outdoors
To prevent common diseases, avoid overhead watering, ensure good air circulation around the plants, and keep the area around your plants clean. You can also choose disease-resistant varieties of corms.
What are the sunlight and watering needs for growing corms vegetables?
Most corms require full sun to partial shade and consistent moisture, but do not tolerate waterlogged soil.
How to identify and select healthy corms for vegetable planting
Look for firm, plump corms with no signs of rot or damage. Healthy corms should have visible sprout points.
What are the sunlight and watering needs for growing corms vegetables?
Most corms prefer full to partial sun and require consistent moisture, but not waterlogging.
By following these guidelines and addressing common concerns, you can successfully grow a variety of delicious and nutritious corm vegetables in your home garden.
Conclusion
Growing corms vegetables can be a delightful and rewarding experience. By understanding their unique needs and following these essential tips, you can cultivate a thriving garden and enjoy a bountiful harvest. Remember to select healthy corms, provide optimal growing conditions, and nurture your plants with care.
Key takeaways
- Corms are unique underground storage organs that can be successfully grown in home gardens.
- Proper selection, preparation, and planting are essential for a successful harvest.
- Providing the right growing conditions, including adequate sunlight, water, and soil, is crucial for healthy corm development.
- Consistent care and maintenance, including fertilizing, mulching, and pest and disease management, are necessary for optimal growth.
- Harvesting and storing corms properly will ensure that you can enjoy the fruits of your labor for months to come.
By following these guidelines and addressing common challenges, you can unlock the potential of corm vegetables and add a unique dimension to your gardening experience. Remember, every gardener starts somewhere, and with a little patience and perseverance, you can cultivate a thriving garden filled with delicious and nutritious corm vegetables.
Gardening is a journey of continuous learning and discovery. Embrace the challenges, celebrate the successes, and enjoy the process of nurturing your plants. Happy gardening!


")

