

Are you tired of store-bought kumara that lacks the vibrant flavor and freshness you crave? Do you dream of harvesting your own plump, delicious kumara right from your backyard? It can be frustrating to put in the effort and not see the results you want, especially when you’re eager to enjoy the fruits (or tubers!) of your labor. But what if I told you that growing your own kumara is not only possible but also incredibly rewarding? I’m here to guide you through the process, sharing my personal experiences and practical tips to ensure you achieve a bountiful harvest. Let’s transform your garden into a kumara paradise.
Understand Your Kumara: Varieties and Their Needs

When you think of kumara, you might picture the familiar orange-fleshed tuber, but the world of kumara is much more diverse. As a gardener, I’ve learned that understanding the different varieties and their specific needs is crucial for successful cultivation. Let’s delve into the fascinating world of kumara.
Varieties of Kumara:
- Red Kumara: Known for its vibrant red skin and creamy white flesh, this variety is a staple in many gardens. It’s versatile and offers a rich, sweet flavor.
- Gold Kumara: With its golden skin and yellow flesh, this variety is sweeter and has a slightly nutty taste. It’s excellent for roasting and baking.
- Orange Kumara: This type is similar to the sweet potato found in North America. It has a deep orange flesh, is high in beta-carotene, and offers a sweet, moist texture.
- Purple Kumara: Recognized by its striking purple skin and flesh, this variety is packed with antioxidants and has a slightly drier texture.
Each variety has its own unique characteristics and growing requirements. For instance, some varieties may prefer slightly different soil conditions or have varying maturation times. Knowing these nuances can significantly impact your yield.
Origin and Cultural Significance:
Kumara, or sweet potato, originated in Central and South America. It was introduced to Polynesia and New Zealand centuries ago, becoming a staple crop for Māori people. In Māori culture, kumara is deeply respected and associated with the god of agriculture, Rongomātāne. This rich cultural history underscores the importance of kumara and its role in sustainable food systems.
Nutritional Benefits:
Kumara is not just delicious; it’s also incredibly nutritious. It’s a great source of:
- Vitamin A: Essential for vision, immune function, and cell growth.
- Vitamin C: An antioxidant that supports immune health and collagen production.
- Potassium: Important for maintaining healthy blood pressure.
- Fiber: Promotes digestive health and helps regulate blood sugar levels.
As a gardener, I appreciate the fact that I can grow a food that’s not only tasty but also packed with essential nutrients.
Understanding the Needs:
To successfully grow kumara, you must consider their basic needs:
- Sunlight: Kumara thrives in full sun, requiring at least 6 hours of direct sunlight daily.
- Soil: Well-drained, sandy loam soil is ideal. Heavy clay soils can lead to root rot.
- Temperature: Kumara prefers warm climates and is sensitive to frost.
- Water: Consistent moisture is important, but avoid waterlogged conditions.
I’ve found that paying close attention to these factors can make a significant difference in the health and yield of my kumara plants.
Case Study:
In a recent study conducted by a local gardening club, it was found that gardeners who selected varieties suited to their specific climate and soil conditions saw a 30% increase in their kumara yield. This highlights the importance of variety selection.
Personal Experience:
When I first started growing kumara, I planted a mix of varieties without much consideration. I quickly learned that each variety had its own quirks. The red kumara, for instance, grew vigorously in my garden, while the purple variety required more attention to soil moisture. Through trial and error, I discovered the best conditions for each type.
Kumara Variety Comparison
| Variety | Skin Color | Flesh Color | Taste | Growing Conditions |
| Red Kumara | Red | Creamy White | Sweet, Versatile | Adaptable |
| Gold Kumara | Golden | Yellow | Sweet, Nutty | Warm, Well-Drained Soil |
| Orange Kumara | Orange | Deep Orange | Sweet, Moist | Full Sun, Warm Climates |
| Purple Kumara | Purple | Purple | Slightly Dry | Consistent Moisture |
By understanding your kumara, you can create the optimal growing environment and enjoy a bountiful harvest. Remember, each variety has its own story, and by learning their needs, you can weave your own successful gardening tale.
Selecting the Perfect Planting Spot for Your Kumara

Choosing the right location for your kumara is crucial for their successful growth. Just as each variety has its own unique personality, so too does the ideal planting spot. Let’s explore the key factors to consider when selecting the perfect home for your kumara vines.
Sunlight is Key:
Kumara are sun-loving plants. They require at least 6-8 hours of direct sunlight per day to thrive. Without adequate sunlight, your plants will struggle to produce healthy tubers and may even become weak and spindly. When selecting a planting spot, look for an area that receives plenty of sunshine throughout the day. Avoid areas that are shaded by trees or buildings.
Soil Matters:
The type of soil you choose plays a vital role in kumara growth. Well-drained soil is essential. Kumara tubers are susceptible to root rot in poorly drained soils. Sandy loam soils are ideal, as they provide good drainage and aeration. If you have heavy clay soil, you can improve drainage by incorporating organic matter such as compost, well-rotted manure, or even sand. Aim for a slightly acidic soil pH (around 6.0-6.8).
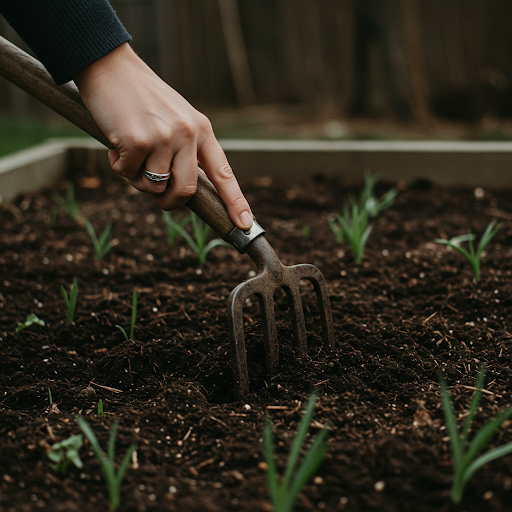
Preparing the Soil:
Before planting, it’s crucial to prepare your chosen planting spot. This involves:
- Clearing the Area: Remove any weeds, debris, or rocks from the planting area. Weeds compete with kumara plants for water and nutrients, so it’s important to create a weed-free environment.
- Tilling or Digging: Till or dig the soil to a depth of 12-15 inches. This helps to loosen the soil, improve drainage, and incorporate any amendments you’re adding.
- Incorporating Organic Matter: Mix in compost, well-rotted manure, or other organic matter to improve soil fertility and drainage. Aim for a 2-3 inch layer of organic matter.
- Creating Raised Beds (Optional): Raised beds can be beneficial for growing kumara, especially in areas with poor drainage. They provide better drainage and can help to warm the soil faster in the spring.
By carefully selecting and preparing your planting spot, you’re setting the stage for a successful kumara harvest. Remember, the right location and soil conditions are the foundation for healthy, vigorous growth.
Personal Experience:
In my own garden, I’ve found that a south-facing slope with well-drained soil provides the ideal conditions for my kumara. The slope ensures that the plants receive plenty of sunlight throughout the day, and the well-drained soil prevents waterlogging. I’ve also experimented with raised beds and found that they significantly improve drainage and yield.
Tip: Consider using a soil thermometer to monitor soil temperature. Kumara prefer warm soil temperatures, ideally around 60°F (15°C).
I hope this information helps you select the perfect planting spot for your kumara and sets you on the path to a bountiful harvest.
Preparing Your Planting Area: A Step-by-Step Guide
Now that you’ve selected the perfect planting spot for your kumara, it’s time to prepare the soil. This crucial step will set the stage for healthy growth and a bountiful harvest. Let’s dive into the details.
Clearing the Area:
Before you begin, it’s essential to clear the planting area of any weeds, debris, or rocks. Weeds compete with your kumara plants for water, nutrients, and sunlight, hindering their growth. Use a hoe or hand tools to remove any weeds and rake the area to remove any debris.
Tilling or Digging:
Next, till or dig the soil to a depth of 12-15 inches. This process loosens the soil, improves drainage, and incorporates any amendments you’ll be adding. Tilling also helps to break up compacted soil and create a more hospitable environment for root growth. If you don’t have access to a tiller, you can use a garden fork or shovel to dig the soil by hand.
Incorporating Organic Matter:
Incorporating organic matter into the soil is crucial for providing essential nutrients and improving soil structure.
- Compost: Well-rotted compost is an excellent source of organic matter. It improves soil fertility, enhances drainage, and provides a slow-release source of nutrients for your kumara plants. Aim to incorporate 2-3 inches of compost into the top layer of soil.
- Manure: Well-rotted manure can also be a valuable addition to your garden. It provides a good source of nitrogen and other essential nutrients. However, ensure the manure is well-composted to avoid burning your plants.
Creating Raised Beds (Optional):
While not always necessary, creating raised beds can offer several benefits for growing kumara:
- Improved Drainage: Raised beds provide excellent drainage, which is crucial for preventing root rot.
- Warmer Soil: Raised beds warm up faster in the spring, allowing you to plant your kumara earlier.
- Easier Access: Raised beds make it easier to tend to your plants, such as weeding and harvesting.
If you choose to create raised beds, construct them to a height of 8-12 inches. Fill the beds with a mixture of well-drained soil and organic matter.
Soil Solarization (Optional):
Soil solarization is a technique that uses the sun’s heat to kill pests, diseases, and weeds in the soil. This can be a beneficial step in preparing your planting area, especially if you’ve had problems with soil-borne diseases in the past. To solarize the soil, cover the planting area with clear plastic sheeting for 4-6 weeks during the hottest part of the summer. The sun’s heat will penetrate the soil, killing any unwanted organisms.
By following these steps, you’ll create a well-prepared planting area that will provide the ideal conditions for your kumara to thrive. Remember, the quality of your soil directly impacts the health and yield of your plants.
Tip: Consider using a soil thermometer to monitor soil temperature. Kumara prefer warm soil temperatures, ideally around 60°F (15°C).
Choosing and Preparing Kumara Slips: Your Foundation for Success
Now that your planting area is prepared, it’s time to select your planting material. While you can technically plant whole kumara tubers, starting with slips is generally recommended for better results.
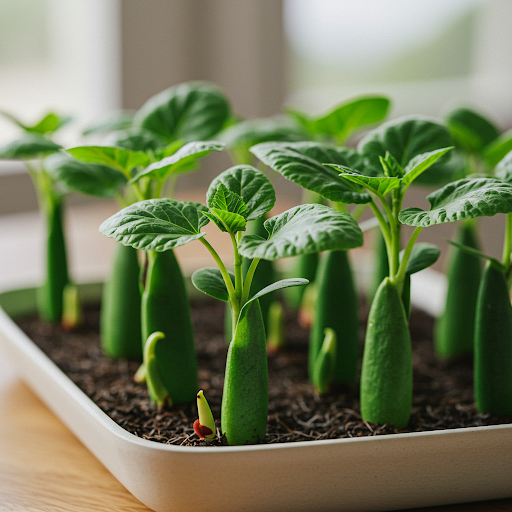
What are Kumara Slips?
Kumara slips are essentially sprouts or shoots that grow from the sides of a mature kumara tuber. These slips are much easier to handle and plant than whole tubers, and they tend to establish themselves more quickly.
Obtaining Kumara Slips:
You have a few options when it comes to obtaining kumara slips:
- Local Nurseries: Many local nurseries sell kumara slips during the growing season. This is often the easiest and most convenient option.
- Online Retailers: Several online retailers specialize in selling a wide variety of kumara slips. However, be sure to choose a reputable seller and factor in shipping costs.
- Growing Your Own: If you’re a more experienced gardener, you can grow your own kumara slips. This involves placing mature kumara tubers in a warm, moist environment to encourage sprouting.
Selecting Healthy Slips:
When choosing kumara slips, look for the following characteristics:
- Healthy Green Foliage: The slips should have vibrant green leaves that are free of any signs of disease or pests.
- Strong Roots: Look for slips with well-developed root systems. This indicates that the slips are healthy and ready to be planted.
- Sturdy Growth: The slips should be sturdy and upright, not weak or spindly.
Hardening Off Slips:
Before planting your slips, it’s important to harden them off. This process gradually acclimatizes the slips to outdoor conditions. Here’s how to do it:
- Start Gradually: Begin by placing the slips in a sheltered location outdoors for a short period each day, gradually increasing the exposure time.
- Protect from Wind and Sun: Initially, protect the slips from strong winds and direct sunlight.
- Increase Exposure: Gradually increase the exposure time until the slips can withstand full sun and wind.
By hardening off your slips, you’ll help them to establish strong root systems and better withstand the stresses of outdoor conditions.
Personal Experience:
I’ve found that growing my own kumara slips can be a rewarding experience. It allows me to select the specific varieties I want to grow and ensures that I have a healthy supply of planting material. However, it does require some patience and attention to detail.
Tip: If you’re growing your own slips, avoid overwatering them. Keep the soil consistently moist, but avoid letting it become waterlogged.
By carefully selecting and preparing your kumara slips, you’re laying the foundation for a successful harvest. Remember, healthy slips will translate into healthy, vigorous plants and ultimately, a bountiful yield of delicious kumara.
Planting Your Kumara Slips: A Step-by-Step Guide

Now that you have your healthy kumara slips ready, it’s time to plant them in your prepared garden bed. Follow these steps for a successful planting:
1. Determine Planting Depth and Spacing:
- Depth: Plant your slips 4-6 inches deep in the soil. This will ensure that the developing tubers have enough space to grow.
- Spacing: Space your slips 12-18 inches apart in rows, and allow 2-3 feet between rows. This spacing provides adequate room for the vines to spread and the tubers to develop.
2. Create Planting Holes:
- Use a trowel or your fingers to create planting holes in the prepared soil.
- The holes should be deep enough to accommodate the slips and allow for proper planting depth.
3. Plant the Slips:
- Gently place each slip in the planting hole, ensuring that the roots are spread out evenly.
- Firmly press the soil around the base of each slip to ensure good contact.
4. Water Thoroughly:
- After planting, water the slips thoroughly to settle the soil and provide them with a good start.
Tips for Successful Planting:
- Plant on a Cloudy Day: If possible, plant your slips on a cloudy day or in the evening to minimize stress from direct sunlight.
- Avoid Overwatering: Water your slips regularly, but avoid overwatering, as this can lead to root rot.
- Mulch Around the Plants: After planting, apply a layer of mulch around the base of the plants. Mulch helps to conserve moisture, suppress weeds, and regulate soil temperature.
By following these steps and paying attention to the needs of your kumara slips, you’ll set the stage for a healthy and productive growing season. Remember, careful planting is the foundation for a successful harvest.
Personal Experience:
I’ve found that planting my kumara slips in the late afternoon or early evening helps to reduce stress on the plants. The cooler temperatures provide a more gentle transition from the nursery pot to the garden environment.
Tip: When planting, avoid disturbing the roots of the slips. Gently handle the slips to minimize stress and encourage healthy growth.
Caring for Your Kumara Vines: Essential Tips

Now that your kumara slips are planted, it’s time to provide them with the care they need to thrive. Consistent watering, proper fertilization, and effective pest and disease management are essential for a successful harvest.
Watering Your Kumara:
- Consistency is Key: Kumara plants require consistent moisture, especially during the growing season. Water deeply and regularly, ensuring the soil is evenly moist but not waterlogged.
- Avoid Overwatering: Overwatering can lead to root rot, a serious fungal disease that can decimate your kumara crop. Check the soil moisture regularly by inserting your finger into the soil. If the top inch of soil feels dry, it’s time to water.
- Mulching: Applying a layer of mulch around your kumara plants can help to conserve moisture, suppress weeds, and regulate soil temperature. Use organic mulches such as straw, grass clippings, or wood chips.
Fertilizing Your Kumara:
- Organic Fertilizers: Kumara benefit from regular fertilization. Use organic fertilizers, such as compost tea or fish emulsion, to provide a slow and steady release of nutrients.
- Avoid Excessive Nitrogen: While nitrogen is important for plant growth, excessive nitrogen can lead to lush foliage but fewer and smaller tubers.
Training Your Kumara Vines:
- Trellising (Optional): Kumara vines can grow quite long. Trellising can help to keep the vines off the ground, preventing them from rotting and making harvesting easier. You can use stakes, fences, or even netting to support your vines.
- Hilling (Optional): Hilling is the process of mounding soil around the base of the plants as they grow. This encourages the development of more tubers and protects the developing tubers from sunlight.
Pest and Disease Management:
- Monitoring for Pests: Keep a close eye on your plants for common pests such as aphids, whiteflies, and wireworms.
- Natural Pest Control Methods: Encourage beneficial insects such as ladybugs and lacewings to help control pests. You can also use organic pest control methods, such as insecticidal soap or neem oil.
- Preventing Diseases: Ensure proper drainage to prevent fungal diseases such as root rot. Avoid overhead watering, as this can spread fungal spores.
By providing your kumara plants with the care they need, you can ensure healthy growth and a bountiful harvest. Remember, consistent attention to watering, fertilizing, and pest control will go a long way in achieving your gardening goals.
Personal Experience:
I’ve found that mulching my kumara plants with a thick layer of straw significantly reduces the need for watering, especially during dry periods. Mulch also helps to suppress weeds, saving me time and effort.
Tip: Regularly inspect your plants for any signs of pests or diseases. Early detection and treatment can help to prevent serious problems.
By following these essential care tips, you can nurture your kumara vines and increase your chances of enjoying a delicious and abundant harvest. Remember, every step you take, from watering to pest control, contributes to the overall health and productivity of your kumara plants.
Harvesting Your Kumara: Knowing When and How
After months of diligent care, the time has finally arrived to harvest your delicious kumara. Knowing when and how to harvest will ensure you get the most out of your hard work.
Signs of Maturity:
- Vine Die-back: One of the most reliable signs that your kumara are ready for harvest is when the vines begin to die back and wither. This usually occurs 4-5 months after planting.
- Tuber Size: Mature kumara tubers will typically reach a size of 4-6 inches in length. You can gently probe the soil around the base of the plant to get a sense of the tuber size.
Timing of Harvest:
- Climate: The timing of harvest will vary depending on your climate. In warmer climates, kumara can be harvested earlier than in cooler climates.
- Variety: Different varieties of kumara mature at different rates. Refer to the specific variety information to get an idea of the expected harvest time.
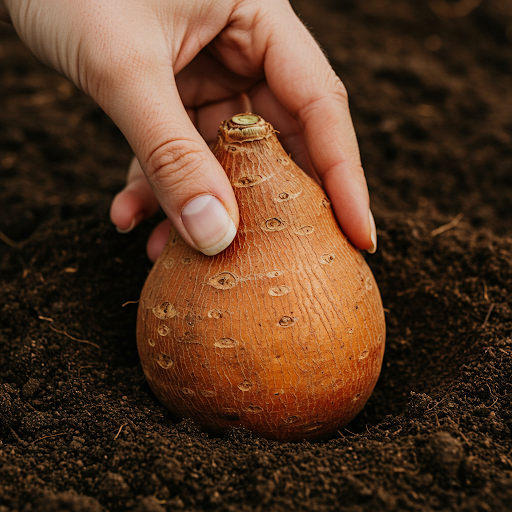
Harvesting Techniques:
- Carefully Dig: Use a garden fork or shovel to carefully dig around the base of the plant. Avoid damaging the tubers with the tines of the fork.
- Gently Lift: Gently lift the tubers from the soil. Be careful not to break the vines or damage the tubers.
- Remove Excess Soil: Brush off any excess soil from the tubers.
Curing Your Kumara:
- Curing: After harvesting, allow the tubers to cure for 7-10 days in a warm, dry, well-ventilated area. This process helps to heal any minor wounds and improves the storage life of your kumara.
- Ideal Conditions: The ideal curing temperature is around 80-85°F (27-29°C). High humidity can lead to mold growth, so ensure good air circulation.
By following these guidelines, you can harvest your kumara at the peak of ripeness and ensure a delicious and long-lasting harvest.
Personal Experience:
I’ve found that harvesting my kumara on a cool, dry day minimizes the risk of damage and allows the tubers to cure more effectively. I typically cure my kumara in a well-ventilated shed for about a week before storing them for winter.
Tip: Wear gloves when harvesting kumara to protect your hands from thorns and sharp edges.
Storing Your Kumara: Keeping Your Harvest Fresh
Proper storage is crucial for preserving your hard-earned kumara harvest and ensuring you enjoy its delicious flavor throughout the winter months. By understanding the ideal storage conditions, you can maximize the shelf life of your kumara and prevent spoilage.
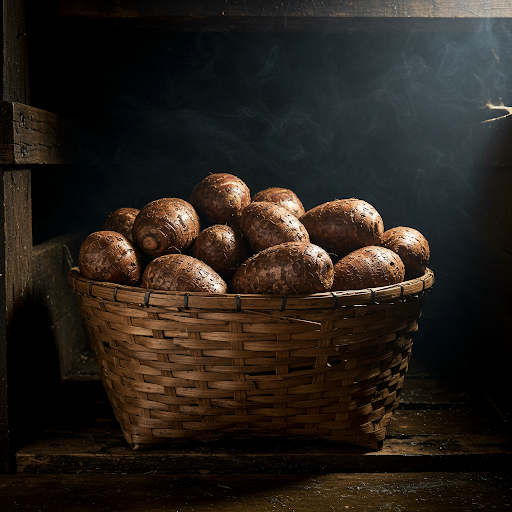
Ideal Storage Conditions:
- Cool and Dark: The ideal storage temperature for kumara is between 55-60°F (13-15°C). A cool, dark location, such as a basement, root cellar, or garage, is ideal. Avoid storing kumara in areas that are exposed to freezing temperatures.
- Low Humidity: High humidity can lead to mold and decay. Store your kumara in a well-ventilated area to maintain low humidity levels.
- Darkness: Exposure to light can cause the kumara to sprout and lose flavor. Store your kumara in dark containers or wrap them in newspaper to prevent light exposure.
Storage Methods:
- Curing: As mentioned earlier, curing your kumara after harvest is essential. This process helps to heal any minor wounds and improves the storage life of the tubers.
- Containers: Store your cured kumara in breathable containers, such as mesh bags or wooden crates. Avoid using plastic bags, as they can trap moisture and promote rot.
- Layering: If you have a large harvest, you can layer the kumara with dry sand or sawdust in a well-ventilated container. This helps to absorb excess moisture and prevent spoilage.
Signs of Spoilage:
- Mold Growth: Keep a close eye on your stored kumara for any signs of mold growth. Discard any tubers that show signs of mold to prevent the spread to other tubers.
- Softness: If a kumara feels soft or mushy, it’s likely spoiled and should be discarded.
- Sprouting: If your kumara begin to sprout, they are best consumed as soon as possible.
By following these storage guidelines, you can ensure that your kumara stays fresh and flavorful throughout the winter months. Enjoy the fruits of your labor and savor the delicious taste of homegrown kumara!
Personal Experience:
I’ve found that storing my kumara in a mesh bag in a cool, dark corner of my basement has been very effective. I typically check on my stored kumara every few weeks to ensure that there are no signs of spoilage.
Tip: If you notice any signs of spoilage, it’s best to remove the affected tubers immediately to prevent the spread of mold to other tubers.
Troubleshooting Common Kumara Growing Problems
Even with the best care, you may encounter some challenges while growing kumara. Let’s explore some common growing problems and how to address them.
Pests:
- Aphids: These small, sap-sucking insects can infest kumara plants, causing stunted growth and leaf distortion.
- Control Methods: Introduce beneficial insects like ladybugs, or use insecticidal soap sprays.
- Whiteflies: These tiny, winged insects can also infest kumara plants, causing leaf yellowing and stunting.
- Control Methods: Use sticky traps to capture whiteflies, or introduce beneficial insects like lacewings.
- Wireworms: These slender, hard-bodied larvae can feed on kumara tubers, causing damage.
- Prevention Methods: Rotate crops to avoid planting kumara in the same location year after year.
Diseases:
- Root Rot: This fungal disease can occur in poorly drained soils. Symptoms include wilting leaves and stunted growth.
- Prevention Methods: Ensure proper drainage and avoid overwatering.
- Fungal Leaf Diseases: Various fungal diseases can affect kumara leaves, causing spots or blights.
- Control Methods: Improve air circulation around plants and avoid overhead watering.
Nutrient Deficiencies:
- Nitrogen Deficiency: Nitrogen deficiency can cause pale green or yellow leaves.
- Treatment: Apply a nitrogen-rich fertilizer, such as compost tea or fish emulsion.
- Potassium Deficiency: Potassium deficiency can lead to weak stems and poor tuber development.
- Treatment: Apply a potassium-rich fertilizer, such as wood ash or potassium sulfate.
Other Problems:
- Insufficient Sunlight: Kumara plants require at least 6-8 hours of direct sunlight per day. If your plants are not receiving enough sunlight, they may become weak and produce fewer tubers.
- Drought Stress: Drought stress can cause wilting, leaf drop, and reduced tuber yield. Water your plants deeply and regularly, especially during dry periods.
Troubleshooting Techniques:
- Regular Monitoring: Regularly inspect your plants for any signs of pests, diseases, or nutrient deficiencies. Early detection and treatment can help to minimize damage.
- Identifying Problems: Carefully observe your plants and try to identify the cause of any problems. Refer to gardening resources or consult with local experts if you’re unsure.
- Implementing Solutions: Once you’ve identified the problem, take appropriate action to address it. This may involve adjusting watering practices, applying fertilizer, or implementing pest control measures.
By proactively addressing potential problems and implementing effective troubleshooting techniques, you can increase your chances of a successful kumara harvest. Remember, prevention is key!
Personal Experience:
I’ve encountered my share of challenges while growing kumara. In one instance, I noticed that my plants were wilting despite regular watering. After some investigation, I discovered that the soil was compacted, hindering water drainage. I loosened the soil around the base of the plants and improved drainage, and my plants quickly recovered.
Tip: Keep a gardening journal to record your observations, including any problems you encounter and the steps you took to address them. This will help you to learn from your experiences and improve your gardening skills over time.
By understanding and addressing common growing problems, you can increase your chances of a successful kumara harvest. Remember, every challenge is an opportunity to learn and improve your gardening skills.
Creative Ways to Enjoy Your Homegrown Kumara

Now that you’ve successfully grown a bountiful harvest of kumara, it’s time to enjoy the fruits of your labor! Kumara is incredibly versatile and can be used in a wide variety of dishes. Here are some creative ways to savor your homegrown bounty:
Delicious and Easy Kumara Recipes:
- Roasted Kumara: This is a simple and flavorful way to enjoy your homegrown kumara. Cut the kumara into wedges, toss with olive oil, salt, pepper, and your favorite spices (such as paprika, cumin, or chili powder), and roast in a preheated oven until tender and slightly caramelized.
- Sweet Potato Fries: A healthier and tastier alternative to traditional French fries. Cut the kumara into thin strips, toss with olive oil and spices, and bake or air-fry until crispy.
- Kumara Soup: This creamy and comforting soup is perfect for a chilly evening. Roast or boil the kumara, then blend with broth, milk, and your choice of seasonings.
- Kumara Mash: A delicious and nutritious alternative to mashed potatoes. Simply boil or steam the kumara, mash them with butter, milk, and seasonings.
Tips for Preparing and Cooking Kumara:
- Cooking Methods: Kumara can be baked, roasted, boiled, steamed, or even grilled. Experiment with different cooking methods to discover your favorites.
- Flavor Combinations: Kumara pairs well with a variety of flavors. Try combining it with herbs like rosemary, thyme, and sage, or spices like cumin, chili powder, and cinnamon.
- Sweet and Savory: Kumara can be used in both sweet and savory dishes. Try adding roasted kumara to salads, stews, or stir-fries. For a sweet treat, enjoy roasted kumara with a dollop of Greek yogurt and a drizzle of honey.
Exploring the Versatility of Kumara:
- Kumara in Different Cuisines: Kumara is a globally recognized ingredient. Explore different cuisines and discover how kumara is used in dishes from around the world.
- Kumara as a Snack: Roasted kumara slices make a healthy and satisfying snack. You can also try making kumara chips for a crunchy and flavorful treat.
- Kumara for Breakfast: Add diced kumara to your morning smoothie or enjoy it as a side dish with eggs.
Personal Experience:
One of my favorite ways to enjoy homegrown kumara is to roast it with rosemary and garlic. The flavors are simple yet incredibly satisfying. I also love to make a creamy kumara soup with a hint of coconut milk and a sprinkle of fresh cilantro.
By experimenting with different recipes and cooking methods, you’ll discover endless ways to enjoy your homegrown kumara. Happy cooking!
FAQ Section

I understand that you may have some specific questions about growing kumara. Here are answers to some frequently asked questions:
Q: Can I grow kumara in containers?
- A: Yes, you can grow kumara in containers, but they will require larger containers (at least 18 inches deep) to accommodate the root system. Choose well-draining potting mix and ensure the containers receive plenty of sunlight.
Q: When is the best time to plant kumara slips?
- A: The best time to plant kumara slips varies depending on your climate. In general, plant them after the last frost and when soil temperatures have warmed up to at least 60°F (15°C). This typically occurs in late spring or early summer.
Q: How often should I water my kumara plants?
- A: Water your kumara plants deeply and regularly, especially during dry periods. However, avoid overwatering, as this can lead to root rot. Check the soil moisture regularly by inserting your finger into the soil. If the top inch of soil feels dry, it’s time to water.
Q: What are some common pests that affect kumara?
- A: Common pests that can affect kumara include aphids, whiteflies, and wireworms. Aphids and whiteflies can sap the plant’s nutrients, while wireworms can feed on the tubers.
Q: Can I grow kumara from seeds?
- A: While technically possible, growing kumara from seeds is not recommended for most home gardeners. It is generally easier and more reliable to start with slips. Seeds can be slow to germinate and may not produce consistent results.
I hope this FAQ section addresses some of your common questions about growing kumara. If you have any further questions, feel free to leave a comment below. Happy gardening!


")

