
Are you tired of your garden looking drab and uninspired after a long winter? Do you crave a vibrant, personalized outdoor space but feel overwhelmed by the costs and complexities of traditional landscaping? I understand that feeling. That’s why I’ve compiled 12 brilliant “DIY spring garden ideas” that are not only budget-friendly but also incredibly rewarding. These projects will help you transform your garden into a flourishing haven, reflecting your unique style and passion for nature.
1. Build a Raised Bed from Reclaimed Wood for Spring Vegetables

One of the most effective ways to kickstart your spring garden is by building raised beds. Raised beds offer numerous advantages: they improve soil drainage, reduce weed growth, and make gardening more accessible. For this project, I recommend using reclaimed wood. Not only is it an eco-friendly choice, but it also adds a rustic charm to your garden.
How to Select and Prepare Reclaimed Wood:
When selecting reclaimed wood, you’ll want to prioritize durability and safety. Avoid wood that is heavily treated with chemicals or shows signs of rot. I often find suitable wood from old pallets, fences, or construction sites. Before using the wood, thoroughly clean it with a wire brush and remove any nails or staples. If the wood is rough, you can sand it down to prevent splinters.
Step-by-Step Instructions for Building a Sturdy Raised Bed:
- Measure and Cut: Determine the desired size of your raised bed and cut the wood planks accordingly. I typically aim for a bed that is 4 feet wide and 8 feet long, with a depth of at least 12 inches.
- Assemble the Frame: Lay the planks on a flat surface and assemble the frame using screws or nails. Ensure the corners are square and the frame is sturdy.
- Reinforce the Corners: To add extra support, attach corner braces or additional wood pieces to the inside corners of the frame.
- Line the Bed: Line the inside of the raised bed with landscape fabric to prevent soil erosion and weed growth.
- Fill with Soil: Fill the raised bed with a high-quality soil mixture. I recommend a blend of topsoil, compost, and peat moss for optimal plant growth.
Best Spring Vegetables to Plant in Raised Beds:
Raised beds are ideal for growing a variety of spring vegetables. Some of my favorites include:
- Lettuce: Lettuce thrives in cool weather and can be harvested multiple times.
- Radishes: Radishes are fast-growing and add a spicy kick to salads.
- Peas: Peas prefer well-drained soil and can be trellised for vertical growth.
- Spinach: Spinach is a nutrient-rich leafy green that grows well in raised beds.
- Carrots: Carrots require loose, well-draining soil, which raised beds provide.
Soil Preparation and Composting Tips for Optimal Growth:
Soil preparation is crucial for a successful spring garden. Before planting, loosen the soil and remove any rocks or debris. I always incorporate compost into the soil to improve its fertility and structure. You can create your own compost by layering kitchen scraps, yard waste, and other organic materials.
Benefits of Raised Beds:
- Improved soil drainage
- Reduced weed growth
- Easier access for planting and harvesting
- Extended growing season
- Better soil temperature control
Case Study:
Last spring, I built a raised bed using reclaimed pallet wood. I planted a variety of vegetables, including lettuce, radishes, and peas. The raised bed provided excellent drainage and reduced weed growth. I was able to harvest fresh vegetables throughout the spring and into the summer.
Ideal Spring Vegetables for Raised Beds
| Vegetable | Planting Time | Sunlight Needs | Soil pH |
| Lettuce | Early Spring | Full sun to part shade | 6.0-7.0 |
| Radishes | Early Spring | Full sun | 6.0-7.0 |
| Peas | Early Spring | Full sun | 6.0-7.5 |
| Spinach | Early Spring | Full sun to part shade | 6.5-7.5 |
| Carrots | Early Spring | Full sun | 6.0-7.0 |
Quote:
“The greatest gift of the garden is the restoration of a sense of wholeness.” – Penelope Lively
Data:
According to a study by the University of California, raised beds can increase vegetable yields by up to 30%.
I find that creating raised beds is a fulfilling project, and it significantly enhances the productivity of my spring garden. I encourage you to try it and experience the joy of growing your own vegetables.
2. Create a Vertical Herb Garden Using Repurposed Pallets

Vertical gardening is a fantastic space-saving solution, especially for smaller gardens or balconies. Repurposing old pallets into a vertical herb garden is not only eco-friendly but also adds a rustic charm to your outdoor space.
How to Find and Prepare a Wooden Pallet for Gardening:
You can often find discarded pallets behind businesses or construction sites. Inspect the pallets for any signs of rot or chemical treatment. Avoid pallets that have been treated with pesticides or insecticides. Thoroughly clean the pallet with a wire brush to remove any debris, dust, and loose splinters. Sand down any rough edges to prevent injuries.
Designing and Installing Pockets for Herb Planting:
There are several ways to create pockets for planting herbs in your pallet.
- Simple Slit Method: Cut vertical slits into the pallet slats to create pockets for small pots.
- Wire Mesh Method: Attach wire mesh to the front of the pallet and hang small pots or plant directly into the mesh.
- Pocket Liner Method: Create fabric pockets from old t-shirts or burlap sacks and attach them to the pallet using nails or staples.
Choosing the Right Herbs for Spring Planting in a Vertical Garden:
Select herbs that thrive in well-drained soil and can handle some exposure to the elements. Some excellent choices for spring planting include:
- Basil: A popular culinary herb that thrives in warm weather.
- Mint: A vigorous grower that can easily spread, so consider planting it in a contained pot within the pallet.
- Thyme: A versatile herb that adds flavor to many dishes.
- Chives: Easy to grow and adds a delicate onion flavor to dishes.
- Parsley: A versatile herb that can be used fresh or dried.
Maintenance Tips for a Thriving Vertical Herb Garden:
- Watering: Water your herbs regularly, especially during dry periods. Check the soil moisture regularly and water deeply.
- Fertilizing: Fertilize your herbs once a month with a balanced liquid fertilizer.
- Pruning: Regularly prune your herbs to encourage bushier growth and prevent them from becoming leggy.
- Pest Control: Monitor your herbs for pests and diseases. Use organic pest control methods whenever possible.
By following these tips, you can create a beautiful and productive vertical herb garden using repurposed pallets. This project is a great way to add a touch of greenery to your outdoor space while minimizing your environmental impact.
3. Design Colorful Painted Terra Cotta Pots for Spring Flowers

Terra cotta pots are a classic choice for spring flowers, and painting them is a fun and easy way to add a personal touch. You can find terra cotta pots in various sizes and shapes at most garden centers or home improvement stores.
Selecting and Preparing Terra Cotta Pots for Painting:
Before painting, it’s essential to prepare your terra cotta pots. Wash them thoroughly with soap and water to remove any dust or residue. Allow them to dry completely before painting. If you’re using new pots, soak them in water for several hours to seal the pores and prevent them from absorbing paint too quickly.
Creative Painting Techniques and Design Ideas:
There are endless possibilities for painting terra cotta pots. Here are a few ideas to get you started:
- Floral Patterns: Use acrylic paints to create colorful floral designs, such as daisies, tulips, or roses.
- Geometric Patterns: Create geometric patterns using stencils or freehand techniques.
- Ombre Effects: Create a gradual color transition from one color to another.
- Textured Effects: Use textured paints or create texture with sponges or other tools.
- Inspirational Quotes: Paint inspirational quotes or sayings on your pots.
Best Spring Flowers to Plant in Painted Pots:
Choose flowers that thrive in warm weather and complement the colors of your painted pots. Some excellent choices include:
- Petunias: Available in a wide range of colors and bloom profusely throughout the spring and summer.
- Pansies: Hardy flowers that come in various colors and add a cheerful touch to your pots.
- Geraniums: Easy to care for and come in a variety of colors and leaf patterns.
- Marigolds: Vibrant and colorful flowers that attract pollinators to your garden.
- Impatiens: Shade-loving flowers that come in a wide range of colors.
How to Care for Potted Flowers in Spring:
- Watering: Water your potted flowers regularly, especially during hot and dry weather. Check the soil moisture regularly and water deeply.
- Fertilizing: Fertilize your flowers once a month with a balanced liquid fertilizer.
- Pruning: Prune your flowers regularly to encourage bushier growth and remove any dead or damaged blooms.
- Pest Control: Monitor your flowers for pests and diseases. Use organic pest control methods whenever possible.
Painting terra cotta pots is a fun and creative way to add a personal touch to your spring garden. By following these tips, you can create beautiful and unique pots that will enhance your outdoor space.
4. Construct a DIY Trellis for Climbing Spring Blooms

Climbing plants can add a touch of vertical interest and beauty to your spring garden. However, they need support to grow and flourish. Building a simple trellis is a DIY project that can be easily accomplished with readily available materials.
Materials Needed for a Simple DIY Trellis:
- Wood: Use untreated wood like cedar or redwood for durability. You can use wooden stakes, bamboo poles, or even sturdy branches from pruned trees.
- Twine or Rope: Choose a strong and weather-resistant material like jute twine or nylon rope.
- Tools: A saw, hammer, drill, and screws or nails.
Step-by-Step Assembly Instructions:
- Plan and Design: Determine the size and shape of your trellis based on the space available and the type of climbing plants you plan to grow.
- Assemble the Frame: If using stakes or poles, drive them into the ground at the desired spacing. For a more elaborate design, you can create a frame using wooden planks and screws.
- Attach the Twine or Rope: Weave the twine or rope horizontally and vertically across the frame to create a grid-like structure. Adjust the spacing between the strings based on the size and growth habit of your climbing plants.
- Secure the Trellis: Secure the trellis to a sturdy fence, wall, or other support structure to ensure stability.
Ideal Climbing Plants for Spring Blooms:
- Clematis: Known for their large, showy blooms in various colors.
- Morning Glories: Produce vibrant flowers that open in the morning and close at night.
- Sweet Peas: Fragrant flowers that bloom in a variety of colors.
- Climbing Roses: Add a touch of elegance and fragrance to your garden.
- Honeysuckle: Produces fragrant flowers and attracts pollinators.
Placement and Support Tips for Climbing Plants:
- Sunlight: Plant climbing plants in a location that receives adequate sunlight, typically at least 6 hours per day.
- Watering: Water your climbing plants regularly, especially during dry periods.
- Pruning: Prune your plants regularly to maintain their shape and encourage healthy growth.
- Support: As your plants grow, gently guide their vines along the trellis to ensure proper support.
Building a DIY trellis is a rewarding project that can add a touch of vertical interest and beauty to your spring garden. By following these simple steps, you can create a supportive structure for your climbing plants to thrive.
5. Craft Decorative Garden Markers from Recycled Materials

Adding decorative garden markers is a fun way to personalize your space and keep track of your plants. You can create unique and charming markers using a variety of recycled materials.
Ideas for Using Recycled Materials:
- Painted Stones: Collect smooth, flat stones from your garden or a local creek. Clean them thoroughly and paint them with acrylic paints. You can write the plant names directly on the stones or use stencils to create decorative patterns.
- Spoon Markers: Repurpose old spoons by painting them with colorful designs or writing the plant names on the handles.
- Bottle Cap Markers: Clean and dry bottle caps from soda or beer bottles. Paint them with different colors and write the plant names on them using a permanent marker.
- Wooden Skewers: Write the plant names on wooden skewers using a permanent marker or paint. You can also decorate them with colorful beads or ribbons.
- Popsicle Stick Markers: Paint popsicle sticks with bright colors and write the plant names on them. You can also add decorative elements like glitter or stickers.
Creative Painting and Labeling Techniques:
- Use stencils: Create unique designs using stencils and spray paint or acrylic paint.
- Add texture: Use textured paints or create texture by pressing objects like bubble wrap or leaves into the paint.
- Use permanent markers: Write the plant names clearly and neatly using permanent markers.
- Get creative with fonts: Use different fonts and styles to add personality to your markers.
How to Make Garden Markers Durable for Outdoor Use:
- Seal the paint: Apply a clear sealant to your painted markers to protect them from the elements.
- Use weatherproof materials: Choose materials that are resistant to moisture and sunlight.
- Anchor the markers: Use stakes or wires to secure the markers in the soil.
Organizing Your Garden with Effective Markers:
- Group plants together: Place markers for similar plants near each other to make it easier to find what you’re looking for.
- Use a consistent labeling system: Use the same font and color scheme for all your markers to create a cohesive look.
- Update markers as needed: Replace or update markers as plants grow or change.
Creating decorative garden markers is a fun and rewarding project that allows you to express your creativity and personalize your outdoor space. By using recycled materials and employing some creative techniques, you can create unique and eye-catching markers that will add a touch of charm to your garden.
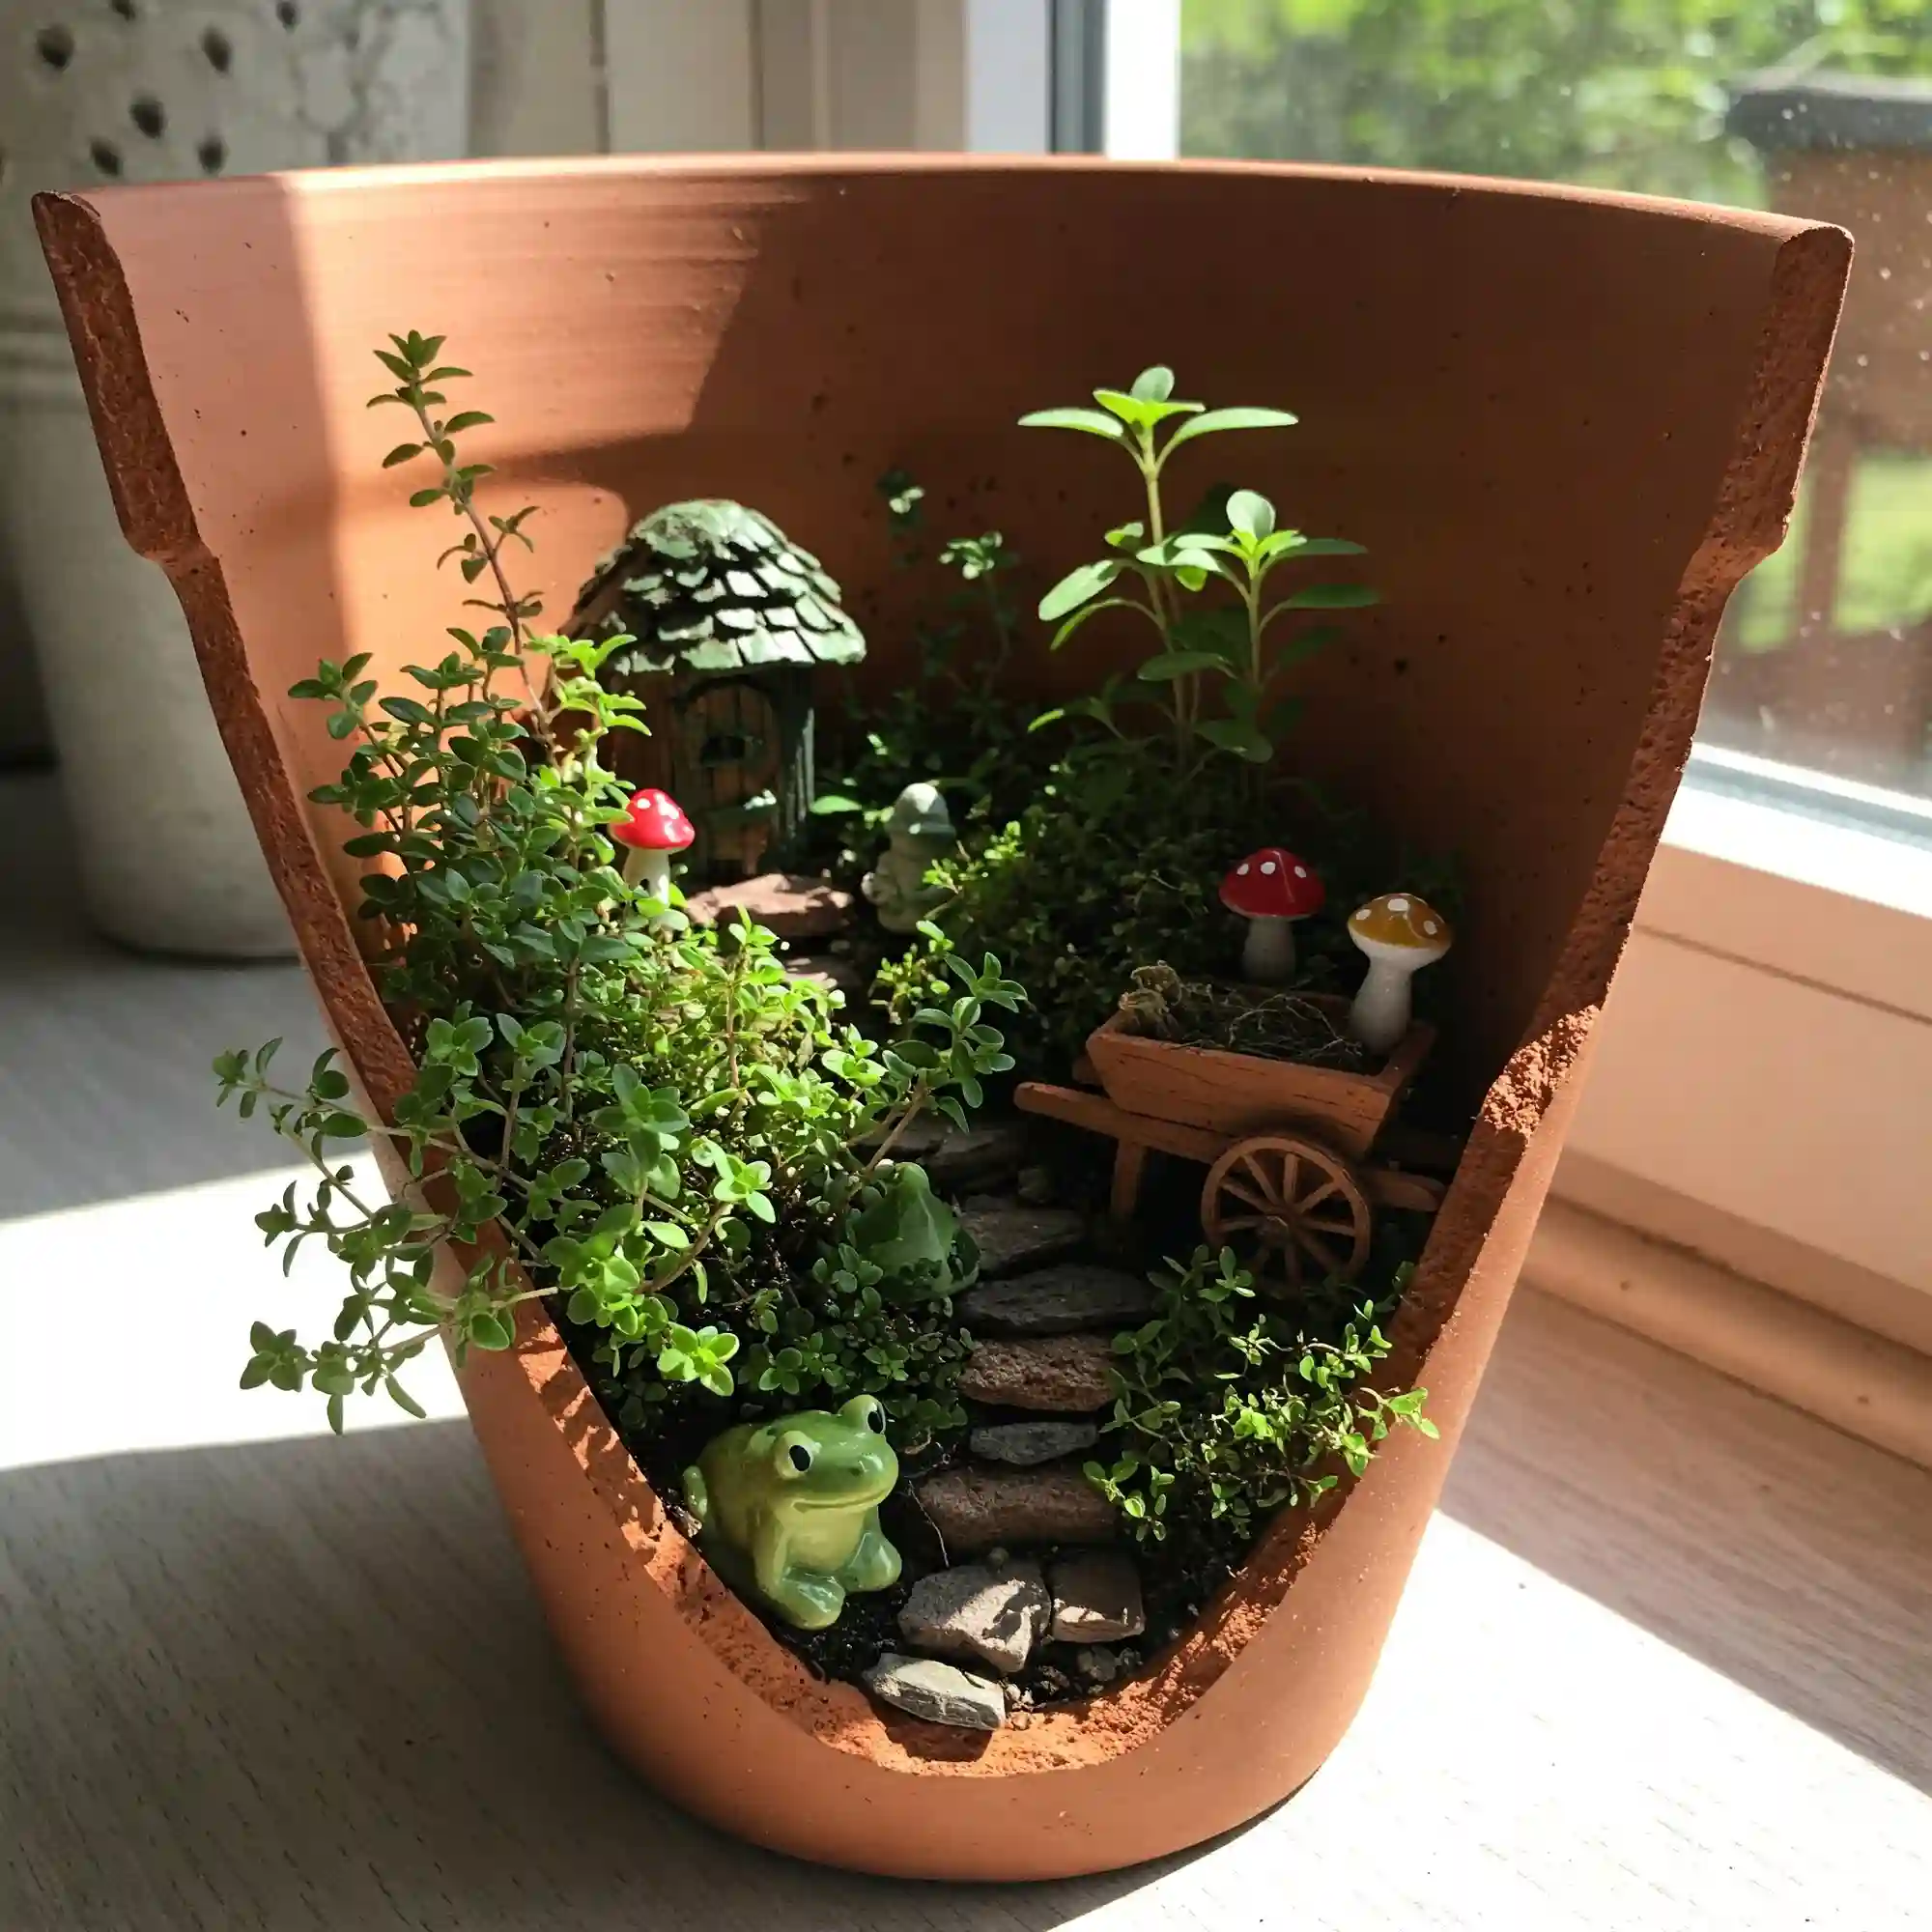
6. Make a Spring-Themed Fairy Garden in a Broken Pot

Fairy gardens are a delightful way to add a touch of whimsy and enchantment to your outdoor space. They’re particularly fun to create with children and can be made from a variety of materials, including broken pots.
How to Safely Break and Arrange a Terra Cotta Pot:
If you have a broken terra cotta pot, you can use it to create a charming fairy garden. Here are some tips:
- Safety First: Wear protective gloves and eyewear when breaking the pot.
- Break Carefully: Use a hammer or a heavy object to break the pot into smaller pieces. Be careful not to injure yourself.
- Arrange the Pieces: Arrange the broken pieces to create a natural and interesting landscape for your fairy garden. You can use the larger pieces as walls or hills, and the smaller pieces as pathways or decorative elements.
Selecting Miniature Plants and Accessories:
Choose small, low-growing plants that thrive in well-drained soil and can tolerate some shade. Some excellent choices include:
- Moss: Creates a soft, lush ground cover.
- Creeping Thyme: A fragrant herb that adds a touch of color and aroma.
- Baby Tears: A delicate plant with tiny, rounded leaves.
- Miniature Succulents: Add a touch of texture and interest.
For accessories, you can use a variety of small objects, such as:
- Miniature figurines: Fairies, gnomes, animals, and other whimsical creatures.
- Tiny furniture: Miniature chairs, tables, and swings.
- Decorative stones and pebbles: Create pathways, waterfalls, and other features.
- Seashells: Add a beachy touch to your fairy garden.
- Miniature houses and buildings: Create a magical village for your fairy friends.
Creating a Whimsical and Enchanting Fairy Garden:
Let your imagination run wild when creating your fairy garden. Arrange the plants and accessories to create a whimsical and enchanting scene. You can create hidden pathways, secret grottos, and miniature waterfalls. Add a touch of magic with glitter, fairy dust, or other decorative elements.
Maintaining a Fairy Garden in Spring:
- Watering: Water your fairy garden regularly, but avoid overwatering.
- Weeding: Remove any weeds that may sprout in your fairy garden.
- Pruning: Trim any overgrown plants to maintain the shape and size of your fairy garden.
- Decorating: Add new accessories and decorations to your fairy garden throughout the spring season.
Creating a fairy garden is a fun and creative way to add a touch of whimsy to your outdoor space. By using broken pots and other recycled materials, you can create a magical world for your imagination to flourish.
7. Build a Simple Compost Bin for Spring Garden Soil

Composting is a fantastic way to create nutrient-rich soil for your spring garden. Building a simple compost bin is an easy and eco-friendly project that will benefit your garden and the environment.
Choosing the Right Location and Materials for a Compost Bin:
Select a location for your compost bin that is easily accessible and receives some shade. You can use a variety of materials to build a compost bin, including:
- Wooden Pallets: Repurpose old wooden pallets to create a three-bin composting system.
- Wire Mesh: Construct a simple wire mesh cage to contain your compost.
- Plastic Totes: Use large plastic storage bins with holes drilled in the sides for ventilation.
- Compost Tumblers: These rotating bins make it easy to turn and aerate your compost.
Step-by-Step Instructions for Building a Basic Compost Bin:
- Gather Materials: Collect the materials you need to build your compost bin, such as wood, wire mesh, or plastic totes.
- Assemble the Bin: Follow the instructions for your chosen method to assemble the compost bin. Ensure that the bin is sturdy and well-ventilated.
- Add Layers of Materials: Start by adding a layer of coarse materials, such as twigs and branches, to the bottom of the bin. Then, add layers of “green” materials (nitrogen-rich materials like kitchen scraps and grass clippings) and “brown” materials (carbon-rich materials like leaves, twigs, and shredded paper).
- Maintain Moisture: Keep the compost moist but not soggy. Water it regularly if needed.
- Turn the Compost: Turn the compost regularly to aerate it and speed up the decomposition process.
Best Materials for Spring Composting:
- Green Materials: Kitchen scraps (fruit and vegetable peels, coffee grounds, tea bags), grass clippings, weeds (without seeds).
- Brown Materials: Leaves, twigs, shredded paper, cardboard, sawdust.
How to Use Compost to Enrich Spring Garden Soil:
Once your compost has finished decomposing, you can use it to enrich your garden soil. Simply spread a layer of compost over your garden beds and till it into the soil. Compost will improve soil structure, increase water retention, and provide essential nutrients for your plants.
Benefits of Composting:
- Reduces waste sent to landfills
- Creates nutrient-rich soil for your garden
- Improves soil health and plant growth
- Saves money on expensive fertilizers
By building a simple compost bin and composting your kitchen and yard waste, you can create a valuable resource for your spring garden while also contributing to a more sustainable environment.
8. Create a DIY Bird Feeder to Attract Spring Wildlife

Attracting birds to your garden is a rewarding experience. Building a DIY bird feeder is a simple and fun way to encourage birdlife and add a touch of nature to your outdoor space.
Simple Designs for Bird Feeders Using Recycled Materials:
- Plastic Bottle Feeder: Cut a large hole near the top of a plastic bottle. Fill the bottle with birdseed. Poke several smaller holes below the feeding hole for drainage. Hang the bottle upside down from a tree branch or hook.
- Pine Cone Feeder: Spread peanut butter on a pine cone. Roll the pine cone in birdseed. Hang the pine cone from a tree branch or hook using a string or wire.
- Milk Carton Feeder: Cut a hole in the side of a clean milk carton. Fill the carton with birdseed. Poke several drainage holes in the bottom. Hang the carton upside down from a tree branch or hook.
- Spoon Feeder: Attach a spoon to a tree branch or hook. Place a small amount of birdseed in the spoon.
Choosing the Right Birdseed for Spring Birds:
Select a birdseed mix that is appropriate for the types of birds you want to attract. Some popular choices include:
- Black oil sunflower seeds: A favorite among many birds, including cardinals, chickadees, and nuthatches.
- Nyjer seed: Attracts small birds like finches and goldfinches.
- Safflower seeds: Preferred by cardinals and some other birds, but less appealing to squirrels.
- Suet: A high-energy food source that is especially popular with woodpeckers and nuthatches.
Placement Tips to Attract Various Bird Species:
- Location: Place your bird feeder in a sheltered location away from direct sunlight, rain, and wind.
- Height: Hang your feeder at least 5 feet off the ground to deter squirrels and other predators.
- Visibility: Place your feeder near trees or shrubs to provide birds with a safe place to perch and observe their surroundings.
Maintaining a Clean and Safe Bird Feeder:
- Clean Regularly: Clean your bird feeder regularly with hot soapy water to prevent the spread of disease.
- Remove Old Seed: Discard any old or moldy seed.
- Check for Pests: Monitor your feeder for signs of pests like squirrels or raccoons.
Building a DIY bird feeder is a fun and rewarding project that can bring a touch of nature to your spring garden. By following these simple tips, you can create a welcoming space for birds to visit and enjoy your backyard.
9. Design a Budget-Friendly Spring Garden Pathway with Stepping Stones

Garden pathways not only add visual interest but also guide visitors and protect your plants from being trampled. Creating a budget-friendly pathway with stepping stones is a simple and rewarding DIY project.
Selecting Affordable Stepping Stone Materials:
You can find affordable stepping stones from a variety of sources:
- Natural Stones: Gather smooth, flat stones from your local area.
- Recycled Bricks: Use old bricks to create a classic and durable pathway.
- Concrete Stepping Stones: Purchase inexpensive concrete stepping stones from home improvement stores.
- Recycled Materials: Repurpose old slate tiles, flagstones, or even large, flat river rocks.
Laying Out and Installing a Garden Pathway:
- Plan the Path: Determine the desired path of your pathway and mark it out with stakes or string.
- Prepare the Ground: Remove any grass or weeds from the path area. Level the ground and add a layer of gravel or crushed stone for drainage.
- Place the Stepping Stones: Arrange the stepping stones along the path, ensuring they are spaced comfortably for walking. Experiment with different arrangements to create a visually appealing design.
- Secure the Stones: Use sand, gravel, or pea gravel to fill the gaps between the stones and secure them in place.
- Add Mulch: Apply a layer of mulch around the pathway to suppress weeds and add a finished look.
Creating Decorative Stepping Stones with Molds and Concrete:
If you’re feeling creative, you can make your own decorative stepping stones using simple molds and concrete.
- Materials: Concrete mix, molds (such as plastic containers or bowls), water, and decorative elements (such as shells, pebbles, or glass).
- Instructions: Mix the concrete according to the package directions. Pour the concrete into the molds and add your desired decorative elements. Allow the concrete to set for several hours or overnight. Remove the stones from the molds and let them cure for a few days before placing them in your garden.
Maintaining a Spring Garden Pathway:
- Weed Control: Regularly remove any weeds that grow between the stones.
- Repair Loose Stones: Reset any loose stones as needed.
- Refresh Mulch: Add fresh mulch to the pathway as needed to control weeds and maintain a neat appearance.
Creating a DIY garden pathway with stepping stones is a budget-friendly and rewarding project that can add a touch of elegance and functionality to your outdoor space. By using readily available materials and a little creativity, you can create a beautiful pathway that you’ll enjoy for years to come.
10. Start Seedlings Indoors for Early Spring Planting

Starting seeds indoors is a great way to get a head start on the growing season and enjoy a longer harvest. You can start a variety of vegetables, herbs, and flowers indoors several weeks before the last expected frost.
Selecting the Right Seeds and Starting Trays:
Choose high-quality seeds from a reputable supplier. Look for seeds that are specifically labeled for starting indoors. You can find a wide variety of seeds at garden centers, online retailers, and local seed libraries.
Select seed starting trays with drainage holes to prevent overwatering. You can also use small pots, peat pellets, or egg cartons as seed starting containers.
How to Provide Optimal Light and Warmth for Seedlings:
Seedlings require adequate light and warmth to germinate and grow. Place your seed trays near a sunny window or under grow lights. Maintain a consistent temperature between 65-75°F (18-24°C). You can use a heat mat to provide additional warmth.
Transplanting Seedlings to the Garden in Spring:
Once your seedlings have developed several true leaves and the weather has warmed up, it’s time to transplant them to the garden. Gradually harden off your seedlings by placing them outdoors for short periods each day before transplanting. This will help them acclimate to the outdoor conditions.
Tips for Hardening Off Seedlings Before Planting:
- Start by placing your seedlings outdoors for a few hours each day in a sheltered location.
- Gradually increase the amount of time your seedlings spend outdoors each day.
- Protect your seedlings from strong winds, rain, and direct sunlight during the hardening-off process.
By starting your seeds indoors and following these tips, you can ensure a successful and bountiful spring garden. Enjoy the satisfaction of nurturing young plants and watching them grow into healthy, productive plants.
Additional Tips for Seed Starting:
- Use a well-draining seed starting mix.
- Water your seedlings gently and consistently.
- Avoid overwatering, which can lead to damping off.
- Monitor your seedlings for pests and diseases.
- Label your seedlings to keep track of what you’ve planted.
Starting seeds indoors is a rewarding experience that allows you to connect with the natural world and enjoy the fruits of your labor. By following these tips, you can successfully start a variety of plants and create a thriving spring garden.
11. Create a Spring Garden Water Feature from a Recycled Container

The gentle sound of trickling water can be incredibly soothing and relaxing. Adding a water feature to your spring garden can create a peaceful oasis and attract wildlife. You can create a simple and budget-friendly water feature using a recycled container.
Choosing a Suitable Container and Pump:
Select a container that is waterproof and large enough to accommodate your water feature. Some suitable options include:
- Old wheelbarrow: Create a rustic and charming water feature.
- Large terracotta pot: Add a classic touch to your garden.
- Plastic storage bin: A versatile and affordable option.
- Repurposed bathtub: Create a unique and eye-catching focal point.
Choose a small submersible pump that is designed for use in water features. Make sure the pump is the right size for your container and has adequate power to circulate the water.
Designing and Installing a Simple Water Feature:
- Prepare the Container: Clean the container thoroughly and ensure it is free of any debris.
- Line the Container: Line the bottom of the container with a layer of pond liner to protect it from water damage.
- Add Water and Pump: Fill the container with water and place the submersible pump at the bottom.
- Arrange Stones and Plants: Arrange rocks, pebbles, and aquatic plants around the pump to create a natural and visually appealing look.
- Add Decorative Elements: Add decorative elements such as small figurines, floating candles, or colorful glass beads.
Adding Plants and Decorations for a Spring Aesthetic:
- Aquatic Plants: Add oxygenating plants like water hyacinth or water lilies to improve water quality and add visual interest.
- Floating Plants: Add floating plants like water hyacinths or water lilies to provide shade and create a serene atmosphere.
- Decorative Elements: Add decorative elements such as small figurines, floating candles, or colorful glass beads.
Maintaining a Small Garden Water Feature:
- Water Level: Regularly check the water level and add water as needed.
- Algae Control: Monitor for algae growth and clean the water feature regularly.
- Pump Maintenance: Clean the pump regularly to ensure proper function.
- Winterizing: If you live in a climate with cold winters, drain the water feature and store it indoors to prevent damage.
Creating a DIY water feature is a rewarding project that can add a touch of tranquility and beauty to your spring garden. By using recycled materials and a little creativity, you can create a unique and relaxing focal point for your outdoor space.
12. Enhance Curb Appeal with DIY Spring Planters and Window Boxes

First impressions matter, and your home’s curb appeal plays a significant role in creating a positive impression. Adding colorful spring planters and window boxes is a simple and effective way to enhance your home’s exterior and welcome the arrival of spring.
Selecting the Right Plants and Containers for Window Boxes:
Choose plants that thrive in sunlight and can withstand the elements. Some excellent choices for spring window boxes include:
- Petunias: Available in a wide range of colors and bloom profusely throughout the spring and summer.
- Pansies: Hardy flowers that come in various colors and add a cheerful touch to your window boxes.
- Geraniums: Easy to care for and come in a variety of colors and leaf patterns.
- Marigolds: Vibrant and colorful flowers that attract pollinators to your garden.
- Impatiens: Shade-loving flowers that come in a wide range of colors.
Select window boxes that are sturdy, well-drained, and the right size for your windows. You can find a variety of window boxes made from wood, metal, or plastic.
Creating Eye-Catching Spring Planter Arrangements:
When arranging your plants, consider the color scheme and overall design. Plant flowers with different heights and blooming times to create a visually appealing and long-lasting display. Use trailing plants to cascade over the edges of the window box.
Placement Tips to Enhance Curb Appeal:
- Symmetry: Place matching window boxes on both sides of your front door or windows for a balanced look.
- Focal Point: Use a larger planter or a unique container to create a focal point on your porch or steps.
- Color Coordination: Choose plants and containers that complement the colors of your home’s exterior.
Maintaining Vibrant Spring Planters and Window Boxes:
- Watering: Water your plants regularly, especially during hot and dry weather.
- Fertilizing: Fertilize your plants once a month with a balanced liquid fertilizer.
- Pruning: Prune your plants regularly to remove dead or damaged blooms and encourage bushier growth.
- Pest Control: Monitor your plants for pests and diseases. Use organic pest control methods whenever possible.
Adding colorful spring planters and window boxes is a simple and effective way to enhance your home’s curb appeal and create a welcoming atmosphere for the arrival of spring. By following these tips, you can create beautiful and vibrant displays that will brighten up your home and your neighborhood.
Conclusion:
I hope these DIY spring garden ideas have inspired you to transform your outdoor space into a vibrant and inviting haven. Remember to have fun, experiment, and let your creativity shine through in your projects. Enjoy the process of creating and the beauty of a flourishing spring garden!
Additional Tips:
- Take photos: Document your progress and share your creations with friends and family.
- Join a local gardening club: Connect with other gardeners and learn new tips and techniques.
- Attend local garden shows and events: Find inspiration and discover new plants and products.
- Start small: Begin with a few simple projects and gradually expand your gardening endeavors.
- Most importantly, have fun and enjoy the process!
By incorporating these DIY projects into your spring gardening routine, you can create a beautiful and functional outdoor space that you’ll enjoy for years to come. Happy gardening!


