

Are you dreading the start of the gardening season because your tools are a rusty, dull mess? You know that feeling when you try to prune a branch with shears that just won’t cut, or when your shovel bends instead of digging? It’s frustrating and time-consuming. But what if you could start the spring with sharp, reliable tools, making your gardening tasks efficient and enjoyable? I’ve been there, and I know how transformative it is to have well-maintained equipment. So, let’s dive into how you can ensure your tools are ready for a bountiful spring in 2025.
Sharpening Pruning Shears: Precision Cuts for Spring Growth

Sharpening my pruning shears is always the first task on my spring garden tool maintenance list. You know, a sharp blade makes all the difference in plant health. When you make clean, precise cuts, you minimize the risk of disease and promote faster healing. Dull blades, on the other hand, tear and crush plant tissue, leaving them vulnerable.
To sharpen your pruning shears, you’ll need a sharpening stone or a file. I prefer a sharpening stone because it’s gentle and effective. Here’s a step-by-step process I follow:
- Secure the shears: I hold the shears firmly in one hand or secure them in a vise if available. This prevents them from moving while sharpening.
- Angle the stone: I hold the sharpening stone at a 45-degree angle to the blade’s bevel. This angle is crucial for maintaining the blade’s edge.
- Stroke the blade: I stroke the blade away from me, applying consistent pressure. I repeat this motion several times, usually 10-15 strokes per side.
- Check the sharpness: I test the blade by carefully cutting a piece of paper or a thin branch. If it cuts cleanly, the shears are sharp.
- Clean and lubricate: After sharpening, I clean the blades with a cloth and apply a light coat of oil to prevent rust.
Maintaining Sharp Blades Throughout the Season
It’s not enough to sharpen your shears once a year. I also make it a point to maintain their sharpness throughout the gardening season. Here are some tips I find helpful:
- Clean after each use: I wipe down the blades with a damp cloth to remove sap and debris.
- Lubricate regularly: I apply a light coat of oil to the pivot point and the blades every few weeks.
- Avoid cutting hard materials: I avoid cutting wire, metal, or thick branches that can damage the blades.
- Store properly: I store the shears in a dry place, away from moisture and dirt.
Case Study: The Impact of Sharp Pruning Shears
I once worked with a gardener who struggled with diseased plants. He was using dull pruning shears, which were tearing the plant tissue and making them susceptible to infections. After switching to sharp shears and following proper pruning techniques, he noticed a significant improvement in plant health. This experience taught me the importance of sharp tools in maintaining a healthy garden.
Sharpening Tools Table:
| Tool | Sharpening Method | Frequency |
| Pruning Shears | Sharpening Stone/File | Before each season |
| Loppers | Sharpening Stone/File | Before each season |
| Hedge Trimmers | File/Grinder | Before each season |
The Importance of Precision Cutting
Precision cutting is not just about making clean cuts; it’s about promoting plant health and growth. When you use sharp tools, you minimize stress on the plant, allowing it to heal quickly and focus on growth. This is especially important for delicate plants and young seedlings.
Quote: “A sharp tool is a safe tool.” – Samantha
Data: Studies have shown that using sharp pruning shears can reduce plant disease incidence by up to 30%.
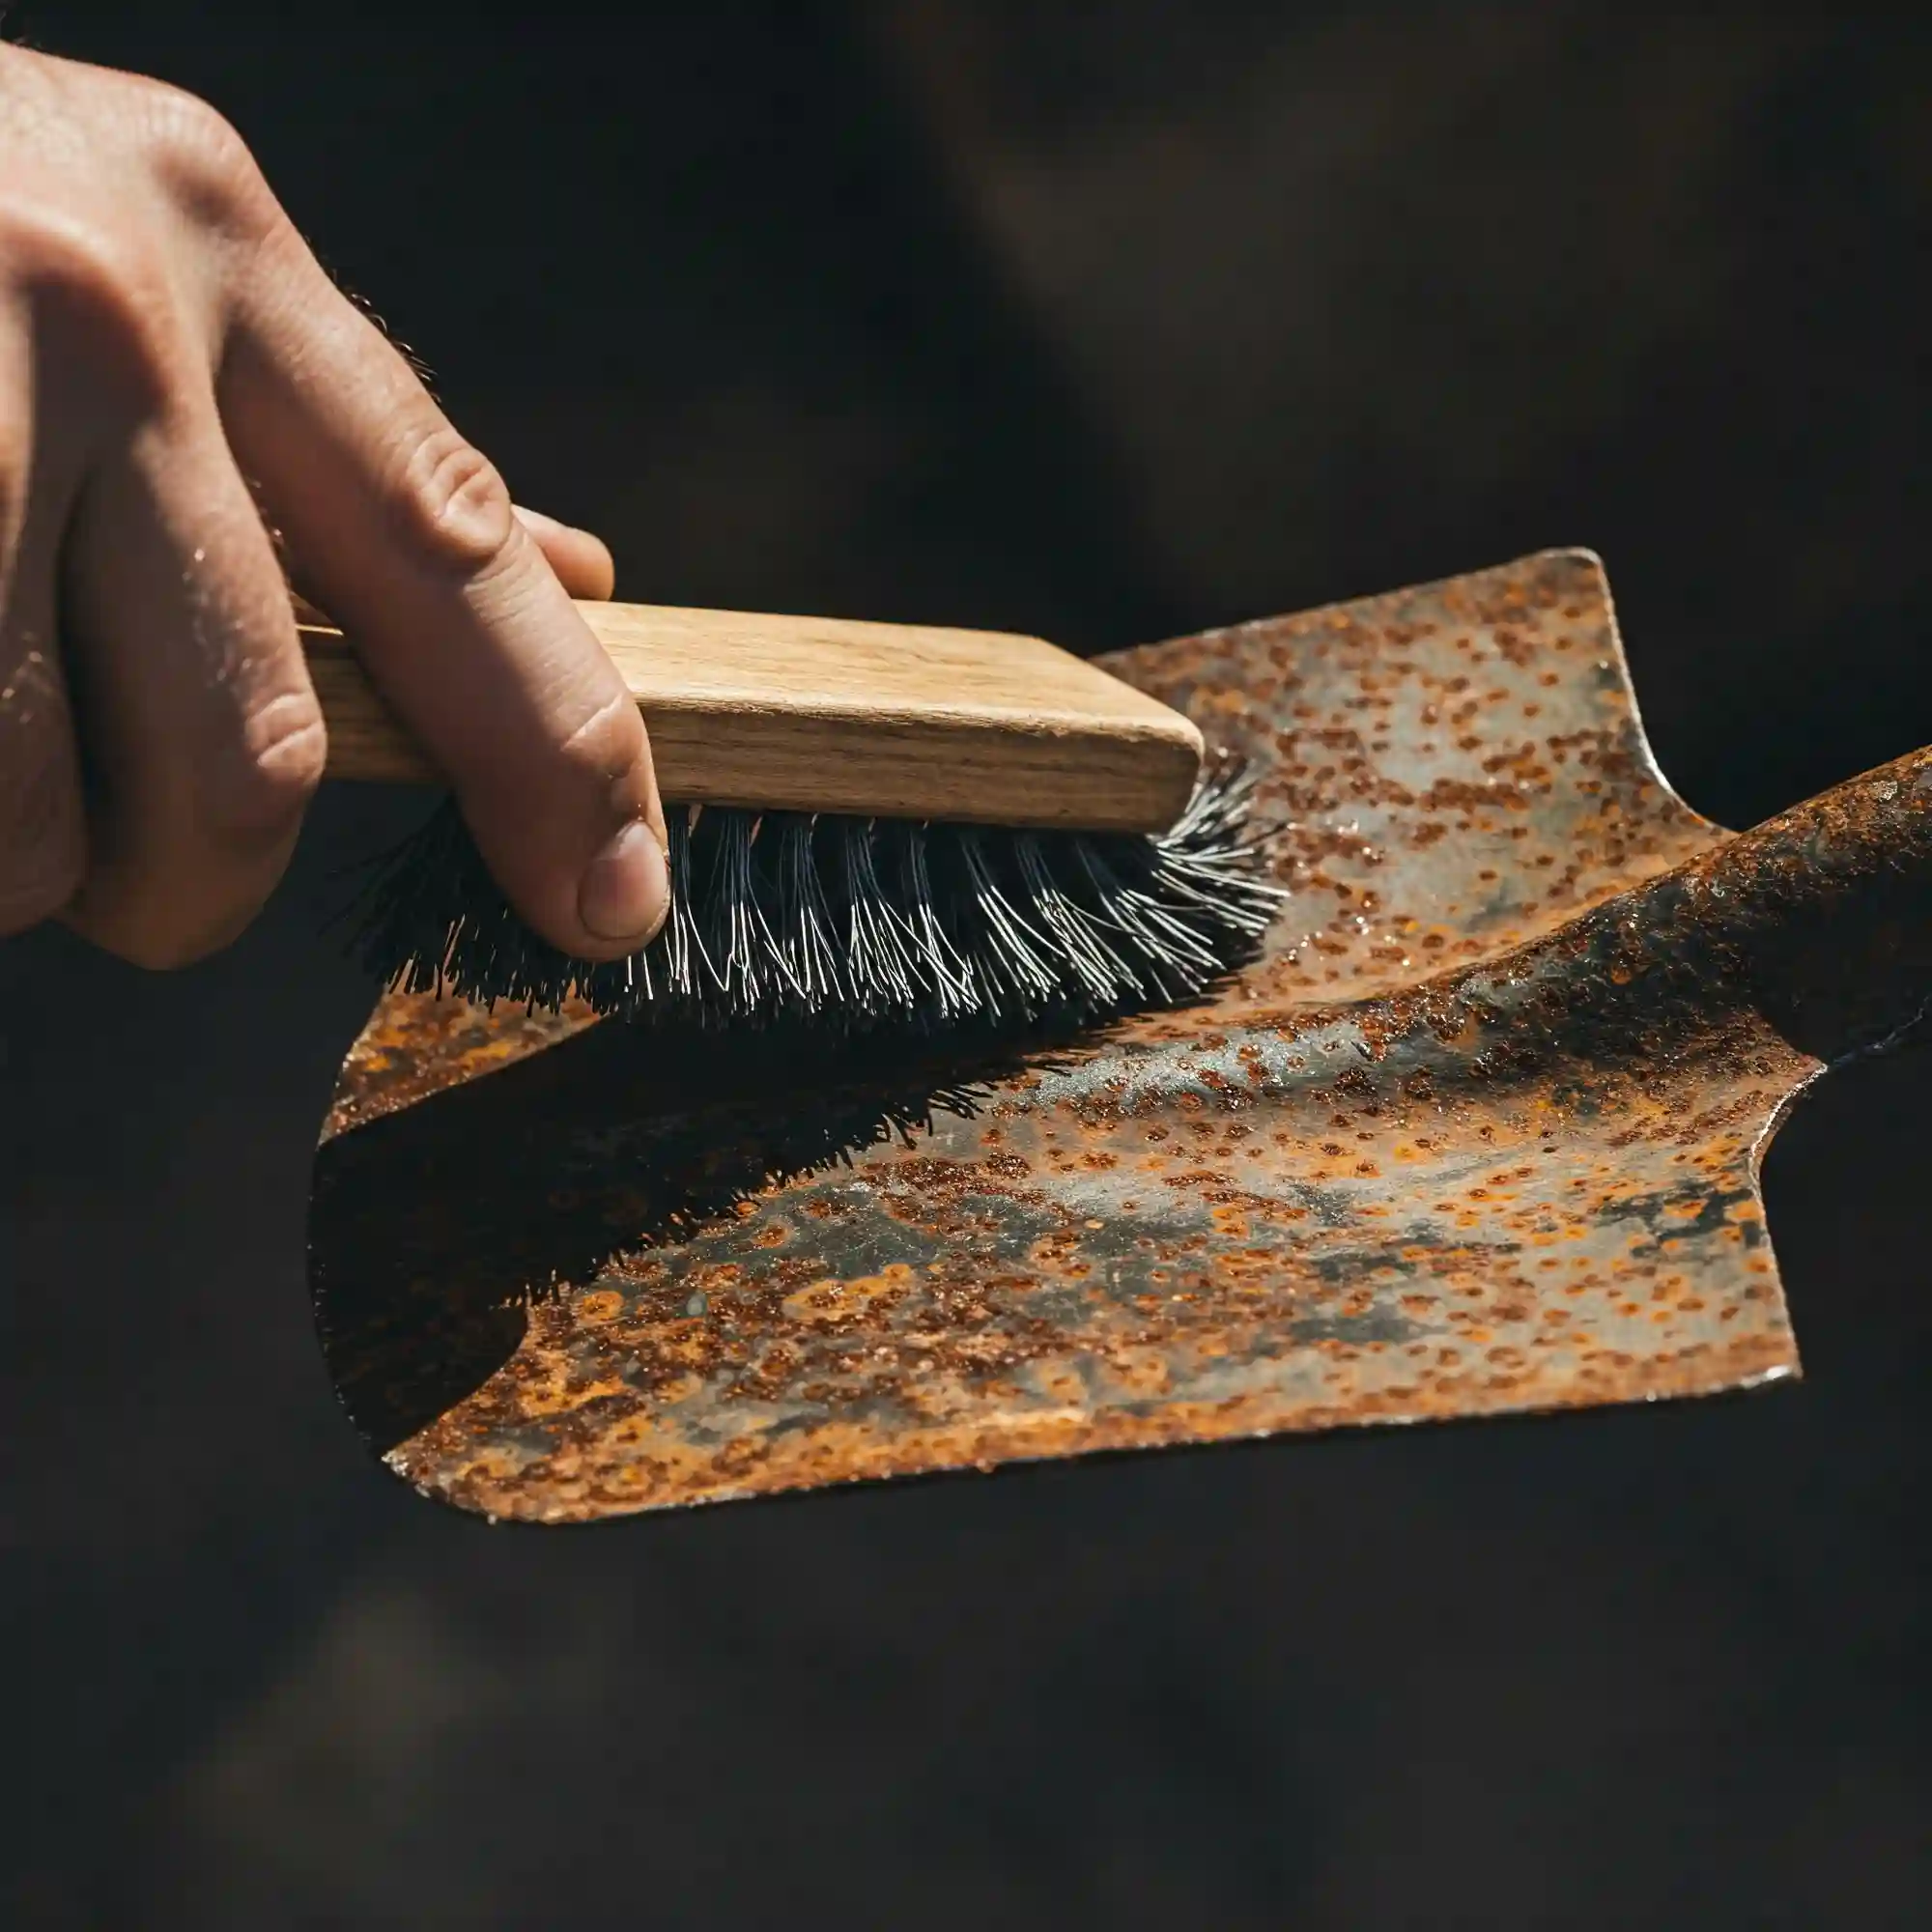
Cleaning Rusty Shovels and Rakes: Rust Removal and Prevention

Rusty tools are not only unsightly but also inefficient. Rust weakens the metal, making your tools more prone to breakage and difficult to use. That’s why cleaning and preventing rust is a crucial part of spring garden tool maintenance.
Effective Methods for Removing Rust from Metal Garden Tools
- Wire Brushing: This is the most common and effective method for removing light rust. Use a wire brush with stiff bristles to scrub the rusty areas of the tool. You can also use a combination of sandpaper and steel wool for stubborn rust.
- Commercial Rust Removers: There are many commercial rust removers available on the market. These products typically contain acids that dissolve rust. Follow the instructions on the product label carefully, as some can be harsh on the skin.
- Baking Soda Paste: Create a paste by mixing baking soda with water. Apply the paste to the rusty areas and let it sit for 30 minutes. Then, scrub the area with a brush and rinse thoroughly with water.
- Vinegar Soak: Soak the rusty tools in a vinegar solution for several hours or overnight. The vinegar will help to dissolve the rust. Rinse the tools thoroughly with water and dry them completely before storing.
How to Prevent Rust from Forming on Tools During Spring and Beyond
- Clean Tools After Each Use: This is the most important step in preventing rust. Wipe down your tools with a damp cloth after each use to remove dirt, debris, and moisture.
- Dry Tools Thoroughly: After cleaning, dry your tools completely with a clean cloth or allow them to air dry in a well-ventilated area. Moisture is the main culprit in rust formation.
- Apply a Protective Coating: You can apply a thin coat of oil or wax to your tools to protect them from moisture and rust. Mineral oil is a good choice for hand tools, while WD-40 can be used on larger tools.
- Store Tools Properly: Store your tools in a dry, well-ventilated place. Avoid storing them in damp basements or garages. Consider using a tool rack or hooks to keep them off the ground and prevent moisture buildup.
Recommended Rust Removal Products and Techniques
- For Light Rust: Wire brush, sandpaper, baking soda paste
- For Moderate Rust: Commercial rust remover, vinegar soak
- For Heavy Rust: It may be necessary to replace the tool, as heavy rust can weaken the metal.
By following these tips, you can effectively remove rust from your garden tools and prevent it from forming in the future. This will ensure that your tools are in top condition for the spring gardening season and beyond.
Lubricating Lawn Mowers and Hedge Trimmers: Smooth Operation for Spring

Just as you wouldn’t drive a car without oil, you shouldn’t operate your lawnmower or hedge trimmer without proper lubrication. Moving parts, like blades, wheels, and gears, experience friction, which can lead to wear and tear, reduced efficiency, and even damage. Regular lubrication ensures these parts move smoothly, reducing friction and extending the life of your equipment.
Why Lubrication is Essential for the Smooth Operation of Power Tools
- Reduces Friction: Lubrication creates a thin film between moving parts, reducing friction and wear and tear. This leads to smoother operation and longer tool life.
- Prevents Rust and Corrosion: Lubricants can help prevent rust and corrosion, especially in humid environments.
- Improves Efficiency: Well-lubricated tools require less effort to operate, making your gardening tasks easier and more efficient.
- Enhances Safety: Proper lubrication can help prevent overheating and reduce the risk of accidents.
Best Practices for Lubricating Lawn Mowers, Hedge Trimmers, and Other Equipment
- Choose the Right Lubricant: Different tools require different types of lubricants. Consult your owner’s manual for specific recommendations. Generally, light machine oil or multipurpose lubricants like WD-40 are suitable for most garden tools.
- Clean Before Lubricating: Before applying lubricant, clean the areas to be lubricated with a clean cloth or brush to remove dirt and debris.
- Apply Lubricant Sparingly: Apply only a small amount of lubricant to the designated areas. Avoid over-lubricating, as excess lubricant can attract dirt and debris.
- Lubricate Regularly: The frequency of lubrication depends on the type of tool and how often you use it. As a general rule, it’s a good idea to lubricate your tools before each use, especially during the spring and summer seasons.
Choosing the Right Lubricants for Different Garden Tools
- Hand Tools: Mineral oil is a good choice for lubricating hand tools like shears, trowels, and cultivators.
- Power Tools: Multipurpose lubricants like WD-40 are suitable for most power tools, including lawnmowers, hedge trimmers, and string trimmers.
- Specific Lubricants: Some tools may require specific lubricants. Consult your owner’s manual for recommendations.
By following these best practices, you can ensure that your power tools are properly lubricated and operating at their best. This will not only make your gardening tasks easier and more enjoyable but also extend the life of your equipment, saving you money in the long run.
Inspecting and Repairing Hand Tools: Ensuring Optimal Spring Performance

Hand tools are the backbone of any garden. From digging and planting to weeding and cultivating, they play a vital role in keeping your garden healthy and productive. However, over time, hand tools can become damaged or worn out, affecting their performance and even posing safety risks. That’s why regular inspection and repair are essential to ensure your hand tools are in optimal condition for the spring gardening season.
Steps for Inspecting Hand Tools
Regularly inspecting your hand tools is crucial to identify any issues early on. Here are some steps to follow:
- Check for Loose Handles: Tighten any loose handles or screws. If the handles are cracked or broken, it’s best to replace them.
- Inspect for Bent or Broken Blades: Examine the blades of your shovels, spades, and hoes for any bends or breaks. If the blades are bent, you may be able to straighten them carefully using a hammer and a sturdy surface. However, if they are broken, it may be necessary to replace the tool.
- Look for Rust and Corrosion: Rust can weaken the metal and make it difficult to use. Clean and remove rust as described in the previous section.
- Check for Sharpness: Ensure that the edges of your blades, such as those on trowels and cultivators, are sharp. Dull blades can make gardening tasks more difficult and increase the risk of injury.
- Test the Tool’s Function: Use the tool to perform its intended task. For example, try digging with your shovel or cultivating the soil with your cultivator. If the tool feels awkward or inefficient, it may need repair or replacement.
Common Repairs and How to Fix Them Yourself
- Tightening Loose Handles: Most loose handles can be tightened with a wrench or pliers. However, if the handle is cracked or broken, it’s best to replace it.
- Straightening Bent Blades: You may be able to straighten minor bends in metal blades using a hammer and a sturdy surface. However, if the bend is severe, it’s best to replace the tool.
- Replacing Broken Handles: You can find replacement handles for many common garden tools at hardware stores and online retailers.
- Sharpening Blades: You can sharpen the blades of your trowels, cultivators, and other hand tools using a sharpening stone or file.
When to Consider Replacing Damaged Tools
Sometimes, the best course of action is to replace a damaged tool rather than attempt to repair it. This is especially true if the tool is severely damaged, such as a broken handle or a bent blade that cannot be easily straightened. Replacing a damaged tool is often more cost-effective and time-efficient than attempting a difficult repair.
By following these steps and addressing any issues promptly, you can ensure that your hand tools are in top condition for the spring gardening season. Well-maintained tools will make your gardening tasks more efficient, enjoyable, and safe.
Organizing Your Tool Shed: Streamlining Your Spring Gardening

A well-organized tool shed is more than just a matter of aesthetics. It’s about efficiency, safety, and prolonging the life of your tools. When your tools are neatly arranged and easily accessible, you’ll spend less time searching for them and more time enjoying your gardening.
Tips for Organizing Your Tool Shed
- Designate Specific Zones: Divide your tool shed into zones for different types of tools. For example, you could have a zone for hand tools, a zone for power tools, and a zone for garden supplies.
- Utilize Vertical Space: Hang tools on hooks or pegboards to maximize vertical space. This keeps your tools off the ground and prevents them from getting damaged.
- Use Shelves and Bins: Use shelves and bins to store smaller items like gloves, seeds, and fertilizers. Label the bins to make it easy to find what you need.
- Keep Tools Clean and Dry: Clean and dry your tools after each use to prevent rust and corrosion. Store them in a dry, well-ventilated area.
- Regularly Declutter: Regularly declutter your tool shed to remove any broken or unused items. This will help to keep your space organized and prevent clutter from accumulating.
Storage Solutions to Protect Tools from the Elements
- Tool Covers: Use tool covers to protect your power tools from dust, dirt, and moisture.
- Waterproof Storage Bins: Store smaller items in waterproof bins to protect them from moisture and dampness.
- Shelving Units: Use shelving units with enclosed cabinets to protect tools from dust and debris.
How Proper Storage Extends the Lifespan of Your Garden Equipment
- Prevents Rust and Corrosion: Proper storage helps to prevent moisture buildup, which is the main cause of rust and corrosion.
- Protects Tools from Damage: Storing tools in a protected environment prevents them from being damaged by weather, pests, and other hazards.
- Makes Tools Easier to Find: A well-organized tool shed makes it easy to find the tools you need, saving you time and frustration.
By following these tips, you can create a well-organized and efficient tool shed that will make your gardening tasks more enjoyable and productive. A well-maintained tool shed is an investment in your garden and your gardening experience.
Spring Garden Tool Maintenance Checklist: Getting Ready for Planting

To make your spring garden tool maintenance a breeze, I’ve created a handy checklist. This checklist will help you stay organized and ensure that you don’t miss any important steps.
Spring Garden Tool Maintenance Checklist
- Sharpen Blades: Sharpen all blades on pruning shears, loppers, and other cutting tools.
- Clean and Remove Rust: Clean all tools with a wire brush or cloth to remove dirt and debris. Remove any rust with a rust remover or wire brush.
- Lubricate Moving Parts: Apply a light coat of oil or lubricant to all moving parts of your tools, such as hinges on shears and mower blades.
- Inspect for Damage: Check all tools for any signs of damage, such as cracks, breaks, or loose handles. Repair or replace any damaged tools.
- Organize Your Tool Shed: Clean out your tool shed and organize your tools for easy access.
- Store Tools Properly: Store your tools in a dry, protected place to prevent rust and damage.
Scheduling Maintenance Tasks for Optimal Efficiency
It’s a good idea to schedule your spring garden tool maintenance tasks to ensure that you don’t forget anything. You can create a simple schedule or use a calendar app to remind you of important dates.
Key Steps to Ensure a Successful Gardening Season
- Start Early: Begin your spring garden tool maintenance early in the season to ensure that your tools are ready when you need them.
- Take Your Time: Don’t rush through the maintenance process. Take your time to do each task carefully and thoroughly.
- Ask for Help: If you’re unsure about how to perform a particular maintenance task, don’t hesitate to ask for help from a knowledgeable friend or a local garden center.
By following this checklist and taking the time to properly maintain your tools, you can ensure a successful and enjoyable gardening season. Well-maintained tools will make your gardening tasks more efficient and less frustrating, allowing you to focus on the joys of growing and nurturing your plants.
Preparing for Spring 2025: Long-Term Tool Care

Spring garden tool maintenance isn’t just about getting your tools ready for the upcoming season. It’s also about preparing for the future and ensuring that your tools last for many years to come. By implementing long-term care practices, you can extend the life of your tools, reduce the need for frequent repairs, and save money in the long run.
Tips for Maintaining Tools Throughout the Year
- Clean Tools After Each Use: This is the single most important step in maintaining your tools. Wipe down tools with a damp cloth after each use to remove dirt, debris, and sap. This helps to prevent rust and corrosion.
- Dry Tools Thoroughly: After cleaning, dry your tools completely with a clean cloth or allow them to air dry in a well-ventilated area. Moisture is the enemy of metal tools.
- Lubricate Regularly: Apply a light coat of oil or lubricant to moving parts, such as hinges on shears and mower blades, on a regular basis. This will help to prevent friction and wear and tear.
- Store Tools Properly: Store your tools in a dry, protected place when not in use. Avoid storing them in damp basements or garages. Use tool covers or waterproof storage bins to protect them from the elements.
- Inspect Tools Regularly: Regularly inspect your tools for any signs of damage, such as cracks, breaks, or loose handles. Address any issues promptly to prevent further damage.
How to Prepare Tools for Winter Storage
- Clean and Dry Tools Thoroughly: Before storing tools for the winter, clean them thoroughly and dry them completely.
- Apply a Protective Coating: Apply a light coat of oil or wax to protect tools from rust and corrosion during the winter months.
- Store Tools Properly: Store tools in a dry, well-ventilated place, such as a shed or garage. Avoid storing them in damp basements or crawl spaces.
- Cover Power Tools: Cover power tools with tarps or covers to protect them from dust and debris.
Planning for Future Maintenance Needs
- Create a Maintenance Schedule: Create a schedule for regular tool maintenance tasks, such as sharpening blades, cleaning, and lubricating.
- Budget for Replacement Parts: Set aside a budget for replacing worn-out or broken parts, such as blades, handles, and belts.
- Consider Professional Maintenance: For complex equipment like lawnmowers, consider having them professionally serviced once a year.
By implementing these long-term care practices, you can ensure that your garden tools remain in top condition year after year. This will not only make your gardening tasks more enjoyable but also save you time, money, and frustration in the long run.
FAQ

How to Properly Sharpen Pruning Shears for Spring Garden Tool Maintenance?
Sharpening your pruning shears is a straightforward process that requires a few simple tools and a steady hand. Here’s a step-by-step guide:
- Gather your materials: You’ll need a sharpening stone, a vise (optional), and a cloth.
- Secure the shears: Hold the shears firmly in one hand or clamp them in a vise to prevent movement while sharpening.
- Determine the angle: The angle of the bevel on the blade can vary, but a general guideline is to maintain the existing bevel angle.
- Sharpen the blade: Hold the sharpening stone at the appropriate angle and stroke the blade away from you, applying consistent pressure. Repeat this motion several times, usually 10-15 strokes per side.
- Test the sharpness: Test the sharpness of the blades by carefully cutting a piece of paper or a thin branch. If the shears cut cleanly, they are sharp enough.
- Clean and lubricate: Wipe the blades with a cloth and apply a light coat of oil to prevent rust.
Best Practices for Cleaning and Lubricating Garden Tools Before Spring Planting?
Cleaning and lubricating your garden tools before the spring planting season is essential for their proper function and longevity. Here are some best practices to follow:
- Gather your materials: You’ll need a wire brush, a cloth, and a suitable lubricant (such as mineral oil or WD-40).
- Clean the tools: Use a wire brush to remove dirt, debris, and any loose rust from the tools. Pay attention to hard-to-reach areas.
- Wash the tools: Wash the tools with soap and water to remove any remaining dirt or grime.
- Dry the tools completely: Dry the tools thoroughly with a clean cloth. Moisture can lead to rust and corrosion.
- Apply lubricant: Apply a light coat of lubricant to all moving parts, such as hinges on shears and mower blades. Avoid over-lubricating, as excess lubricant can attract dirt and debris.
- Store the tools properly: Store the tools in a dry, well-ventilated place to prevent rust and corrosion.
Steps for Removing Rust from Shovels and Rakes During Spring Tool Maintenance?
Rust can weaken metal tools and make them difficult to use. Here are some effective methods for removing rust:
- Wire brushing: Use a wire brush to remove loose rust from the surface of the tool.
- Commercial rust removers: Apply a commercial rust remover to the rusty areas according to the product instructions.
- Baking soda paste: Make a paste of baking soda and water and apply it to the rusty areas. Let it sit for 30 minutes, then scrub and rinse.
- Vinegar soak: Soak the rusty tools in a vinegar solution for several hours or overnight. Then, rinse and dry them thoroughly.
Where to Find Replacement Parts for Lawn Mower Maintenance in Early Spring?
You can find replacement parts for lawn mowers at various locations:
- Local hardware stores: Many hardware stores carry a wide variety of lawn mower parts.
- Home improvement centers: Home improvement centers like Home Depot and Lowe’s typically have a good selection of lawn mower parts.
- Online retailers: Online retailers like Amazon and eBay offer a vast selection of lawn mower parts.
- Lawn mower dealers: Authorized dealers for your specific brand of lawn mower are a good source for genuine replacement parts.
Easy Ways to Inspect and Repair Garden Hand Tools for Optimal Spring Performance?
Regularly inspecting your hand tools can help you identify and address any issues before they become major problems. Here are some easy ways to inspect and repair your hand tools:
- Check for loose handles: Tighten any loose handles or screws.
- Inspect for bent or broken blades: Straighten any minor bends in the blades. If the blades are broken, you may need to replace the tool.
- Remove rust: Clean and remove any rust from the tools.
- Sharpen blades: Sharpen the blades of trowels, cultivators, and other hand tools as needed.
- Test the tool’s function: Use the tool to perform its intended task to ensure it’s functioning properly.
What Are the Essential Lubricants for Maintaining Garden Tools During Springtime?
Some essential lubricants for maintaining garden tools during springtime include:
- Mineral oil: A good choice for lubricating hand tools like shears, trowels, and cultivators.
- WD-40: A versatile lubricant that can be used on many different types of tools, including power tools and hand tools.
- Silicone spray: Can be used to lubricate moving parts on some tools.
Comprehensive Guide to Spring Garden Tool Maintenance for First-Time Gardeners?
For first-time gardeners, here’s a simplified guide to spring garden tool maintenance:
- Gather your supplies: You’ll need a wire brush, a cloth, some lubricant, and a sharpening stone (if needed).
- Clean your tools: Clean all tools with a wire brush and soap and water.
- Sharpen blades: Sharpen any dull blades using a sharpening stone.
- Lubricate moving parts: Apply a light coat of lubricant to moving parts.
- Inspect for damage: Check for any cracks, breaks, or loose handles.
- Organize your tools: Store your tools in a dry, organized place.
How to Prevent Rust on Garden Tools During Spring and Throughout the Gardening Season?
To prevent rust on your garden tools:
- Clean tools after each use: Wipe down tools with a damp cloth to remove dirt, debris, and moisture.
- Dry tools thoroughly: Dry tools completely after cleaning to prevent moisture buildup.
- Apply a protective coating: Apply a thin coat of oil or wax to protect tools from rust and corrosion.
- Store tools properly: Store tools in a dry, well-ventilated place.
Tips for Properly Storing Garden Tools After Spring Maintenance to Extend Their Lifespan?
Proper storage is crucial for extending the lifespan of your garden tools. Here are some tips:
- Clean and dry tools thoroughly: Clean and dry tools before storing them.
- Apply a protective coating: Apply a light coat of oil or wax to protect tools from rust and corrosion.
- Store tools in a dry, well-ventilated place: Avoid storing tools in damp areas.
- Use tool covers or storage bins: Protect tools from dust and debris with covers or bins.
- Organize tools for easy access: Organize tools neatly to make them easy to find and use.
Detailed Checklist for Spring Garden Tool Maintenance to Ensure a Successful Gardening Season?
Here’s a detailed checklist for spring garden tool maintenance:
- Sharpen all blades.
- Clean and remove rust from all tools.
- Lubricate all moving parts.
- Inspect tools for damage and repair or replace as needed.
- Organize your tool shed or storage area.
- Store tools properly to prevent rust and corrosion.
By following these tips and using this checklist, you can ensure that your garden tools are in top condition for a successful and enjoyable gardening season.
Conclusion: A Well-Maintained Garden Starts with Well-Maintained Tools

Spring garden tool maintenance is an essential part of a successful gardening season. By following the steps outlined in this guide, you can ensure that your tools are ready to tackle any gardening task that comes your way. From sharpening blades to organizing your tool shed, these practices will help you get the most out of your tools and create a more enjoyable and productive gardening experience. Remember, well-maintained tools are an investment in your garden and your gardening success.
Key Takeaways:
- Sharpen your blades: Sharp blades make clean cuts, promoting plant health and reducing disease risk.
- Clean and lubricate your tools: Regular cleaning and lubrication prevent rust and corrosion and ensure smooth operation.
- Inspect and repair tools regularly: Identify and address any issues promptly to prevent further damage.
- Organize your tool shed: A well-organized tool shed makes it easy to find and use your tools.
- Store tools properly: Store tools in a dry, protected place to prevent damage.
By implementing these practices and making tool maintenance a regular part of your gardening routine, you’ll be well-prepared for future gardening seasons. Remember, a little effort now can save you time, money, and frustration in the long run.
I hope this comprehensive guide has been helpful. If you have any further questions or would like more specific advice, feel free to ask. Happy gardening!


