

Key Takeaways
| What are root balls? | How to plant root balls? | Why plant root balls? |
|---|---|---|
| Root balls are plants that have been grown in the open ground and then dug up with a ball of soil around their roots. They are usually wrapped in burlap or other material to protect the roots from drying out or breaking. | Planting root balls involves preparing the ground, handling and loosening the root balls, planting and filling the root balls, watering and mulching the root balls, and caring and maintaining the root balls. | Planting root balls has many benefits, such as cheaper, bushier, and more adaptable plants, better survival and establishment rates, and less transplant shock and stress. |
Introduction

Do you want to add some life and beauty to your garden or landscape project? Do you want to save some money and time while getting high-quality plants? Do you want to learn how to plant root ball trees like a pro?
If you answered yes to any of these questions, then this article is for you.
Root balls are plants that have been grown in the open ground and then dug up with a ball of soil around their roots. They are usually wrapped in burlap or other material to protect the roots from drying out or breaking.
Root balls are popular among landscapers and gardeners because they offer many advantages over potted or bare-root plants. Some of these benefits are:
- Root balls are cheaper than potted plants because they require less labor, materials, and transportation costs.
- Root balls are bushier than potted plants because they have more branches and foliage that have not been pruned or trimmed.
- Root balls are more adaptable than potted or bare-root plants because they have a natural soil environment that helps them adjust to different soil types and conditions.
However, planting root balls also requires some extra care and attention to ensure their success. You need to follow some best practices for preparing the ground, handling and loosening the root balls, planting and filling the root balls, watering and mulching the root balls, and caring and maintaining the root balls.
In this article, we will guide you through all these steps and provide you with some tips and tricks for planting root ball trees like a pro. By the end of this article, you will be able to:
- Choose the right location, season, and time for planting root balls
- Test and improve the soil quality, drainage, and pH level
- Dig a hole that is 2 or 3 times as wide and as deep as the root ball
- Cut and remove any strings, wires, nails, or burlap that are holding the root ball
- Loosen or tease the roots gently with your fingers or a fork
- Plant the root ball at the right depth and position in the hole
- Fill the hole with the original soil mixed with some compost or organic matter
- Water thoroughly and regularly, especially during dry spells or hot weather
- Apply some mulch around the base of the plant to conserve moisture and prevent weeds
- Fertilize, prune, stake, protect, and monitor the root ball periodically
- Deal with common problems and solutions, such as pests, diseases, frost damage, or transplant shock
Are you ready to get started? Let’s dive in!
Preparing the Ground for Planting Root Balls
The first step for planting root balls is to prepare the ground where you want to plant them. This step is crucial because it will determine how well your plants will grow and thrive in their new location.
Here are some things you need to consider when preparing the ground for planting root balls:
Location
You need to choose a location that suits your plant’s needs and preferences. For example, some plants need full sun exposure while others prefer partial shade. Some plants need more space while others can grow in tight spots.
You also need to consider other factors such as wind exposure, slope angle, drainage pattern, existing vegetation, utility lines, property boundaries, etc.
You can use a site map or a sketch to plan your location and layout. You can also consult with a local nursery or extension service for advice on choosing suitable plants for your area.
Season
You need to choose a season that is optimal for planting root balls. Generally speaking, spring and fall are the best seasons for planting most plants because they have moderate temperatures and rainfall.
However, some plants may have different planting seasons depending on their hardiness and dormancy. For example, evergreen plants can be planted anytime except during extreme heat or cold. Deciduous plants can be planted in early spring before they leaf out or in late fall after they drop their leaves.
You can check the plant tags or labels for specific planting instructions. You can also consult with a local nursery or extension service for advice on choosing the best planting season for your plants.
Time
You need to choose a time that is convenient and safe for planting root balls. Ideally, you should plant root balls early in the morning or late in the afternoon when the temperatures are cooler and the sun is less intense.
You should also avoid planting root balls during rainy or windy days because they can damage the roots or cause soil erosion. You should also avoid planting root balls during frosty or freezing days because they can harm the plants.
You can check the weather forecast for your area and plan your planting accordingly. You can also consult with a local nursery or extension service for advice on choosing the best planting time for your plants.
Soil
You need to test and improve the soil quality, drainage, and pH level before planting root balls. The soil is the foundation of your plants’ health and growth, so you need to make sure it is suitable for them.
Here are some ways to test and improve your soil:
- Test your soil using a soil test kit or a soil probe. You can get these tools from a local nursery, garden center, or extension service. You can also send your soil samples to a soil testing laboratory for analysis.
- Improve your soil by adding some organic matter, such as compost, manure, peat moss, or leaf mold. These materials will improve the soil structure, fertility, water retention, and drainage.
- Adjust your soil pH level by adding some lime or sulfur. These materials will raise or lower the soil pH level, respectively. The ideal soil pH level for most plants is between 6.0 and 7.0.
You can use a table like this one to compare your soil test results with the optimal ranges for different plants:
| Plant | Soil Type | Soil pH | Soil Drainage |
|---|---|---|---|
| Azalea | Loamy | 4.5-5.5 | Well-drained |
| Boxwood | Sandy loam | 6.0-7.0 | Well-drained |
| Dogwood | Loamy | 5.5-6.5 | Well-drained |
| Holly | Loamy | 5.0-6.0 | Well-drained |
| Maple | Loamy | 6.0-7.0 | Well-drained |
| Oak | Sandy loam | 5.0-6.5 | Well-drained |
| Pine | Sandy loam | 4.5-6.0 | Well-drained |
| Rhododendron | Loamy | 4.5-5.5 | Well-drained |
You can use a list like this one to find some suitable plants for different soil types and conditions:
- Clay soil: Arborvitae, juniper, yew, cypress, magnolia, birch, willow, poplar, etc.
- Sandy soil: Pine, spruce, fir, cedar, larch, hemlock, etc.
- Rocky soil: Mountain ash, sumac, cotoneaster, barberry, etc.
- Wet soil: Bald cypress, red maple, river birch, swamp white oak, etc.
- Dry soil: Russian olive, honey locust, hawthorn, etc.
Handling and Loosening the Root Balls
The second step for planting root balls is to handle and loosen them before putting them in the hole. This step is important because it will prevent the roots from being damaged or tangled and help them spread out and grow in all directions.
Here are some things you need to do when handling and loosening the root balls:
Handling
You need to handle the root balls gently and carefully to avoid breaking or tearing the roots. You should also avoid lifting or moving the root balls by the trunk or the branches, as this can cause stress or injury to the plants.
Here are some tips on how to handle the root balls:
- Transport the root balls using a wheelbarrow, a dolly, or a sling. You can also use a tarp or a blanket to cover and protect the root balls from wind or sun exposure.
- Store the root balls in a shaded and cool area until you are ready to plant them. You can also water them lightly to keep them moist but not soggy.
- Place the root balls near the hole where you want to plant them. You can also use a board or a plank to slide or roll them into position.
Loosening
You need to loosen or tease the roots gently with your fingers or a fork before planting them. This will help them break free from the soil ball and make contact with the new soil.
Here are some steps on how to loosen the root balls:
- Cut and remove any strings, wires, nails, or burlap that are holding the root ball. You can leave the burlap in the hole if it is biodegradable, but make sure it is not exposed above the soil level.
- Soak the root ball in water for a few hours or overnight to make it easier to detangle the roots. You can use a bucket, a tub, or a hose to soak them.
- Loosen or tease the roots gently with your fingers or a fork. Start from the bottom and work your way up. You can also cut off any dead, diseased, or circling roots with a sharp knife or pruners.
Planting and Filling the Root Balls
The third step for planting root balls is to plant and fill them in the hole. This step is crucial because it will determine how well your plants will settle and establish in their new location.
Here are some things you need to do when planting and filling the root balls:
Planting
You need to plant the root balls at the right depth and position in the hole. You should also avoid burying or exposing too much of the root ball.
Here are some tips on how to plant the root balls:
- Set the root ball in the center of the hole and handle it by the soil ball. You can also use a level or a straight edge to check if it is even with the ground.
- Adjust the depth of the hole if needed. You can add or remove some soil from the bottom of the hole until you get the right depth.
- Make sure that the top of the root ball is slightly above (1-2 inches) the soil level and not buried. This will prevent waterlogging and rotting of the roots.
Filling
You need to fill the hole with the original soil mixed with some compost or organic matter. You should also tamp the soil lightly to remove air pockets and firm up the soil around the root ball.
Here are some steps on how to fill the hole:
- Mix some compost or organic matter with your original soil. You can use a ratio of 1:3 or 1:4 of compost to soil.
- Fill half of the hole with your soil mixture and tamp it lightly with your hands or a shovel.
- Water well and soak thoroughly until you see water coming out of the drainage holes.
- Fill the rest of the hole with your soil mixture and tamp it lightly again.
- Water well and soak thoroughly again.
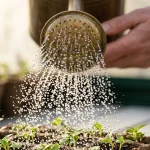
Watering and Mulching
The fourth step for planting root balls is to water and mulch them after planting. This step is essential because it will ensure their survival and establishment in their new location.
Here are some things you need to do when watering and mulching the root balls:
Watering
You need to water the root balls thoroughly and regularly, especially during dry spells or hot weather. You should also avoid overwatering or underwatering the root balls.
Here are some tips on how to water the root balls:
- Water well and soak thoroughly right after planting the root balls. You can use a hose, a sprinkler, or a drip irrigation system to water them.
- Water regularly and deeply for the first few weeks or months until the root balls are established. You can check the soil moisture by inserting your finger or a stick into the soil. If it feels dry, you need to water more. If it feels wet, you need to water less.
- Water less frequently and more deeply as the root balls grow and develop. You can reduce your watering frequency to once or twice a week or as needed depending on the weather and the plant’s needs.
Mulching
You need to apply some mulch around the base of the plant to conserve moisture and prevent weeds. You should also avoid piling up or touching the mulch to the trunk or the branches of the plant.
Here are some steps on how to mulch the root balls:
- Choose a suitable type of mulch for your plant and your area. You can use organic mulches, such as bark, straw, or leaves, or inorganic mulches, such as gravel, stone, or plastic.
- Apply a layer of 2-4 inches of mulch around the base of the plant. You can use a rake, a shovel, or your hands to spread it evenly.
- Leave a gap of 2-3 inches between the mulch and the trunk or the branches of the plant. This will prevent fungal diseases, insect infestations, or rodent damage.
Caring and Maintaining the Root Balls
The fifth and last step for planting root balls is to care and maintain them after planting. This step is important because it will ensure their growth and health in their new location.
Here are some things you need to do when caring and maintaining the root balls:
Fertilizing
You need to fertilize the root balls occasionally to provide them with the nutrients they need. You should also avoid overfertilizing or underfertilizing the root balls.
Here are some tips on how to fertilize the root balls:
- Fertilize sparingly and infrequently for the first year or two after planting the root balls. You can use a slow-release or organic fertilizer that is suitable for your plant and your soil.
- Fertilize more regularly and moderately after the root balls are established. You can use a balanced or specific fertilizer that matches your plant’s needs and preferences.
- Fertilize according to the label instructions and recommendations. You can also consult with a local nursery or extension service for advice on choosing and applying the best fertilizer for your plants.
Pruning
You need to prune the root balls occasionally to shape them, remove dead or diseased branches, and promote new growth. You should also avoid overpruning or underpruning the root balls.
Here are some tips on how to prune the root balls:
- Prune lightly and selectively for the first year or two after planting the root balls. You can remove any broken, crossing, or rubbing branches that may interfere with the plant’s structure or health.
- Prune more heavily and regularly after the root balls are established. You can shape, thin, or reduce the size of the plant according to your desired appearance or purpose.
- Prune according to the plant’s type and season. You can prune evergreen plants anytime except during extreme heat or cold. You can prune deciduous plants in early spring before they leaf out or in late fall after they drop their leaves.
Staking
You may need to stake the root balls temporarily to support them, protect them from wind damage, and encourage them to grow straight. You should also avoid overstaking or understaking the root balls.
Here are some steps on how to stake the root balls:
- Choose a suitable type of stake for your plant and your area. You can use wooden, metal, or plastic stakes that are sturdy and durable.
- Drive one or two stakes into the ground near the edge of the hole where you planted the root ball. You can use a hammer, a mallet, or a sledgehammer to drive them.
- Tie one or two loops of flexible material around the trunk of the plant and attach them to the stakes. You can use twine, rope, wire, or tape that are strong and soft.
- Adjust the tension of the loops so that they are snug but not tight. They should allow some movement but not too much sway.
- Remove the stakes and loops after one or two growing seasons when the root ball is established and stable.
Protecting
You may need to protect the root balls from harsh weather conditions, such as frost, snow, hail, drought, etc. You may also need to protect the root balls from pests, diseases, animals, etc.
Here are some ways to protect the root balls:
- Cover the root balls with a frost cloth, a burlap sack, a plastic sheet, or a cardboard box during cold nights or winter months. You can also use straw, leaves, or mulch to insulate the soil around the root ball.
- Water the root balls deeply before a freeze or a drought to prevent dehydration or damage. You can also use a sprinkler system or a drip irrigation system to water them automatically.
- Spray the root balls with an insecticide, a fungicide, a repellent, or a deterrent to prevent or treat pest infestations or diseases. You can also use natural remedies, such as neem oil, garlic spray, chili pepper spray, etc.
- Fence the root balls with a wire mesh, a chicken wire, a plastic netting, or a wooden fence to prevent animal damage or browsing. You can also use scarecrows, noise makers, motion sensors, etc.
Monitoring
You need to monitor the root balls regularly to check their progress and performance. You should also look for any signs of problems or issues that may affect the root balls.
Here are some things to look for when monitoring the root balls:
- New growth: Look for new buds, leaves, flowers, fruits, etc. that indicate the root ball is growing and thriving.
- Color: Look for green, healthy, and vibrant colors that indicate the root ball is getting enough water, nutrients, and sunlight.
- Shape: Look for symmetrical, balanced, and natural shapes that indicate the root ball is developing properly and not distorted or deformed.
- Damage: Look for broken, wilted, or discolored parts that indicate the root ball is suffering from stress, injury, or disease.
Conclusion
Congratulations! You have successfully planted your root balls and learned how to care and maintain them. You have also learned about the benefits of planting root balls, such as cheaper, bushier, and more adaptable plants.
Here is a table that summarizes the main points of this article:
| Step | Action | Purpose |
|---|---|---|
| Preparing the ground | Choose the right location, season, time, and soil | To provide the optimal conditions for planting root balls |
| Handling and loosening the root balls | Cut and remove any strings, wires, nails, or burlap; soak and loosen the roots | To prevent root damage or tangling and help them spread out and grow |
| Planting and filling the root balls | Set the root ball in the center of the hole; fill the hole with soil mixed with compost; water well and soak thoroughly | To ensure proper depth and position of the root ball and make contact with the new soil |
| Watering and mulching the root balls | Water thoroughly and regularly; apply mulch around the base of the plant | To conserve moisture and prevent weeds |
| Caring and maintaining the root balls | Fertilize, prune, stake, protect, and monitor the root balls periodically | To ensure growth and health of the root balls |
We hope you enjoyed reading this article and learned something new about planting root balls. If you have any questions or feedback, feel free to ask us.


[…] as a knife or a spoon, and gently loosen the soil around the seedling. Lift the seedling by the root ball, not by the stem or the leaves, and place it in a larger pot or in the ground. Fill the hole with […]
[…] Glacier eucalyptus prefers well-draining soil with a neutral pH level. It does not like soil that is too acidic or alkaline, as this can affect its nutrient uptake and health. It also likes soil that is rich in organic matter, as this can provide nutrients, moisture, and aeration for the roots. […]
[…] or summer, when the temperature is warm and stable. Dig a hole that is twice as wide and deep as the root ball of your plant, and place your plant in the hole. Fill the hole with soil, and press it firmly. Water your plant […]
[…] previous one, and has drainage holes. You should also use fresh potting mix, and gently loosen the roots before planting. You should water the plant well after repotting, and keep it in a shady spot for a few days to […]