
Ever craved a splash of the tropics in your garden? Look no further than the captivating Canna lily, often referred to as “Indian cane” due to its tall, majestic stature. These vibrant blooms boast a dazzling array of colors and shapes, transforming any outdoor space into a visual feast. But beneath their exotic allure lies a surprising truth: Canna lilies are surprisingly easy to cultivate!
This comprehensive guide unveils the secrets to cultivating magnificent Canna lilies, ensuring a season overflowing with breathtaking blooms. We’ll delve into essential tips, from selecting the perfect location and planting technique to nurturing them with the right care and solving potential problems. With a little TLC and this guide by your side, your Canna lilies will blossom into the stars of your summer show!

Finding the Perfect Paradise: Sunlight and Space for Thriving Canna Lilies
Canna lilies, true to their tropical heritage, crave an abundance of sunshine. Aim for at least 6-8 hours of direct sunlight per day for optimal growth and flower production. When scouting for the ideal location, consider these factors:
- Sun exposure: South-facing beds bathed in sunlight are prime real estate for your Canna lilies.
- Spacing: Canna lilies can grow quite tall, reaching heights of 2-4 feet or more depending on the variety. Provide ample space for them to flourish, around 18-24 inches between plants.
- Protection from wind: While Canna lilies can tolerate gentle breezes, sheltered locations safeguard them from strong winds that might damage their delicate flowers.
Top Tip: If you live in a particularly hot climate with scorching afternoon sun, consider providing some dappled shade during the hottest part of the day, especially for container-grown Canna lilies.
Choosing Your Canna Champion: Selecting the Right Rhizomes
Canna lilies, much like royalty, come in a vast array of captivating varieties. Selecting the perfect “heir” for your garden kingdom is an exciting first step. Here’s how to navigate the world of Canna rhizomes:
- Size Matters: Opt for firm, plump rhizomes that are at least 1-2 inches in diameter. These robust specimens boast the energy to produce a spectacular display of blooms.
- Inspect Before You Invest: Give your chosen rhizome a thorough examination. Avoid any that appear shriveled, soft, or exhibit signs of mold or disease.
- Variety is the Spice of Life: Canna lilies come in a kaleidoscope of colors, from fiery oranges and reds to soft pinks and yellows. Consider the overall color scheme of your garden when making your selection. There are even varieties with stunning bi-colored blooms or speckled patterns that add a touch of whimsy.

Canna Lily Varieties at a Glance:
To help you narrow down your choice, here’s a brief overview of some popular Canna lily varieties:
| Variety Name | Flower Color | Height |
| Cannova | Orange with yellow spots | 2-3 feet |
| Stuttgart | Red with yellow throat | 3-4 feet |
| Tropicanna | Yellow with orange markings | 4-5 feet |
| Pink President | Soft pink | 2-3 feet |
| Cleopatra | Bicolor (red and yellow) | 3-4 feet |
Remember, this is just a glimpse into the remarkable world of Canna lilies. With a little research, you’re sure to discover the perfect variety to grace your garden.
Prime Time for Planting: When to Get Your Canna Started
Just like Cinderella at the ball, Canna lilies have a preferred time to shine. Planting them at the right moment ensures they have ample time to establish themselves before the summer heat arrives. Here’s a guide to planting Canna lilies based on your climate:
- Warmer Climates (Zones 8-10): If you reside in a region with consistently warm spring temperatures (around 70°F or above), you can get a head start by planting Canna lily rhizomes in late April or early May.
- Temperate Climates (Zones 5-7): For those in areas with cooler spring weather, wait until all danger of frost has passed, typically around late May or early June. The soil temperature should be consistently above 60°F for optimal root development.
Top Tip: While some gardeners advocate for pre-sprouting Canna lily rhizomes indoors before planting them outside, this step is entirely optional. Healthy rhizomes will sprout naturally once planted in warm soil.
Prepping the Soil: Building a Canna-Friendly Home
Happy roots equal happy plants! Before welcoming your Canna lilies, it’s crucial to prepare the perfect soil bed for them to thrive. Canna lilies prefer a well-draining, fertile soil that allows for good air circulation. Here’s how to create the ideal foundation for your Canna champions:
- Loosen Up the Soil: Use a shovel or garden fork to loosen the soil to a depth of at least 12-18 inches. This aeration allows for proper root development and drainage.
- Amend, Amend, Amend: Enrich the loosened soil with organic matter such as compost, aged manure, or well- decomposed leaves. Aim for a ratio of about 50% existing soil to 50% organic amendment. This addition provides essential nutrients for your Canna lilies to flourish.
- Drainage is Key: If your soil tends to be heavy clay, consider adding some coarse sand or perlite to the mix. This improves drainage and prevents the roots from sitting in waterlogged conditions, which can lead to rot.
Testing Your Soil:
For optimal results, consider conducting a soil test to determine the pH level of your soil. Canna lilies prefer slightly acidic soil with a pH between 6.0 and 6.8. If your soil falls outside this range, you can adjust it accordingly using amendments like lime to raise the pH or sulfur to lower it.

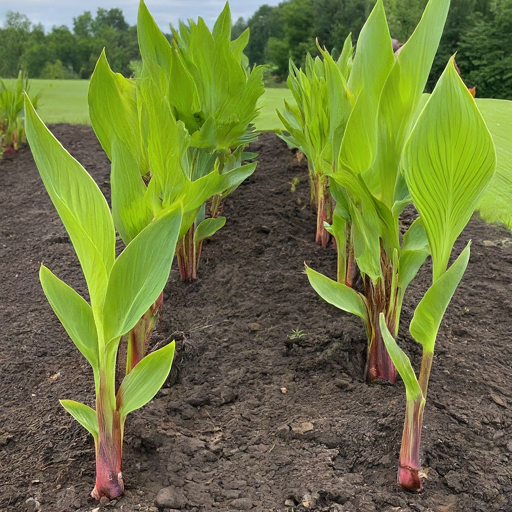
Planting Power: How to Give Your Canna a Head Start
Planting your Canna lily rhizomes correctly is the first step towards a thriving, flower-filled season. Here’s a breakdown of the planting process:
- Digging the Perfect Hole: Create a planting hole for each Canna lily rhizome, ensuring it’s deep enough to comfortably accommodate the rhizome with its “eyes” (buds) facing upwards. A good rule of thumb is to make the hole 2-3 times deeper than the thickness of the rhizome.
- Spacing it Out: Remember, Canna lilies can grow quite large depending on the variety. Space your planting holes accordingly, allowing for 18-24 inches between each plant for optimal air circulation and growth.
- Gently Nestle It In: Carefully place the Canna lily rhizome into the prepared hole, ensuring the “eyes” are positioned upwards towards the sky.
- Backfill and Water: Fill the hole back in with the amended soil mixture, gently firming it around the rhizome. Give your newly planted Canna lily a thorough watering to settle the soil and hydrate the roots.
Top Tip: For container-grown Canna lilies, select a pot that’s at least 12-18 inches in diameter with drainage holes to prevent waterlogging. Fill the pot with a well-draining potting mix and plant the rhizome following the same steps as outlined above.

Watering Wisdom: Keeping Your Canna Hydrated
Just like a knight in shining armor protecting his kingdom, consistent watering is essential for ensuring your Canna lilies thrive. Here’s a guide to proper watering practices for these vibrant blooms:
- The Golden Rule: Canna lilies prefer to stay consistently moist, but not waterlogged. Aim to water them deeply when the top inch of soil feels dry to the touch.
- Frequency is Key: The frequency of watering will depend on several factors, including climate, temperature, and soil type. During hot, dry periods, you might need to water your Canna lilies every other day, while cooler or more humid weather might require less frequent watering.
- Observe and Adapt: Keep a close eye on your Canna lilies and adjust your watering schedule accordingly. Wilting leaves are a telltale sign that your plants need a drink.
Mulch Magic:
Applying a layer of mulch around the base of your Canna lilies offers several benefits:
- Moisture Retention: Mulch helps conserve moisture in the soil, reducing the frequency of watering needed.
- Temperature Regulation: A mulch layer helps regulate soil temperature, keeping it cool and moist during hot weather.
- Weed Suppression: Mulch acts as a barrier, suppressing weed growth and preventing them from competing with your Canna lilies for nutrients and water.
Top Tip: Choose an organic mulch like shredded bark, wood chips, or compost. Apply a 2-3 inch layer of mulch around your Canna lilies, keeping it a few inches away from the base of the stems to prevent rot.

Feed the Flowers: Canna-Specific Fertilizer Tips
Canna lilies, like any high performer, appreciate a nutritional boost to produce a dazzling display of blooms. Here’s a breakdown of fertilizer needs for these captivating plants:
- Balanced Approach: Opt for a balanced fertilizer formulated for flowering plants. These fertilizers typically contain a ratio of nitrogen (N), phosphorus (P), and potassium (K) that promotes healthy foliage and flower production. A common ratio is 10-10-10 (N-P-K).
- Timing is Everything: Fertilize your Canna lilies once a month during the active growing season, which typically starts in late spring or early summer and continues until the first fall frost. Avoid fertilizing too late in the season, as this can encourage new growth that might be susceptible to frost damage.
- Liquid Love: Liquid fertilizers are readily absorbed by Canna lilies and offer a convenient way to deliver nutrients. Simply dilute the recommended amount of fertilizer according to the manufacturer’s instructions and apply it directly to the soil around the base of the plants.
Going Granular:
While liquid fertilizers offer quick results, granular fertilizers provide a slower, more sustained release of nutrients. Here’s how to use them effectively:
- Scatter and Water: Sprinkle a recommended amount of granular fertilizer around the base of your Canna lilies, following the package instructions.
- Water Thoroughly: Water the area generously to dissolve the granules and allow them to penetrate the soil where they can be absorbed by the roots.
Remember: It’s always better to err on the side of under-fertilizing rather than overdoing it. Excess fertilizer can damage the roots and hinder growth.

Deadheading Delights: Encouraging More Blooms
Just like a meticulous sculptor refining their masterpiece, deadheading spent blooms on your Canna lilies encourages them to produce even more flowers throughout the season. Here’s how to properly deadhead your Canna lilies:
- Snip Happy: Once a Canna lily flower begins to fade and wilt, use sharp pruning shears or bypass pruners to remove the spent bloom. Make the cut just above the point where the flower stalk attaches to the main stem.
- Two for One Deal: Don’t just remove the flower itself! By cutting the stalk down to the first healthy set of leaves below the wilted bloom, you encourage the plant to produce a secondary flower stalk with fresh blooms.
- Benefits Beyond Beauty: Deadheading not only keeps your Canna lilies looking their best, but it also redirects the plant’s energy towards producing new flowers instead of wasting it on developing seeds.
Bonus Tip: Throughout the growing season, keep an eye out for any yellowing or discolored leaves on your Canna lilies. These can be carefully removed to improve air circulation and overall plant health.

Overwintering Options: Protecting Your Canna for Next Year
Canna lilies, despite their tropical flair, are not truly frost-tolerant. Depending on your climate, you might need to take some additional steps to protect your Canna lilies during the winter months and ensure their return the following season. Here’s a breakdown of two common overwintering strategies:
Lifting and Storing:
This method is ideal for gardeners in colder climates (Zones 5 and below) where the ground freezes solid during winter.
- Digging Up Treasures: Before the first fall frost arrives, carefully dig up your Canna lily rhizomes using a shovel.
- Shake it Off: Gently remove any excess soil from the rhizomes.
- Drying Out: Allow the rhizomes to air dry in a cool, well-ventilated location for a few days. This helps prevent rot.
- Winter Wonderland: Choose a cool, dark location protected from frost, such as a garage, basement, or shed. Pack the rhizomes in a container filled with slightly damp (not wet) peat moss, sawdust, or wood shavings to provide insulation and prevent them from drying out completely.
Leaving Them in the Ground:
This method is suitable for gardeners in warmer climates (Zones 8-10) where winters are mild and the ground doesn’t freeze deeply.
- Cut Back the Cannas: After the first frost, cut back the stems of your Canna lilies to about 6-8 inches above the ground.
- Mulch Magic: Apply a thick layer of mulch (around 4-6 inches) around the base of the plants to insulate the rhizomes from freezing temperatures. Choose a material like shredded bark, wood chips, or straw.
- Spring Surprise: In the spring, once the danger of frost has passed, remove the winter mulch and wait for your Canna lilies to sprout anew.
Top Tip: Regardless of the overwintering method you choose, it’s crucial to check on your Canna lilies periodically throughout the winter. If you’re using the “leaving them in the ground” method, ensure the mulch hasn’t been disturbed or washed away by heavy rains.

Troubleshooting Tips: Common Canna Concerns Solved
Even the most dedicated gardener might encounter a few challenges along the way. Here’s a look at some common Canna lily problems and solutions to keep your vibrant blooms thriving:
- Yellowing Leaves: This can be caused by a variety of factors, including underwatering, nutrient deficiencies, or even natural aging of the lower leaves. Ensure you’re watering your Canna lilies adequately and consider providing a balanced fertilizer if necessary. You can also remove the yellowing leaves to improve air circulation and aesthetics.
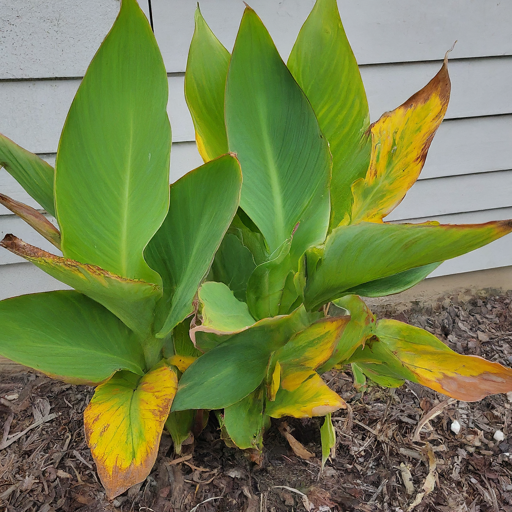
- Stunted Growth: If your Canna lilies appear stunted and aren’t producing flowers, it could be due to insufficient sunlight, lack of nutrients, or improper planting depth. Ensure they’re receiving at least 6-8 hours of direct sunlight daily, fertilize them according to the recommendations earlier in this guide, and double-check that the rhizomes were planted at the correct depth (around 2-3 times their thickness).
- Pests and Diseases: While Canna lilies are generally resistant to pests and diseases, they can be susceptible to problems like aphids, mealybugs, or fungal diseases. Regularly inspect your plants and address any issues promptly using organic methods whenever possible.

By following these tips and remaining vigilant, you can effectively troubleshoot any challenges that might arise and ensure your Canna lilies continue to be the stars of your summer show.
Conclusion: Witnessing the Canna Lily Spectacle
With a little TLC and the knowledge gleaned from this guide, you’ve equipped yourself to cultivate a breathtaking display of Canna lilies in your garden. Witnessing these vibrant blooms erupt in a kaleidoscope of colors throughout the summer season is a truly rewarding experience. Remember, Canna lilies are not just about their stunning flowers – their architectural form with tall, upright stems and lush foliage adds a touch of the tropics to any outdoor space. So, sit back, relax, and savor the visual feast your Canna lily haven creates!

This comprehensive guide has unveiled the secrets to cultivating magnificent Canna lilies. From selecting the perfect location and planting technique to providing the right care and addressing potential problems, you now possess the knowledge to transform your garden into a Canna lily paradise. With dedication and these handy tips, your Canna lilies will flourish and reward you with a season bursting with breathtaking blooms!


