
Have you ever dreamt of harvesting your own sweet, succulent cactus pear fruits, only to find your prickly pear plants stubbornly refusing to yield? The frustration of seeing a thriving plant yet no fruit is a common hurdle for many gardeners, especially when dealing with unique succulents like the cactus pear. You’ve invested time and effort, but the promised harvest remains elusive. This isn’t just about growing a plant; it’s about enjoying the fruits of your labor—literally. What if I told you that by understanding a few key principles, you can transform your barren cactus pear into a fruitful bounty? I’ve seen firsthand how these resilient plants, when given the right conditions and care, can produce an abundance of delicious fruit. Let’s dive into the secrets that will help you achieve a successful harvest.
Choosing the Right Location for Your Cactus Pear

When considering how to grow cactus pear fruits, the first, and perhaps most crucial step, is selecting the right location. These plants, native to arid and semi-arid regions, thrive in environments that mimic their natural habitat. Sunlight is the lifeblood of a cactus pear. You need to ensure your chosen location receives at least six to eight hours of direct sunlight daily. Without sufficient sunlight, the plant’s growth will be stunted, and fruit production will be minimal. I’ve observed that locations with full, uninterrupted sunlight significantly boost flowering and fruit development.
Temperature also plays a pivotal role. Cactus pears are adapted to warm climates, and while they can tolerate short periods of cooler temperatures, prolonged exposure to frost can be detrimental, especially to young plants. You’ll want to aim for temperatures between 70°F and 90°F (21°C and 32°C) during the growing season. If you live in an area with harsh winters, consider growing your cactus pear in a container that can be moved indoors or to a sheltered location.
Well-drained soil is non-negotiable. Cactus pears are susceptible to root rot, a condition caused by waterlogged soil. To prevent this, your soil should be sandy or rocky, allowing water to percolate quickly. If your garden soil is heavy clay, you’ll need to amend it with sand, gravel, or perlite to improve drainage. I’ve found that creating a raised bed or planting on a slight slope can also help with drainage.
Consider the following factors when selecting a location:
- Sun Exposure: Full, direct sunlight for at least 6-8 hours daily.
- Temperature: Warm climates are ideal; protect from frost.
- Soil Drainage: Sandy or rocky soil is crucial.
- Air Circulation: Good airflow helps prevent diseases.
- Space: Cactus pears can grow large, so provide ample room.
Case Study:
In my experience, a gardener in Arizona struggled with their cactus pear not fruiting. They had planted it in a shaded area with heavy clay soil. By relocating the plant to a sunny spot with well-drained, amended soil, they saw a significant increase in flowering and fruit production within a year.
Quote:
“The success of growing cactus pear fruits lies in replicating their native desert environment,” says Dr. Emily Carter, a horticulturalist specializing in arid-climate plants.
Data:
A study by the University of California found that cactus pears grown in full sunlight yielded 30% more fruit than those grown in partial shade.
Ideal Environmental Conditions for Cactus Pear Growth
| Environmental Factor | Ideal Condition | Impact on Growth |
| Sunlight | 6-8 hours daily | Promotes flowering and fruit development |
| Temperature | 70°F – 90°F (21°C – 32°C) | Optimal growth during the growing season |
| Soil Drainage | Sandy or rocky | Prevents root rot |
| Air Circulation | Good airflow | Reduces disease risk |
By carefully selecting the right location, you’re setting the foundation for a successful cactus pear harvest. Remember, these plants are adaptable, but they thrive when their basic needs are met.
Preparing the Soil for Your Cactus Pear

Just as choosing the right location is paramount, preparing the soil is another critical step in successfully growing cactus pear fruits. These plants have evolved to thrive in well-drained, nutrient-poor soils, similar to their native desert environments. Remember, waterlogged soil is a recipe for disaster, leading to root rot and ultimately, the demise of your cactus pear.
The ideal soil for cactus pears is sandy or rocky. This type of soil allows for excellent drainage, preventing water from pooling around the roots. Avoid heavy clay soils, as they tend to retain moisture, creating a suffocating environment for the roots. If you find yourself working with heavy clay soil, amending it is crucial. Incorporate organic matter like compost or well-rotted manure to improve drainage and aeration. You can also add perlite or coarse sand to increase the soil’s porosity.
Before planting, prepare the planting hole. It should be wider than the root ball of the cactus pear and deep enough to accommodate the roots without crowding. Digging the hole a little deeper encourages deeper root growth, which is beneficial for stability and drought tolerance. Once the hole is prepared, carefully remove the cactus pear from its pot or nursery container, ensuring you don’t damage the root ball. Gently loosen any tightly packed roots and place the plant in the hole, ensuring it is at the same depth as it was in the container. Backfill the hole with the prepared soil, gently firming it around the base of the plant.
Tips for Soil Preparation:
- Avoid fresh manure: Use well-rotted manure to avoid burning the roots.
- Test soil pH: Cactus pears prefer slightly acidic to neutral soil (pH 6.0-7.5).
- Add organic matter: Compost or well-rotted manure can improve soil structure and fertility.
- Amend heavy clay soil: Add sand, perlite, or gravel to improve drainage.
By taking the time to prepare the soil properly, you’re creating an ideal environment for your cactus pear to establish itself and thrive. Remember, well-drained soil is key to preventing root rot and ensuring a healthy, productive plant.
Propagation Methods for Cactus Pear

One of the most exciting aspects of growing cactus pears is the ease with which they can be propagated. This allows you to expand your collection and share the joy of growing these fascinating plants with friends and family. There are two primary methods for propagating cactus pears: growing from seeds and propagating from cuttings.
Growing from Seeds:
While rewarding, growing cactus pear from seed requires patience. It can take several years for seedlings to reach maturity and begin producing fruit. However, it’s a great way to experiment with different varieties and potentially develop new cultivars.
- Collecting Seeds: Extract seeds from ripe cactus pear fruits. Wash the seeds thoroughly to remove any remaining pulp.
- Scarification: To aid in germination, lightly scarify the seeds by gently rubbing them with sandpaper or using a file. This helps to weaken the hard seed coat.
- Soaking: Soak the scarified seeds in warm water for 24-48 hours to further soften the seed coat and encourage germination.
- Planting: Sow the seeds in well-draining cactus and succulent potting mix. Cover the seeds lightly with soil and mist the surface.
- Germination: Place the pots in a warm, sunny location. Germination can take several weeks or even months.
- Care for Seedlings: Keep the soil consistently moist but not waterlogged. Once seedlings have developed a few true leaves, transplant them into individual pots.
Propagating from Cuttings:
This method is generally quicker and more reliable than growing from seed. Cactus pear cuttings root readily, making it a popular choice for gardeners.
- Selecting Cuttings: Choose healthy, mature cactus pear pads from a healthy plant. Ensure the cuttings are at least 6-8 inches long.
- Preparing Cuttings: Allow the cut ends to callus over for a few days in a dry, shaded location. This helps prevent rot.
- Planting: Insert the calloused end of the cutting into well-draining potting mix. Water lightly and place the pot in a warm, bright location.
- Rooting: Rooting typically takes 2-4 weeks. Keep the soil slightly moist but not soggy.
- Transplanting: Once the cutting has rooted, you can transplant it into a larger pot or directly into the garden.
Pros and Cons of Each Method:
| Propagation Method | Pros | Cons |
| Growing from Seeds | Genetic diversity, potential for new varieties | Slow germination, time-consuming |
| Propagating from Cuttings | Quick and easy, high success rate | Limited genetic diversity |
By understanding these propagation methods, you can expand your cactus pear collection and enjoy the satisfaction of growing these fascinating plants from scratch. Whether you choose to grow from seed or propagate from cuttings, remember to provide the proper care and attention to ensure healthy and productive plants.
Planting Your Cactus Pear

Now that you’ve selected the perfect location and prepared the soil, it’s time to plant your cactus pear. Timing is key. Spring or fall is generally the ideal time to plant, as these seasons offer milder temperatures that are less stressful for the plant. Avoid planting during the hottest part of summer or the coldest part of winter.
When planting, handle the cactus pear with care. Remember those spines? They can be quite painful! Wear thick gloves and long sleeves to protect yourself. Carefully remove the cactus pear from its pot or nursery container. Gently loosen any tightly packed roots to encourage healthy root growth.
Dig a hole that is slightly wider and deeper than the root ball. Place the cactus pear in the hole, ensuring it is at the same depth as it was in the container. Backfill the hole with the prepared soil, gently firming it around the base of the plant. Avoid over-compacting the soil, as this can restrict root growth.
If you’re planting a young cactus pear, consider providing some support, especially in windy locations. You can use stakes and soft ties to secure the plant and prevent it from toppling over.
Tips for Planting:
- Handle with care: Wear thick gloves and long sleeves to avoid spines.
- Plant at the correct depth: Ensure the plant is at the same depth as it was in the container.
- Gently firm the soil: Avoid over-compacting the soil.
- Provide support for young plants: Use stakes and soft ties to prevent toppling.
- Water thoroughly after planting: Allow the soil to drain completely.
Planting your cactus pear is an exciting step in your gardening journey. By following these guidelines, you’ll ensure your plant gets off to a strong start. Remember to handle the plant with care and provide a well-prepared planting site to promote healthy growth and development.
Watering Your Cactus Pear

While cactus pears are known for their drought tolerance, they still require regular watering, especially during their active growth periods. However, it’s important to strike a balance. Overwatering can lead to root rot, while underwatering can stunt growth and reduce fruit production.
The key to successful watering is to provide deep and infrequent watering. Allow the soil to dry out completely between waterings. You can check soil moisture by inserting your finger a few inches into the ground. If it feels dry, it’s time to water. When watering, apply water slowly and deeply to encourage deep root growth. Avoid overhead watering, as this can lead to fungal diseases.
The frequency of watering will vary depending on factors such as weather conditions, soil type, and plant size. During hot, dry periods, you may need to water more frequently. However, during the cooler months, watering can be reduced or even stopped altogether.
Tips for Watering Cactus Pears:
- Water deeply and infrequently: Allow the soil to dry out completely between waterings.
- Avoid overhead watering: Water at the base of the plant to prevent fungal diseases.
- Adjust watering frequency based on weather conditions.
- Use a soaker hose or drip irrigation system for efficient water delivery.
By following these watering guidelines, you can ensure your cactus pear receives the moisture it needs to thrive. Remember, it’s better to underwater than to overwater, especially during the cooler months.
Fertilizing Your Cactus Pear

While cactus pears are not heavy feeders, fertilizing them can promote healthy growth and increase fruit production. However, it’s important to use caution, as over-fertilizing can harm the plant.
A balanced fertilizer low in nitrogen is generally recommended for cactus pears. High nitrogen fertilizers can encourage excessive vegetative growth at the expense of fruit production. Look for a fertilizer with a balanced NPK ratio, such as 10-10-10 or a slow-release fertilizer formulated for cacti and succulents.
Fertilize your cactus pear during the growing season, typically spring through early summer. Avoid fertilizing during the hottest months of the year, as this can stress the plant. Apply the fertilizer sparingly around the base of the plant, taking care not to let it come into contact with the spines. Water the plant thoroughly after fertilizing to help the nutrients reach the roots.
Tips for Fertilizing Cactus Pears:
- Use a balanced fertilizer low in nitrogen.
- Fertilize during the growing season (spring through early summer).
- Avoid fertilizing during hot weather.
- Apply fertilizer sparingly around the base of the plant.
- Water thoroughly after fertilizing.
By fertilizing your cactus pear appropriately, you can provide it with the essential nutrients it needs to thrive and produce a bountiful harvest of delicious fruits. Remember, less is often more when it comes to fertilizing cactus pears.
Protecting Your Cactus Pear from Pests and Diseases
While cactus pears are generally resilient plants, they are not immune to pests and diseases. Keeping a watchful eye on your plants and taking preventive measures can help ensure their health and vitality.
Common Pests:
- Mealybugs: These tiny, cottony insects suck sap from the plant, causing stunted growth and yellowing. You can often spot them in the crevices of the cactus pads.
- Scale Insects: These small, hard-bodied insects attach themselves to the plant and feed on sap. They can cause discoloration and weaken the plant.
- Spider Mites: These microscopic pests spin webs on the plant and feed on the sap, causing yellowing and stippling of the pads.
Natural Pest Control Methods:
- Insecticidal Soap: For light infestations, insecticidal soap can be effective in controlling mealybugs and spider mites. Apply the soap according to the product instructions, ensuring to cover all parts of the plant.
- Neem Oil: Neem oil is a natural pesticide that can help control a variety of pests, including mealybugs and scale insects. Dilute the neem oil according to the product instructions and apply it to the affected areas of the plant.
- Encourage Natural Predators: Ladybugs and lacewings are natural predators of mealybugs and other soft-bodied insects. You can encourage these beneficial insects by planting flowers that attract them to your garden.
Common Diseases:
- Root Rot: This fungal disease is caused by overwatering and poor drainage. Symptoms include wilting, yellowing, and eventual death of the plant.
- Fungal Diseases: Various fungal diseases can affect cactus pears, causing spots, lesions, and decay.
Prevention and Treatment:
- Provide Adequate Drainage: Ensure the soil is well-drained to prevent root rot.
- Avoid Overhead Watering: Water at the base of the plant to prevent fungal diseases.
- Inspect Plants Regularly: Monitor your cactus pears regularly for signs of pests and diseases.
- Treat promptly: If you notice any signs of pests or diseases, take action immediately to prevent the problem from spreading.
By taking proactive steps to prevent and control pests and diseases, you can ensure the health and vitality of your cactus pear plants. Remember, early detection and prompt treatment are key to managing any issues that may arise.
Harvesting and Enjoying Your Cactus Pear Fruits

The culmination of your efforts in growing cactus pears is the rewarding experience of harvesting and enjoying the fruits of your labor. Knowing when to harvest is crucial to ensure the best flavor and quality.
Signs of Ripeness:
- Color Change: As the fruits ripen, they will typically change color. The color of ripe fruits can vary depending on the variety, but often they turn from green to yellow, orange, or even red.
- Softness: Ripe cactus pear fruits will feel slightly soft to the touch, similar to a ripe tomato.
- Taste: You can often get a good indication of ripeness by tasting a small sample. Ripe fruits will have a sweet or slightly tart flavor.
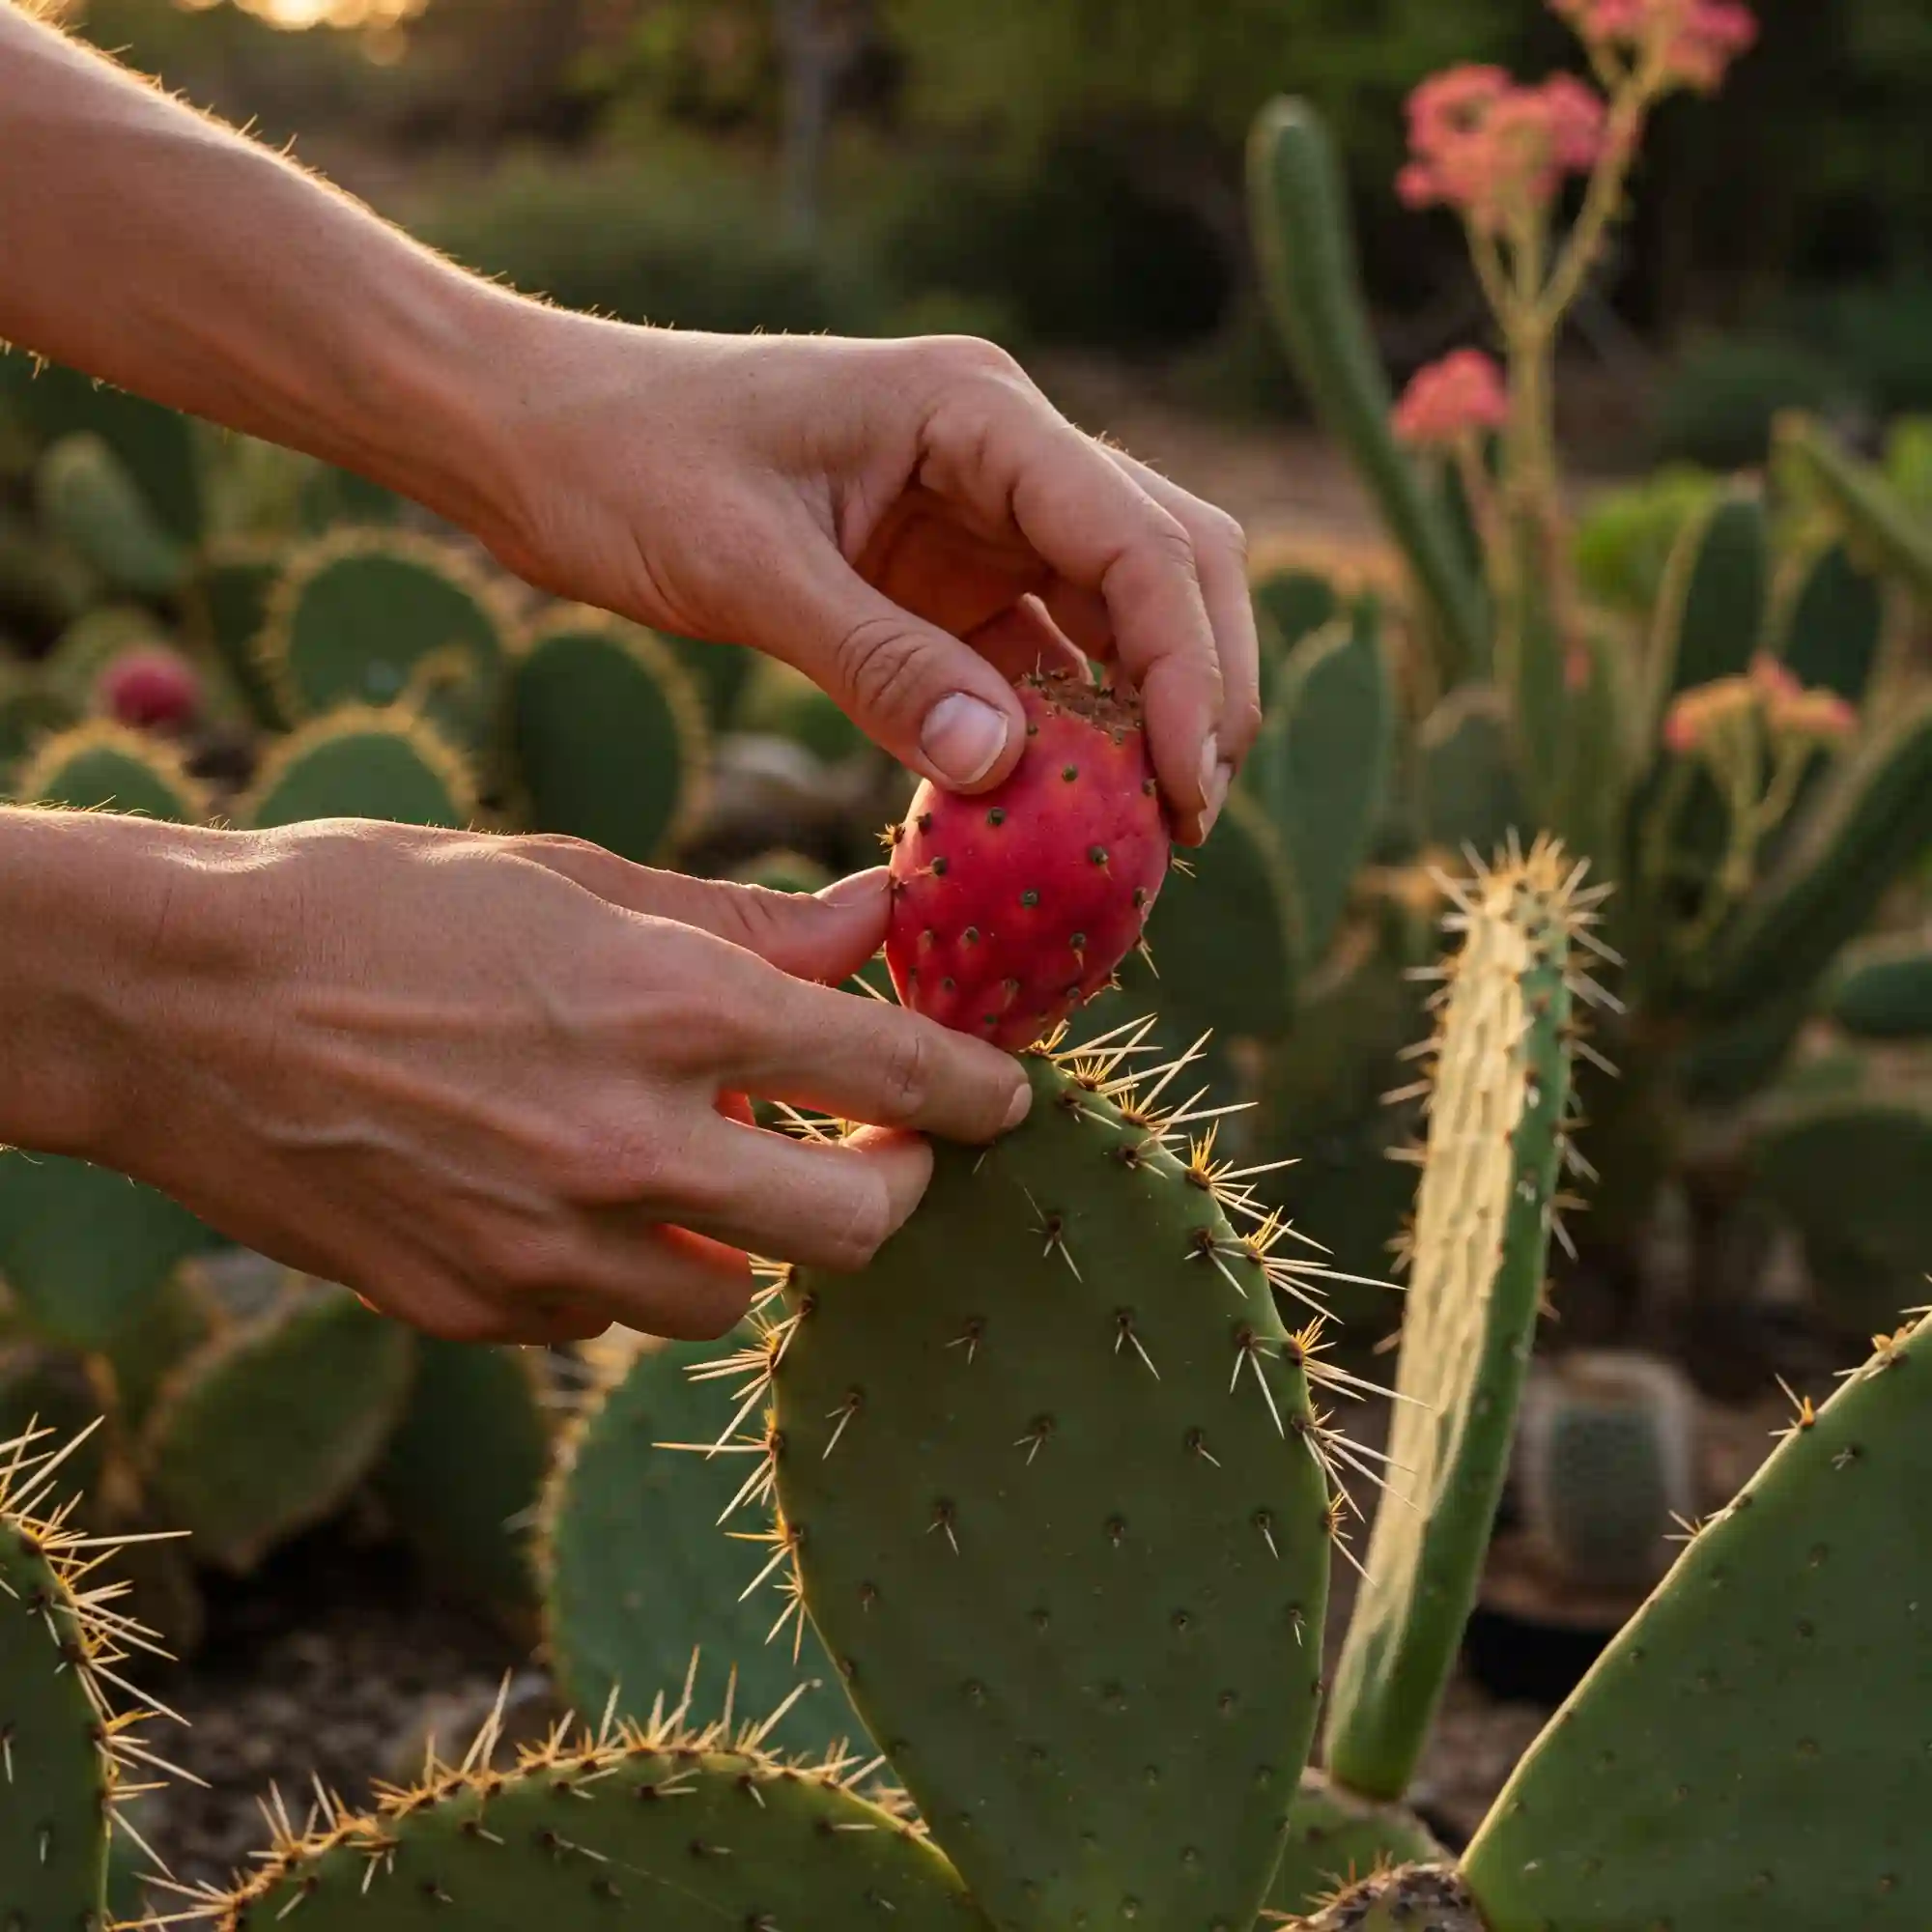
Safe Harvesting Techniques:
Harvesting cactus pears requires a bit of caution due to their spines. Here are some safety tips:
- Wear Protective Gear: Always wear thick gloves, long sleeves, and eye protection when harvesting cactus pears.
- Use a Tool: Use a long-handled tool, such as a pair of tongs or a broom handle, to gently knock the fruits off the plant.
- Collect Fallen Fruits: If fruits have fallen to the ground, use a broom or rake to gather them.
Preparing the Fruit for Consumption:
Once you’ve harvested your cactus pears, there are a few steps to prepare them for eating:
- Remove the Spines: Carefully remove any spines from the skin of the fruit. You can use a pair of tweezers or a gloved hand to gently pull them off.
- Peel the Skin: Peel off the thick, leathery skin of the fruit.
- Cut and Enjoy: Cut the fruit into slices or cubes and enjoy the sweet, refreshing flesh.
Enjoying Cactus Pear Fruits:
Cactus pear fruits are incredibly versatile and can be enjoyed in many ways:
- Fresh: Eat the fruit fresh for a sweet and refreshing treat.
- Juiced: Blend the fruit into a delicious and healthy juice.
- Jams and Jellies: Make homemade jams and jellies using the fruit.
- Cooking: Use cactus pear fruit in a variety of dishes, such as salads, salsas, and desserts.
Tips for Storing Cactus Pear Fruits:
- Refrigerate: Store fresh cactus pear fruits in the refrigerator for up to a week.
- Freeze: You can also freeze the peeled and sliced fruit for later use.
Harvesting and enjoying the fruits of your labor is a rewarding part of the cactus pear growing experience. By following these tips, you can safely harvest and savor the deliciousness of your homegrown cactus pears.
FAQs
Here are answers to some frequently asked questions about growing cactus pear fruits:
Q: How long does it take for a cactus pear to produce fruit?
A: Typically, it takes 2-3 years for a cactus pear plant to reach maturity and begin producing fruit. However, this can vary depending on the variety, growing conditions, and propagation method. Young plants may take longer to fruit than older, more established plants.
Q: Can I grow cactus pear in a pot?
A: Yes, cactus pears can be successfully grown in containers. Choose a large, well-draining pot with drainage holes to accommodate the plant’s root system. Use a well-draining potting mix and ensure the pot receives adequate sunlight.
Q: Are all cactus pear fruits edible?
A: Most varieties of cactus pear are edible, but some may have a bitter taste. There are also a few varieties that are specifically grown for their ornamental value and do not produce edible fruit. When choosing a variety to grow, select one that is known for producing sweet, tasty fruits.
Q: How do I prevent frost damage to my cactus pear?
A: If you live in an area with cold winters, frost can damage your cactus pear. To protect your plant, you can:
- Provide frost protection: Cover the plant with a frost blanket or row cover on cold nights.
- Move the plant indoors: If you’re growing your cactus pear in a container, you can move it indoors to a protected location during the winter months.
- Mulch the base of the plant: A layer of mulch around the base of the plant can help insulate the roots and protect them from frost.
By understanding and addressing these frequently asked questions, you can navigate the challenges of growing cactus pears with greater confidence and success. Remember, every plant is unique, and it’s important to observe your individual plants and adjust your care accordingly.
Conclusion:

Growing cactus pear fruits can be a rewarding and unique gardening experience. By following the tips and techniques outlined in this guide, you can increase your chances of success and enjoy a bountiful harvest of1 these delicious and nutritious fruits. Remember, patience is key. It may take a few years for your cactus pear plants to reach maturity and begin producing fruit. However, with the right care and attention, you’ll be rewarded with a crop of sweet, juicy cactus pears that you can enjoy fresh, juiced, or in a variety of culinary creations.
Happy gardening!


