

From Seed to Salad: Growing Your Own Bean Sprouts
Are you tired of limp, flavorless sprouts from the grocery store? Do you crave that fresh, crisp bite that only comes from homegrown produce? I know I used to feel the same way. The problem is, store-bought sprouts can be expensive, and sometimes they just don’t seem as vibrant as they could be. Plus, you’re never quite sure how long they’ve been sitting on the shelf. This can be frustrating, especially when you’re trying to eat healthy. You want the most nutritious and fresh ingredients possible. You want to know exactly where your food comes from. What if I told you that you could have a constant supply of fresh, crisp bean sprouts right from your kitchen counter? It’s easier than you think. Growing your own bean sprouts is a simple, rewarding process that anyone can do, even if you’ve never grown anything before. It’s a fantastic way to add a boost of nutrients to your meals, and it’s surprisingly quick – you can have fresh sprouts in as little as a few days. In this guide, I’ll walk you through everything you need to know about how to grow bean sprouts vegetable at home, from choosing the right beans to harvesting your fresh crop.
How to Grow Bean Sprouts Vegetable: A Simple Guide
Growing bean sprouts at home is a fantastic way to introduce fresh, nutritious ingredients into your diet with minimal effort. I’ve found it to be incredibly satisfying to watch these tiny seeds transform into crunchy, flavorful sprouts in just a few days. It’s a project that’s perfect even if you live in an apartment or have limited gardening space. You don’t need a garden, special equipment, or even a green thumb to succeed. All you need is a jar, some water, and a little patience.
What are Bean Sprouts?
Before we dive into the how-to, let’s clarify what we’re talking about. Bean sprouts are simply germinated seeds of various legumes, most commonly mung beans. Other popular choices include alfalfa, lentils, soybeans, and adzuki beans. The sprouting process unlocks the nutrients stored within the seed, making them more bioavailable and easier for your body to absorb. This is one of the key reasons why I choose to grow my own sprouts. You get a concentrated dose of vitamins and minerals in a small package.
Why Grow Your Own Bean Sprouts Vegetable?
I often get asked why someone would bother growing their own bean sprouts when they can easily buy them at the store. Here are a few compelling reasons why I prefer the homegrown approach, and why you might too:
- Freshness and Flavor: Homegrown sprouts are undeniably fresher and more flavorful than store-bought ones. You harvest them at their peak, ensuring maximum taste and nutritional value. You’ll notice a significant difference in the crispness and vibrancy.
- Cost-Effectiveness: Sprouting your own beans is significantly cheaper than buying them from the store. A small bag of dried beans can yield a surprisingly large quantity of sprouts. For those of you on a budget, like I was when I first started, this can be a real game changer.
- Control Over Quality: When you grow your own sprouts, you have complete control over the quality of the seeds and the growing environment. You can choose organic, non-GMO seeds and ensure that they are grown in a clean and safe environment. This gives you peace of mind, knowing exactly what you’re eating.
- Educational and Engaging: Sprouting is a fun and educational activity, especially if you have kids. It’s a great way to teach them about the life cycle of plants and where their food comes from. I’ve found that it sparks a real interest in gardening and healthy eating.
- Quick and Easy: The sprouting process is remarkably quick and easy. It requires minimal effort and time, making it perfect for busy individuals. You can have fresh sprouts in just a few days with only a few minutes of work each day.
- Nutritional Boost: Bean sprouts are packed with nutrients, including vitamins, minerals, and enzymes. They are a great source of fiber and protein, making them a healthy addition to any diet. I find that adding sprouts to my meals gives me a noticeable energy boost.
The Science Behind Sprouting
Sprouting is essentially the process of germination, where a seed begins to grow into a plant. When you soak the beans in water, they absorb moisture and activate enzymes that break down stored starches into simpler sugars. This process makes the nutrients more accessible and digestible. As the sprout grows, it produces vitamins and minerals, increasing its nutritional value. This is why sprouts are often considered a superfood.
Benefits of Growing Bean Sprouts Vegetable at Home
Growing bean sprouts at home offers numerous advantages:
- Enhanced Nutrition: Sprouting increases the bioavailability of nutrients in beans, making them easier for your body to absorb.
- Improved Digestion: Sprouts contain enzymes that aid digestion and promote gut health.
- Reduced Phytic Acid: Phytic acid is a compound found in beans that can inhibit the absorption of certain minerals. Sprouting reduces phytic acid content, improving mineral absorption.
- Increased Fiber Content: Sprouts are a good source of fiber, which is essential for digestive health and regularity.
- Cost Savings: Growing your own sprouts is much cheaper than buying them from the store.
- Freshness and Flavor: Homegrown sprouts are fresher and more flavorful than store-bought ones.
- Control Over Ingredients: You can choose organic, non-GMO seeds and ensure a clean growing environment.
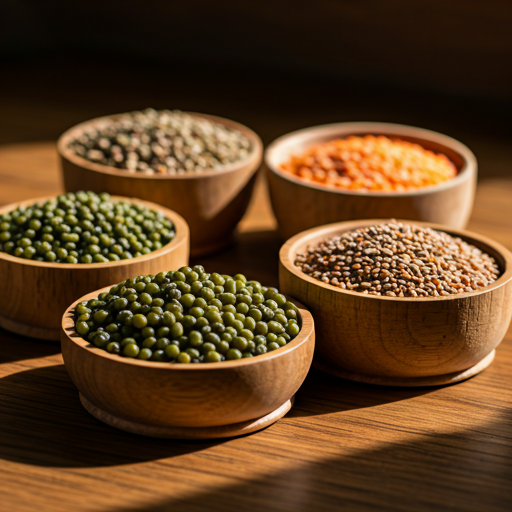
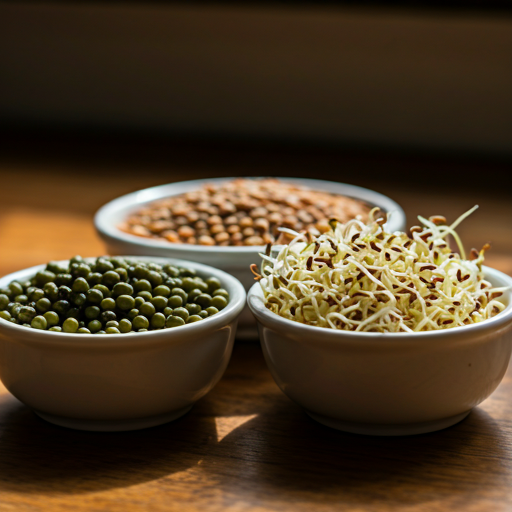
Choosing Your Beans for Sprouting
Not all beans are created equal when it comes to sprouting. Certain varieties are better suited for this purpose than others. Here’s a breakdown of some popular choices:
- Mung Beans: These are the most common type of bean used for sprouting. They are easy to sprout, have a mild flavor, and are readily available. I often recommend mung beans to beginners because they are so reliable.
- Alfalfa: These small seeds produce delicate, slightly nutty sprouts. They are rich in vitamins and minerals.
- Lentils: These small, lens-shaped legumes sprout quickly and have a slightly peppery flavor.
- Soybeans: These produce larger, heartier sprouts with a nutty flavor. However, I’ve found they can be a bit more challenging to sprout than other varieties.
- Adzuki Beans: These small, reddish-brown beans have a sweet, nutty flavor and sprout relatively easily.
- Chickpeas (Garbanzo Beans): These produce crunchy sprouts with a slightly nutty flavor. I recommend soaking them for a longer period than other beans.
Comparison of Common Sprouting Beans
| Bean Type | Flavor | Sprouting Time | Nutritional Benefits |
| Mung Bean | Mild, slightly sweet | 3-5 days | High in vitamins C and K, fiber |
| Alfalfa | Mild, nutty | 5-7 days | Rich in vitamins A, C, E, and K |
| Lentil | Slightly peppery | 3-5 days | Good source of protein and iron |
| Soybean | Nutty | 4-6 days | High in protein and isoflavones |
| Adzuki Bean | Sweet, nutty | 3-5 days | Good source of fiber and antioxidants |
| Chickpea | Nutty, slightly earthy | 3-5 days | Good source of protein and fiber |
I recommend starting with mung beans if you’re new to sprouting. They are very forgiving and provide a great introduction to the process. Once you’ve mastered mung beans, you can experiment with other varieties to discover your favorites.
Gathering Your Sprouting Equipment
Now that you’ve chosen your beans, it’s time to gather the necessary equipment. The great thing about sprouting is that you don’t need a lot of fancy tools. You likely already have most of what you need in your kitchen. I’ve found that keeping things simple is the best approach, especially when you’re just starting out. Here’s a list of essential items:
- Wide-Mouth Jar or Sprouting Container: A wide-mouth jar, like a Mason jar, is ideal for sprouting. The wide opening allows for good air circulation and easy rinsing. You can also use specialized sprouting containers, which often have built-in drainage systems. I started with a simple Mason jar, and it worked perfectly. You can pick these up at most grocery stores or online.
- Sprouting Lid or Cheesecloth and Rubber Band: A sprouting lid is a convenient option, as it provides good drainage and airflow. However, if you don’t have a sprouting lid, you can easily use a piece of cheesecloth secured with a rubber band. I’ve used both methods, and they both work well. The cheesecloth method is a great budget-friendly option.
- Clean Water: You’ll need clean, fresh water for soaking and rinsing your sprouts. I recommend using filtered water, especially if your tap water has a strong chlorine taste. Clean water is essential for preventing bacterial growth and ensuring healthy sprouts.
- Dark Place (Cupboard or Drawer): Sprouts don’t need light to germinate. In fact, they sprout best in a dark, cool place. A cupboard or drawer works perfectly. I usually keep my sprouting jar in a kitchen cabinet.
Optional but Helpful Items:
- Sprouting Stand: A sprouting stand allows you to invert your jar at an angle, which helps with drainage. This isn’t essential, but it can be helpful. I sometimes use a small dish rack to achieve the same effect.
- Spray Bottle: A spray bottle can be useful for misting your sprouts between rinses, especially in dry climates. This helps to keep them moist without overwatering.
Setting Up Your Sprouting Station
I like to set up a dedicated sprouting station in my kitchen. This makes it easy to remember to rinse my sprouts regularly. I usually keep my jar, sprouting lid, and a small bowl for draining on a kitchen towel near the sink. This way, everything is within easy reach.
Choosing the Right Jar
The size of your jar will depend on how many sprouts you want to grow. I usually use a quart-sized jar, which is perfect for a small batch of sprouts. If you want to grow larger quantities, you can use a larger jar or multiple jars. It’s important not to overcrowd the jar, as this can lead to mold growth.
Making a DIY Sprouting Lid
If you don’t have a sprouting lid, you can easily make one using cheesecloth and a rubber band. Simply cut a piece of cheesecloth that is large enough to cover the mouth of the jar. Then, secure it with a rubber band. Make sure the cheesecloth is taut enough to allow for good drainage but loose enough to allow for air circulation.
Importance of Cleanliness
Maintaining cleanliness throughout the sprouting process is crucial for preventing mold and bacterial growth. I always make sure to wash my jar and sprouting lid thoroughly with soap and hot water before each use. I also recommend rinsing your sprouts with clean water at least twice a day.
Sprouting Container Alternatives
While jars are the most common sprouting container, you can also use other options, such as plastic containers or specialized sprouting trays. However, I’ve found that jars are the most versatile and readily available.
Sprouting Equipment Comparison
| Equipment | Pros | Cons |
| Wide-Mouth Jar | Readily available, inexpensive, good air circulation | Can be fragile |
| Sprouting Lid | Convenient, good drainage | Can be more expensive than cheesecloth |
| Cheesecloth and Rubber Band | Inexpensive, readily available | Can be less convenient than a sprouting lid |
| Sprouting Container | Designed for sprouting, good drainage | Can be more expensive than jars |
By gathering the right equipment and maintaining cleanliness, you’ll set yourself up for sprouting success. I’ve found that having a dedicated sprouting station makes the process much more convenient and enjoyable.
The Sprouting Process: Step-by-Step

Now that you have your beans and equipment ready, it’s time to start the sprouting process. I’ve broken it down into simple, easy-to-follow steps:
Step 1: Soaking the Beans
The first step in sprouting is soaking the beans. This rehydrates them and starts the germination process. I usually soak my beans overnight, for about 8-12 hours. Here’s how:
- Place your chosen beans in your wide-mouth jar.
- Add cool, clean water. You’ll want to use about 3 times as much water as beans, as the beans will expand as they soak.
- Cover the jar with your sprouting lid or cheesecloth and secure it with a rubber band.
- Let the beans soak in a cool place, away from direct sunlight.
Step 2: Draining and Rinsing
After soaking, it’s essential to drain and rinse the beans thoroughly. This removes any excess water and helps prevent bacterial growth. I recommend rinsing your sprouts at least twice a day, or even three times a day in warmer weather. Here’s how I do it:
- Remove the sprouting lid or cheesecloth.
- Drain the water from the jar.
- Rinse the beans with fresh, cool water.
- Drain the water again, making sure to remove as much excess water as possible.
- Replace the sprouting lid or cheesecloth.
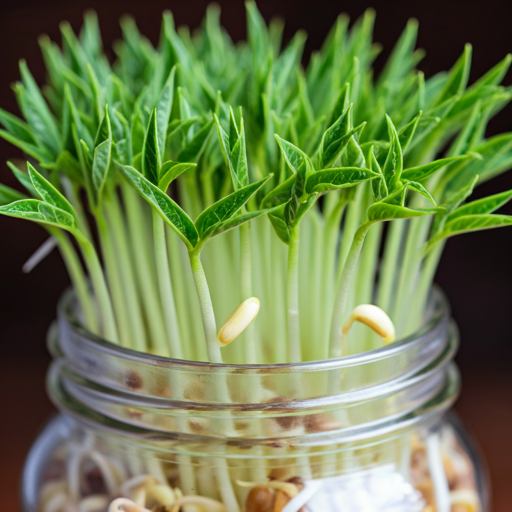
Step 3: Sprouting in the Jar
Now it’s time to let the magic happen! Here’s how to sprout your beans in the jar:
- Place the jar upside down at an angle in a bowl or on a sprouting stand. This allows for proper drainage and air circulation.
- Place the jar in a dark, cool place, such as a cupboard or drawer.
- Continue to rinse and drain the sprouts 2-3 times a day.
Step 4: Harvesting Your Sprouts
Your sprouts will be ready to harvest in about 3-5 days, depending on the type of bean and the temperature of your kitchen. I usually harvest mine when the sprouts have a small tail and the bean is still attached. Here’s how to harvest them:
- Remove the sprouts from the jar.
- Rinse them thoroughly with cool water.
- Remove any remaining bean hulls.
Tips for Success
- Use high-quality, non-GMO beans.
- Rinse your sprouts regularly to prevent bacterial growth.
- Ensure proper drainage to avoid mold.
- Provide good air circulation.
- Store your sprouts in the refrigerator after harvesting.
Troubleshooting
- Mold: If you see any mold growing on your sprouts, discard them immediately.
- Unpleasant Odor: If your sprouts have an unpleasant odor, they may be starting to rot. Discard them immediately.
- Slow Growth: If your sprouts are not growing, they may need more time or a warmer temperature.
By following these simple steps, you can easily grow your own fresh, nutritious bean sprouts at home.
Preventing Common Sprouting Problems
While sprouting is a relatively simple process, there are a few common problems you might encounter. I’ve certainly had my share of sprouting mishaps over the years, from moldy sprouts to uneven growth. But don’t worry, with a little knowledge and attention to detail, you can easily avoid these issues.
Mold Growth
Mold is probably the most common problem that people encounter when sprouting. It can appear as fuzzy white, gray, or black patches on your sprouts. If you see any signs of mold, it’s important to discard the entire batch immediately, as some molds can be harmful.
- Causes of Mold: Mold growth is usually caused by poor drainage, insufficient rinsing, or poor air circulation. Overcrowding the jar can also contribute to mold growth.
- Preventing Mold: To prevent mold, make sure to rinse your sprouts thoroughly at least twice a day, and ensure that they are draining well. Don’t overcrowd the jar, and provide good air circulation by placing the jar at an angle.
Unpleasant Odors
If your sprouts have an unpleasant odor, it’s a sign that they are starting to rot. This is usually caused by the same factors that cause mold growth: poor drainage, insufficient rinsing, or poor air circulation.
- Preventing Unpleasant Odors: To prevent unpleasant odors, follow the same steps as for preventing mold: rinse your sprouts regularly, ensure proper drainage, and provide good air circulation.
Uneven Sprouting
Sometimes, you might notice that some of your beans sprout while others don’t. This can be caused by several factors, including using old or damaged seeds, uneven soaking, or inconsistent rinsing.
- Preventing Uneven Sprouting: To prevent uneven sprouting, use fresh, high-quality seeds. Make sure to soak the beans evenly and rinse them consistently.
Other Common Issues
- Overcrowding: Overcrowding the jar can lead to poor air circulation and increased risk of mold growth. Make sure to use a large enough jar and don’t overcrowd it with beans.
- Temperature: Sprouts prefer a cool environment. If your kitchen is too warm, it can cause them to spoil.
- Light: While sprouts don’t need light to germinate, some indirect light can be beneficial after they have sprouted. However, avoid direct sunlight, as this can dry them out.
Troubleshooting Table
| Problem | Cause | Solution |
| Mold Growth | Poor drainage, insufficient rinsing, poor air circulation | Rinse sprouts thoroughly 2-3 times a day, ensure proper drainage, provide good air circulation |
| Unpleasant Odor | Poor drainage, insufficient rinsing, poor air circulation | Rinse sprouts thoroughly 2-3 times a day, ensure proper drainage, provide good air circulation |
| Uneven Sprouting | Old or damaged seeds, uneven soaking, inconsistent rinsing | Use fresh, high-quality seeds, soak beans evenly, rinse consistently |
| Overcrowding | Using a too small jar or using too many beans | Use a larger jar or fewer beans |
| Spoilage due to heat | High ambient temperature | Keep sprouts in a cool place |
| Sprouts drying out | Exposure to direct sunlight | Avoid direct sunlight |
By being aware of these common problems and taking the necessary precautions, you can ensure that your sprouting experience is a success. I’ve learned from my own mistakes over the years, and I hope these tips will help you avoid similar pitfalls.
Storing and Using Your Fresh Bean Sprouts
Congratulations! You’ve successfully grown your own bean sprouts. Now, it’s time to learn how to store them properly and incorporate them into your meals. I find that having a good storage system is key to keeping your sprouts fresh and preventing them from going bad quickly.
Storing Your Sprouts
Proper storage is essential for maintaining the freshness and quality of your sprouts. Here’s how I store mine:
- Rinse and Drain: Before storing your sprouts, give them a final rinse and make sure they are thoroughly drained. This removes any remaining debris and excess moisture.
- Dry Thoroughly (Optional): You can gently pat your sprouts dry with a clean kitchen towel or spin them in a salad spinner to remove excess water. This helps to prevent them from becoming soggy in the refrigerator.
- Choose the Right Container: I recommend storing your sprouts in a clean, airtight container. A resealable plastic container or a glass jar works well. You can also use a reusable storage bag.
- Line with Paper Towel (Optional): Lining the container with a paper towel can help to absorb any excess moisture and keep your sprouts fresher for longer.
- Refrigerate: Store your sprouts in the refrigerator. They will typically last for up to a week if stored properly.
Using Your Sprouts
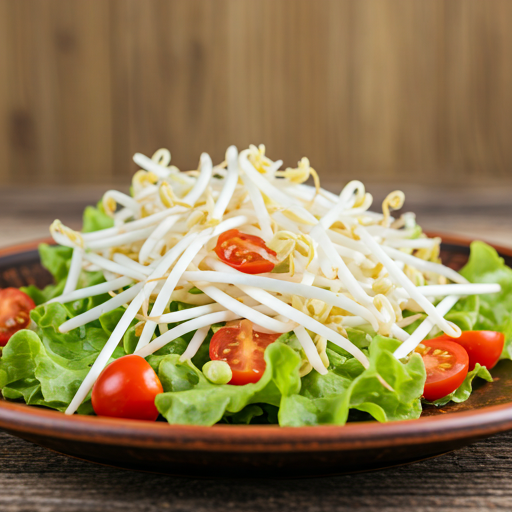
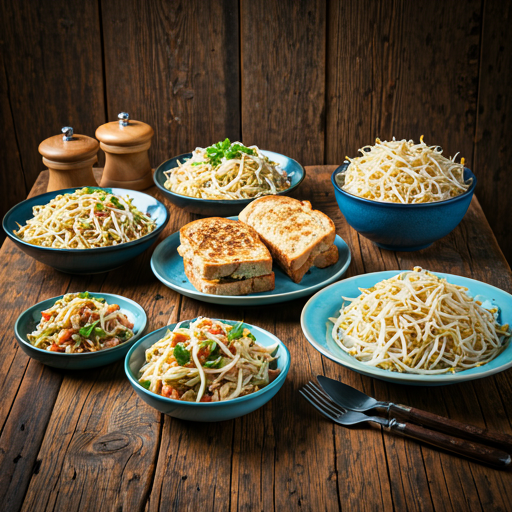
Bean sprouts are incredibly versatile and can be used in a variety of dishes. I love adding them to salads, sandwiches, stir-fries, and soups. Here are some ideas:
- Salads: Add a handful of sprouts to your favorite salad for a boost of crunch and nutrients.
- Sandwiches: Use sprouts as a topping for sandwiches and wraps. They add a nice texture and freshness.
- Stir-fries: Add sprouts to your stir-fries for a quick and easy way to add vegetables. Add them towards the end of cooking to maintain their crispness.
- Soups: Sprinkle sprouts on top of soups for a fresh garnish.
- Juices and Smoothies: You can even add sprouts to your juices and smoothies for an extra nutritional boost.
Tips for Using Sprouts
- Rinse Before Use: Always rinse your sprouts thoroughly before using them, even if you just rinsed them before storing them.
- Eat Raw or Lightly Cooked: Sprouts can be eaten raw or lightly cooked. Overcooking them can destroy their nutrients.
- Add at the End: If you’re adding sprouts to a cooked dish, add them towards the end of cooking to maintain their crispness.
Sprout Recipes
Here are a few simple recipes that you can try:
- Sprout Salad: Combine sprouts with your favorite vegetables, such as carrots, cucumbers, and tomatoes. Dress with a light vinaigrette.
- Sprout Sandwich: Add sprouts to a sandwich with your favorite fillings, such as avocado, hummus, and lettuce.
- Sprout Stir-fry: Stir-fry sprouts with your favorite vegetables and protein.
Maximizing Freshness
To maximize the freshness of your sprouts, follow these tips:
- Harvest at Peak Freshness: Harvest your sprouts when they are young and crisp.
- Store Properly: Store your sprouts in the refrigerator in an airtight container.
- Use Within a Week: Use your sprouts within a week for optimal freshness.
Sprout Storage and Usage Guide
| Method | Description | Benefits |
| Rinsing and Draining | Rinsing sprouts before storing and using | Removes debris and excess moisture |
| Drying | Patting sprouts dry with a towel or using a salad spinner | Prevents sprouts from becoming soggy |
| Container | Storing sprouts in an airtight container | Maintains freshness and prevents spoilage |
| Refrigeration | Storing sprouts in the refrigerator | Extends shelf life |
| Usage | Adding sprouts to salads, sandwiches, stir-fries, and soups | Adds nutrients and flavor to meals |
By following these storage and usage tips, you can enjoy fresh, nutritious bean sprouts for days after harvesting them. I hope you find these tips helpful and that you enjoy incorporating your homegrown sprouts into your meals!
Nutritional Benefits of Bean Sprouts Vegetable
Beyond their fresh taste and satisfying crunch, bean sprouts offer a wealth of nutritional benefits that make them a worthy addition to any diet. I’ve been consistently impressed by the dense nutrient profile of these little powerhouses.
Vitamins and Minerals
Bean sprouts are a good source of several essential vitamins and minerals, including:
- Vitamin C: A powerful antioxidant that supports immune function and collagen production.
- Vitamin K: Important for blood clotting and bone health.
- Folate: A B vitamin that is essential for cell growth and development.
- Iron: Necessary for oxygen transport in the blood.
- Potassium: An electrolyte that helps regulate blood pressure and muscle function.
Fiber
Bean sprouts are a good source of dietary fiber, which is important for digestive health. Fiber helps to promote regularity, prevent constipation, and lower cholesterol levels.
Protein
While not as high in protein as mature beans, bean sprouts still provide a decent amount of protein, which is essential for building and repairing tissues.
Enzymes
Sprouts are rich in enzymes, which are proteins that help to speed up chemical reactions in the body. Enzymes play a crucial role in digestion, metabolism, and other bodily functions.
Antioxidants
Bean sprouts contain various antioxidants, which help to protect the body against damage from free radicals. Free radicals are unstable molecules that1 can contribute to aging and chronic diseases.
Health Benefits
The nutritional profile of bean sprouts translates into several potential health benefits:
- Improved Digestion: The fiber and enzymes in sprouts can help to improve digestion and prevent constipation.
- Boosted Immunity: The vitamin C content of sprouts can help to strengthen the immune system.
- Heart Health: The fiber and potassium in sprouts can help to lower cholesterol levels and blood pressure, reducing the risk of heart disease.
- Weight Management: Sprouts are low in calories and high in fiber, making them a filling and healthy food for weight management.
Specific Nutritional Content
The exact nutritional content of bean sprouts varies depending on the type of bean. However, in general, they are a good source of:
- Vitamins: A, C, K, and folate
- Minerals: Iron, potassium, and phosphorus
- Fiber
- Protein
- Enzymes
- Antioxidants
Incorporating Sprouts into a Healthy Diet
I find that the best way to enjoy the nutritional benefits of bean sprouts is to incorporate them into a balanced diet that includes a variety of fruits, vegetables, whole grains, and lean protein.
Sprout Nutrition Table (Approximate Values per 100g)
| Nutrient | Mung Bean Sprouts | Alfalfa Sprouts |
| Calories | 30 | 23 |
| Protein | 3g | 4g |
| Fiber | 2g | 2g |
| Vitamin C | 13% DV | 14% DV |
| Vitamin K | 34% DV | 30% DV |
| Folate | 16% DV | 11% DV |
*DV = Daily Value
By understanding the nutritional benefits of bean sprouts, you can appreciate their value as a healthy and versatile food.
FAQ (Frequently Asked Questions)
I’ve compiled a list of frequently asked questions to address any lingering questions you might have about growing bean sprouts.
How to grow bean sprouts vegetable in a jar at home?
Growing bean sprouts in a jar is a simple and effective method. You’ll need a wide-mouth jar, sprouting lid or cheesecloth, water, and your chosen beans. Soak the beans overnight, then drain and rinse them twice daily, storing the jar in a dark place. Sprouts will be ready in 3-5 days.
What is the best way to grow bean sprouts vegetable indoors?
The best way to grow bean sprouts indoors is by mimicking their natural growing conditions. This means providing them with adequate moisture, darkness, and air circulation. Using a jar or sprouting container with good drainage is crucial, as is rinsing the sprouts regularly.
How to grow bean sprouts vegetable for salads and stir-fries?
For salads and stir-fries, I recommend using mung bean sprouts or alfalfa sprouts. These varieties have a mild flavor that complements other ingredients well. When adding sprouts to stir-fries, do so at the end of cooking to maintain their crispness.
How to grow organic bean sprouts vegetable in a sprouting kit?
Sprouting kits provide a convenient way to grow organic bean sprouts. These kits typically include a sprouting container, organic seeds, and instructions. Follow the instructions provided with your kit for best results.
Easy steps on how to grow bean sprouts vegetable for beginners?
For beginners, I recommend starting with mung beans, as they are easy to sprout. The basic steps are: soak the beans overnight, rinse and drain them twice daily, and store them in a dark place. Sprouts will be ready in a few days.
How to grow bean sprouts vegetable quickly and prevent mold?
To grow bean sprouts quickly and prevent mold, use fresh seeds, rinse them regularly, ensure proper drainage, and provide good air circulation. Avoid overcrowding the jar and store it in a cool place.
What are the health benefits of growing bean sprouts vegetable at home?
Growing bean sprouts at home allows you to enjoy their many health benefits, including improved digestion, boosted immunity, and heart health. Sprouts are also a good source of vitamins, minerals, fiber, protein, enzymes, and antioxidants.
How to grow different types of bean sprouts vegetable at home?
You can grow various types of bean sprouts at home, including mung beans, alfalfa, lentils, soybeans, and adzuki beans. Each variety has its unique flavor and nutritional profile. The sprouting process is similar for all types of beans, but sprouting times may vary.
How to grow bean sprouts vegetable without using any special equipment?
You don’t need any special equipment to grow bean sprouts. A simple wide-mouth jar, cheesecloth, and a rubber band will do the trick.
How to store and use homegrown bean sprouts vegetable after harvesting?
After harvesting your sprouts, rinse them thoroughly and store them in an airtight container in the refrigerator. Use them within a week for optimal freshness. Add them to salads, sandwiches, stir-fries, or soups for a nutritional boost.
Conclusion
Growing bean sprouts at home is a simple, rewarding, and cost-effective way to add fresh, nutritious ingredients to your diet. With just a few basic supplies and a little patience, you can have a continuous supply of homegrown sprouts right from your kitchen counter.
Benefits of Growing Your Own Sprouts
- Freshness: Homegrown sprouts are fresher and more flavorful than store-bought ones.
- Cost-effectiveness: Sprouting your own beans is significantly cheaper than buying them from the store.
- Control over quality: You have complete control over the quality of the seeds and the growing environment.
- Educational and engaging: Sprouting is a fun and educational activity, especially for children.
- Quick and easy: The sprouting process is remarkably quick and easy, requiring minimal effort and time.
- Nutritional boost: Bean sprouts are packed with nutrients, including vitamins, minerals, and enzymes.
Tips for Success
- Use high-quality, non-GMO beans.
- Rinse your sprouts regularly to prevent bacterial growth.
- Ensure proper drainage to avoid mold.
- Provide good air circulation.
- Store your sprouts in the refrigerator after harvesting.
I encourage you to give sprouting a try. It’s a fun and rewarding experience that can provide you with a continuous supply of fresh, nutritious food. With a little practice, you’ll be a sprouting pro in no time!
I hope this blog post has been helpful. If you have any questions or comments, please feel free to leave them below.


")

